scroll text to advance content . click image to toggle zoom & drag to pan
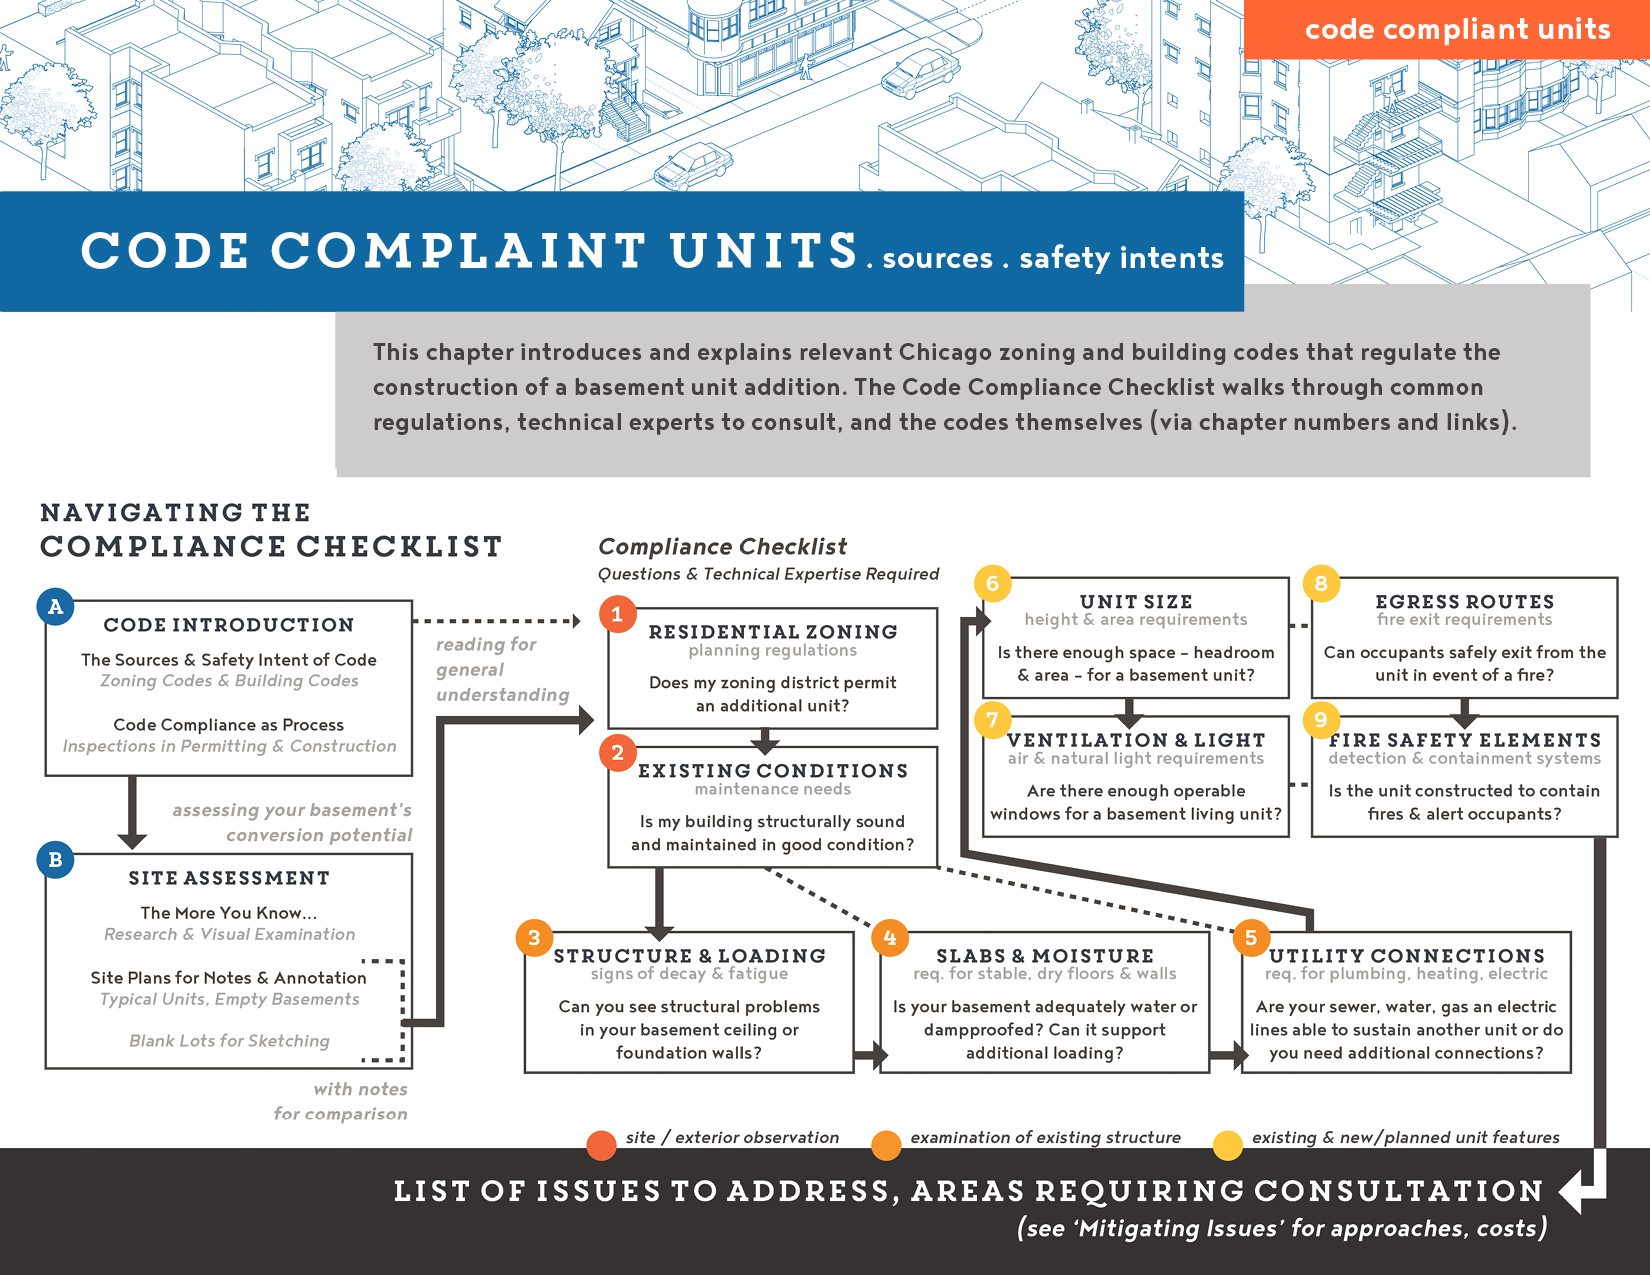
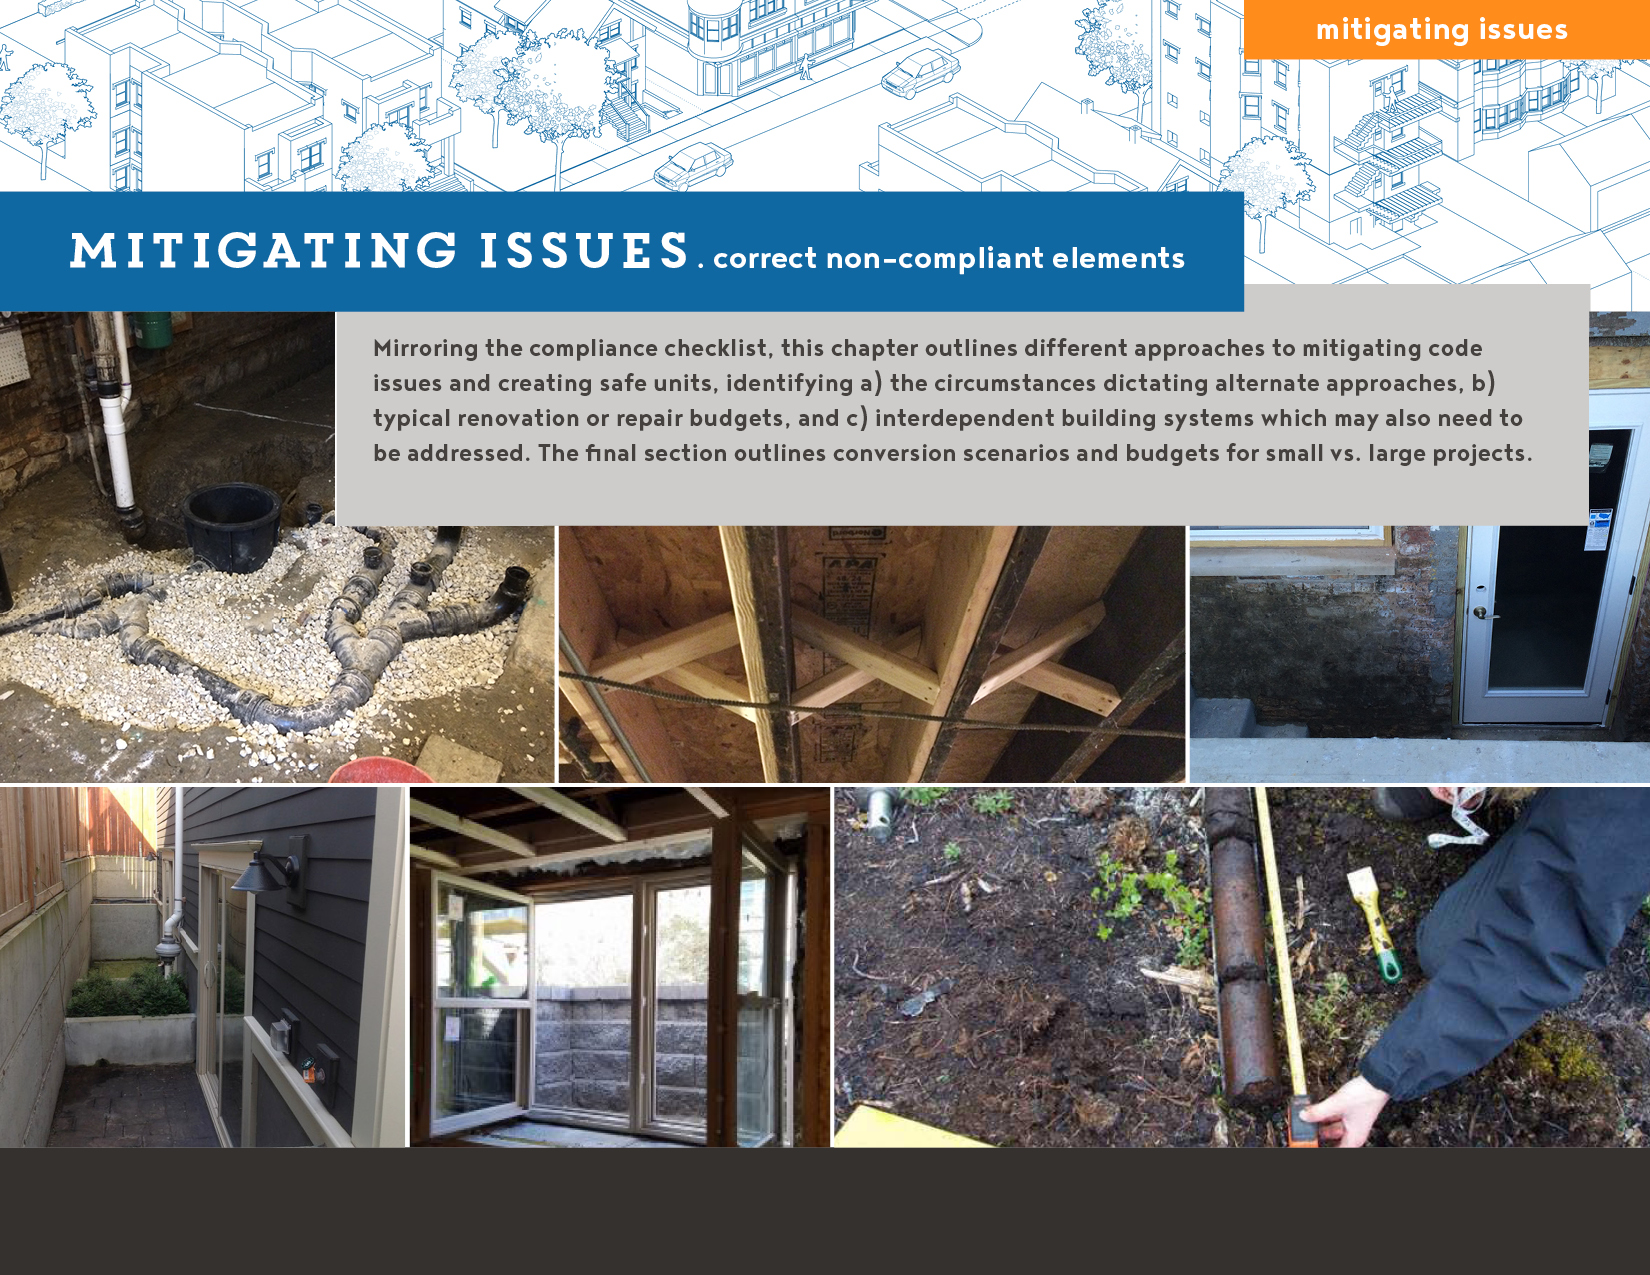
Mirroring the compliance checklist,Mitigating Issues outlines different approaches to mitigating code issues and creating safe units, identifying a) the circumstances dictating alternate approaches, b) typical renovation or repair budgets, and c) interdependent building systems which may also need to be addressed. The final section outlines conversion scenarios and budgets for small vs. large projects.
Mitigating Issues
Chapter Contents
This ‘Mitigating Issues’ chapter helps you identify, in broad terms, the applicable approach and estimated costs involved in fixing any building element or system that is not code compliant. For every code element introduced in the ‘Code Compliant Units’ chapter there are one or more sections that outline the contextual variables—site soils, property offsets, existing infrastructure—that will drive your architect’s or engineer’s recommendations for repair and the estimated cost of your basement conversion.
Each mitigation section includes the follow:
-
Thumbnails for Visual Identification:
These photos show existing elements, common tests, and construction in process. They are spread between the introductory identification and specific fixes, to enable you to visually inspect ongoing work. -
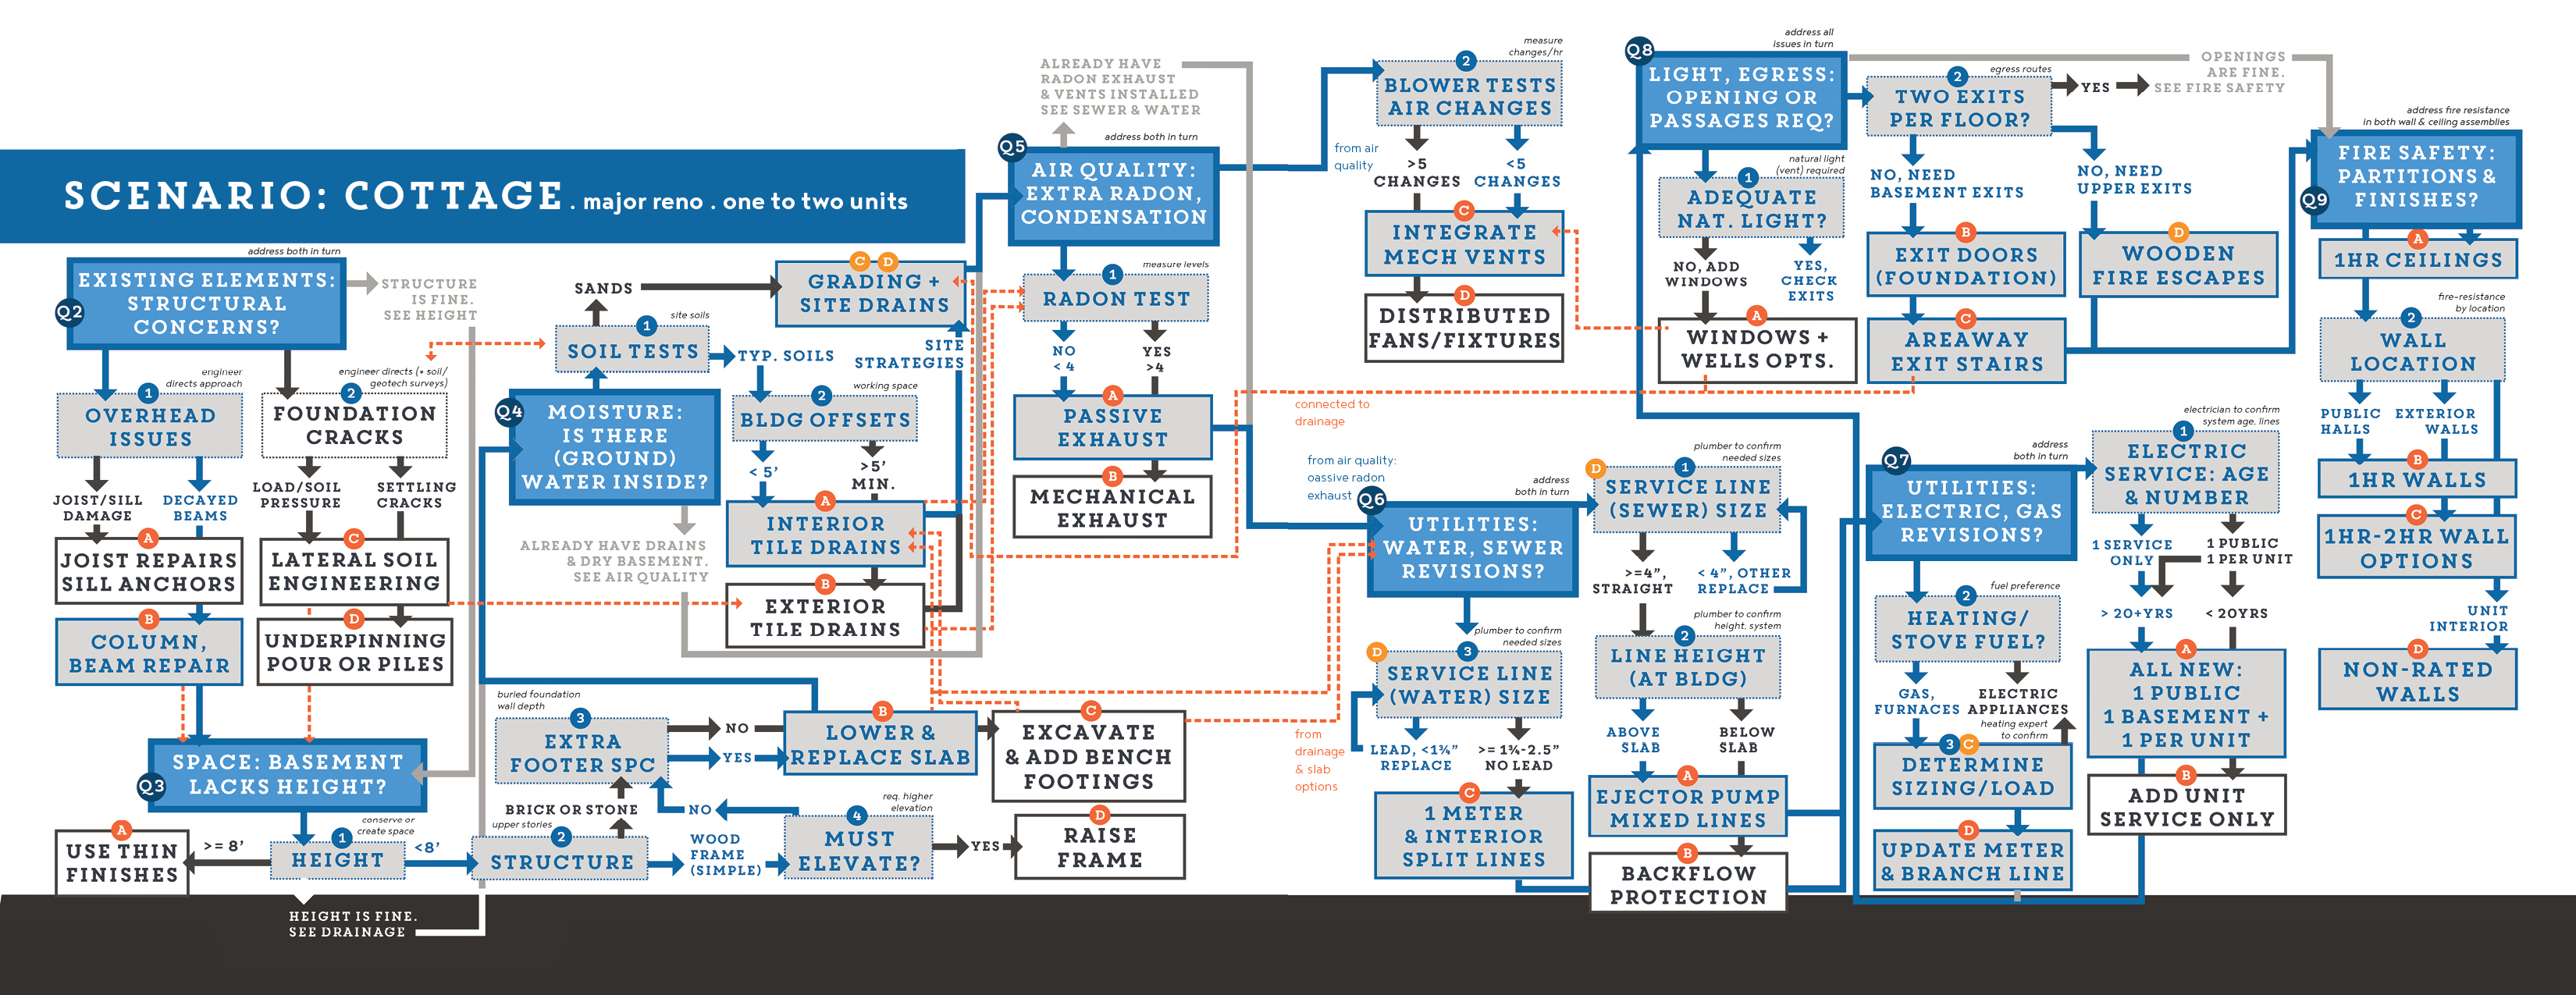
Decision Diagrams:
Each section begins with text and a flowchart that identifies the key information which will inform your decisions facing compliance. Sometimes the factors are spatial —like offsets and their impact on drainage and fire resistance. Some are derived from specific testing; soils, air changes, radon levels. Sometimes decisions will hinge on engineering assessments or personal preferences. The more you understand the decision factors, the more you can engage with your architect or engineer and their guidance during the design process. -
Additional elements for coordination:
For each alternate approach to mitigation shown, a series of bullet points list the physical elements which will require coordinated planning and execution. -
Alternate approaches:
The second half of each section shows the most common approaches to correcting tissues. These drawings are fairly generic basement sections. Your basement will vary by starting foundation materials, elevation, etc. The sections, diagrams, and cost ranges are provided to give you a general sense of the layered construction systems; the construction documents provided by your architect will be tailored to your basement’s circumstances. These details are provided to 1) help you navigate those ultimate drawings and 2) allow for rough cost estimation.
Interventions that are particularly risky and expensive—and thus not advised—are marked with the icon at left. These approaches are not listed in the generic estimate tables, specifically because of their overwhelming risk. They may be necessary for structural stability, instead of conversion.
NHS makes no guarantee as to details’ completeness (they are simplified representations when compared with CDs and specs). Given site and conditions variability, NHS cannot guarantee that your basement mitigation directly aligns with the generic systems shown. The drawings are tools for rough estimation and education only.
In addition to the individual mitigation sections, the chapter ends with two construction scenarios that elaborate on chosen approaches and costs. The first conversion—from a single family Cottage to a Two-Flat—is a larger project due to common revisions to meet code and address structural repairs. The second conversion—from a Two-Flat to a Three-Flat—is a smaller project, with fewer major interventions. For each scenario, an introduction and table outline the assumed conditions and costs. On the following pages a composite decision diagram highlights the contextual decisions behind the project as a whole.
To navigate the chapter turn to the next section, for alliances between code compliance issues and mitigation sections.
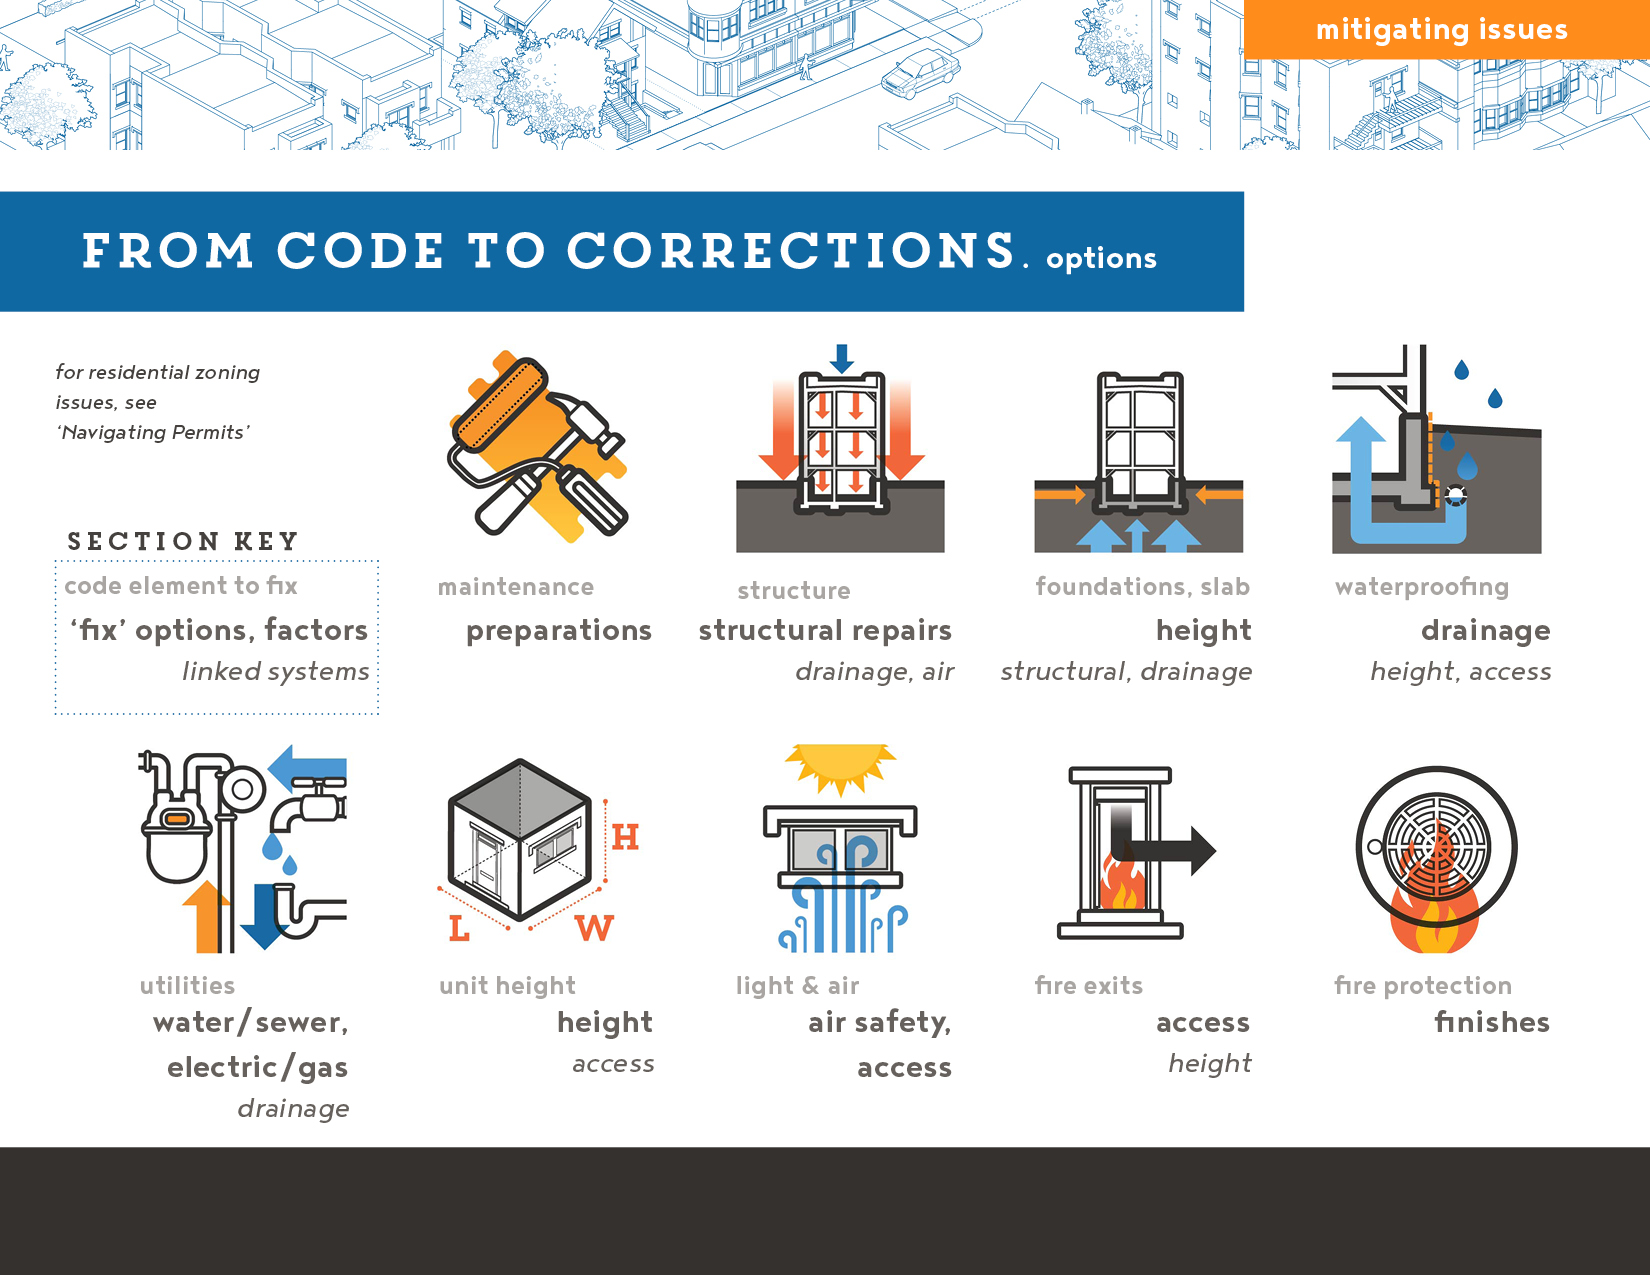
From Code Issues to Corrections:
approaches to mitigation
Identify your non-compliant code issue, in icons and bullets (right, below), and follow the links to applicable mitigation approaches:
Residental Zoning
go to Navigating Permits goes to chapter
Negligent Maintenance
see Construction Prep loads & scrolls to section-
Structural Decay & Failures
see Structural Repairs
see Area Drainage (secondary) -
Failing Foundations / Slabs:
see Height / Slab Excavations
see Area Drainage (secondary)
see Structural Repairs (secondary) -
Moisture & Waterproofing Failures
see Area Drainage
see Height / Slab Excavation (secondary)
see Openings / Egress (secondary) -
Inadequate Utility Connections
see Water / Sewer Connections
see Electric / Gas Connections
see Area Drainage (secondary) -
Limited Ceiling Heights
see Height / Slab Excavations
see Openings / Egress (secondary) -
Inadequate Air & Light; Radon Exposure
see Air Safety / Ventilation
see Openings / Egress -
Inadequate Fire Exits
see Openings / Egress
see Height / Slab Excavations (secondary) -

Inadequate Fire Protection/Partitions
see Finishes
Construction Prep: This section includes safe demolition, deconversion, and lead/abestos removals as general site preparations. It overlaps with all other sections.
Structural Repairs: Foundation repairs and column replacements should be coordinated with slab work, vapor and waterproofing. Joists and beam updates should be coordination with overhead plumbing, ventiliation, and fire-resistant ceiling finishing.
Excavating Slabs / Repairing Foundations: All slab and excavation-based additions of height should address issues under waterproofing, radon, and revised utility connection locations.
Foundation & Area Drainage: Slab, vapor and moisture barrier and drainage should be coordinated with any height excavations, utility connections, and required radon exhaust systems.
Utility Updates: Utility work should be coordinated with slab work, as connections dictate, and internal piping/conduits should be coordinated with ventilation system and wall finishing.
Increasing Ceiling Height: All slab and excavation-based additions of height should address issues under waterproofing, radon, revised utility connection locations, and, with new windows and doors, revised insulation and moisture barriers. Low profile finishes should be coordinated with ventilation & finishing.
Ventilation, Exhaust, & Window additions: All new openings should be coordinated with structure, vapor & moisture barriers, and comply with external opening allowances based on site-offsets (fire safety).
Door, Areaway, and Fire Escape additions: All new openings should be coordinated with structure, vapor & moisture barriers, and comply with external opening allowances based on site-offsets (fire safety).
Fire Partition Assemblies: Fire resistance of partitions depends on site offsets and egress routes. Materials should coordinate with ventilation, electric, and plumbing at foundation walls and between overhead beams and joists.
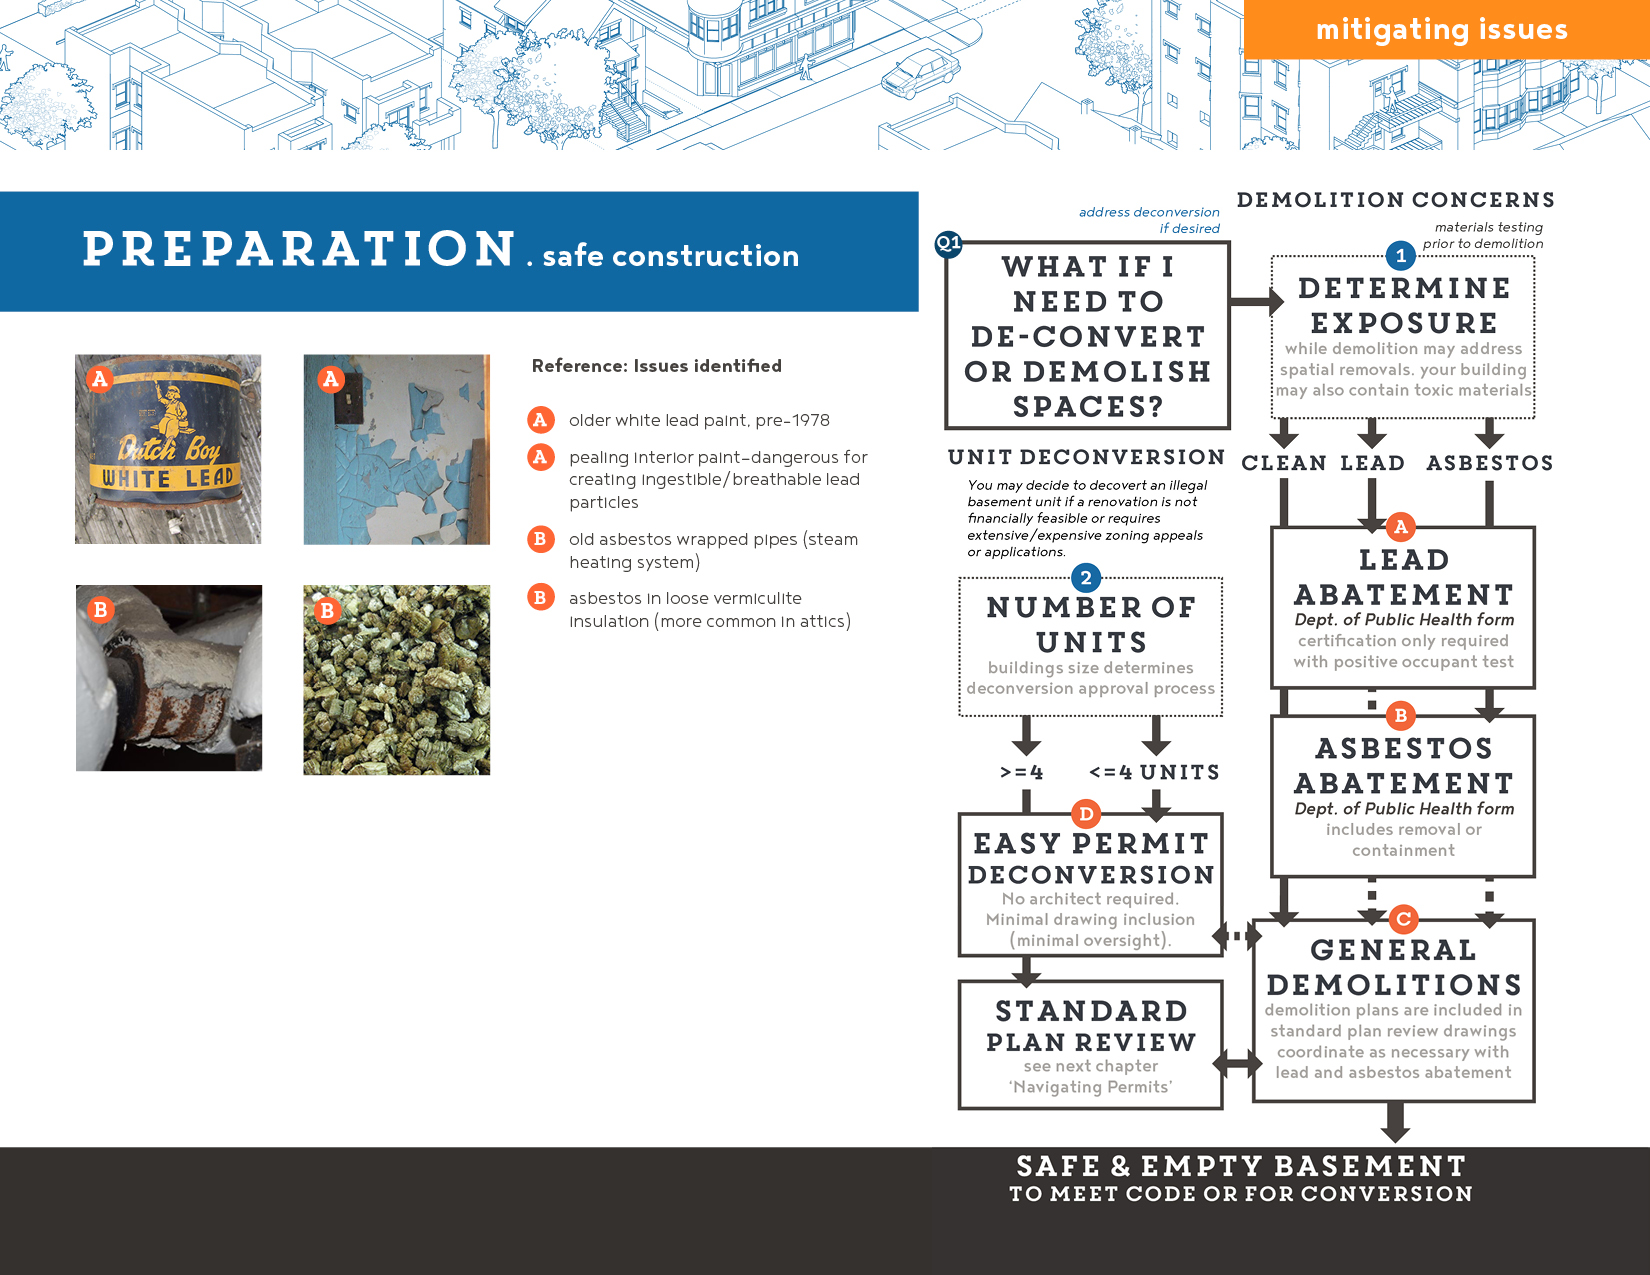
safe construction preparation:
Key Elements & Decisions
If you are considering a basement conversion or are looking to de-convert a current illegal unit, you may be facing interior demolition of older interior partitions and indeterminate finishes. For the safety of your family, tenants, and the contractors’ crew, you should have material samples tested to determine what environmental cleanup is needed. Environmental permits are submitted after your building or deconversion permits, but for safety, tenant communication, and coordination purposes it’s best to assess any toxins and risks early.
1. Exposure: To detect lead, you can start with a simple home kit, like 3m leadcheck swabs, and follow up with formal lead paint inspection (with paint test and XRF scanning) by a state-licensed lead inspector. For asbestos, all testing should be handled by a professional. If lead is found, your contractor should follow clean-up procedures recommended by the EPA, to avoid tenant exposure. If a child/tenant were to tests positive for lead, you would be required to submit a Lead-Based Paint Renovation, Repair, and Painting (LRRP) for paint removal to the Department of Public Health. If asbestos is present and friable (crumbling) a professional should perform asbestos abatement, coordinated with the city by submitting the “National Emission Standards for Hazardous Air Pollutants (NESHAP)” form.
2. Deconversion & Demolition: If you have decided not to convert an old, illegal unit, into a legal dwelling, you will need to apply for unit deconversion with the Department of Buildings. The complexity of this process depends on your building size: five or six unit buildings must submit deconversion through the standard plan review. Broadly, a standard plan set includes demolition plans—what to keep, what to eliminate—for existing structures.
Expand the Construction Preparation slide to learn more about costs and additional building systems associated with each alternative approach

Construction Preparation Lead & Asbestos Removal
a. safety: lead paint removal
Lead paint is common in older buildings. Lead particulate and paint chips, if ingested by children, cause lead poisoning and developmental damage. Lead is typically either covered and contained—away from accessible surfaces—or removed during demolition to avoid future hazards.
Properly done lead abatement is easy to recognize as it requires the use of plastic tarp for containment, ventilator masks for work safety. and vacuums to remove dusty, contaminated air. Testing is typically inexpensive (under $500) but abatement costs will depend on the extent and complexity of the area. Chicago LRRP certification is required if a building occupant test positive & work includes window replacement, work that disturbs 6 square feet + of interior paint or 20 square feet + of exterior paint.
(Learn more from the EPA.)
related construction required:
- cleaning is done in tandem with preparatory demolition
- city certification is only required if occupants test positive, but federal safety protocols should guide cover/cleaning practices
costs
cost varies by extent
b. safety: asbestos removal
Asbestos was once a common insulating material and may be found wrapping old pipes or in floor and sheathing materials. When airborne it can be inhaled and causes lung cancer. As with lead, intact asbestos can be covered and contained. If crumbling, it should be removed during renovations to lessen the risk of accidental disturbance and fiber release.(Learn more from the EPA and the Chicago Department of Public Health.)
Asbestos abatement looks similar to lead—with ventilators, plastic containment bags, and air tubes—as removal protocols seek to contain dust and stop particulate dispersal. Testing is reasonable (under $250-750) but abatement costs will depend on the extent and complexity of the area. Removals tend to be more focused, on specific pipes or insulation, in contrast with the wider area attention required for lead paint abatement.
related construction required:
- cleaning is done in tandem with preparatory demolition
costs
$300 permit costs, cost varies by extent
Construction PreparationDemolition & Deconversion
c. Interior Demolition
General demolition is done at the start of construction or phased by building system to align with repairs and replacements.
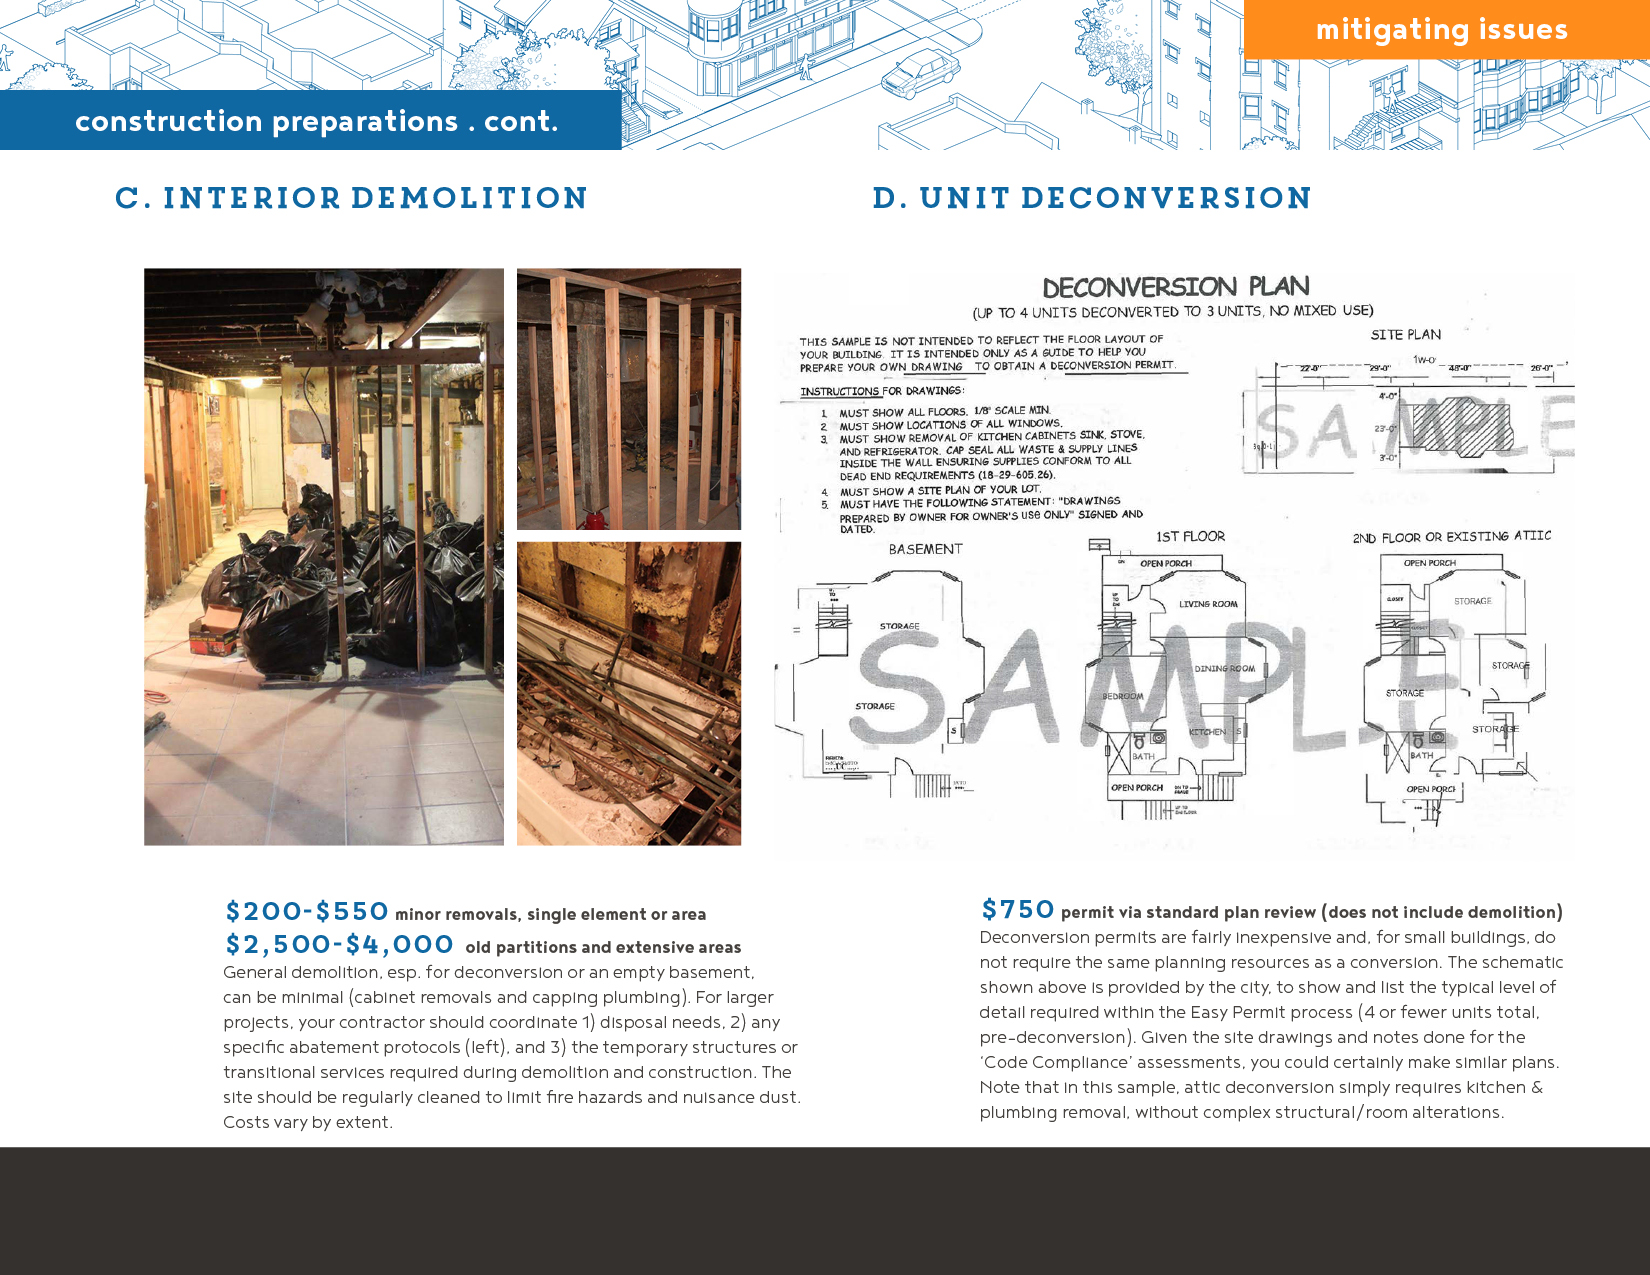
General demolition, esp. for deconversion or an empty basement, can be minimal (cabinet removals and capping plumbing). For larger projects, your contractor should coordinate 1) disposal needs, 2) any specific abatement protocols (left), and 3) the temporary structures or transitional services required during demolition and construction. The site should be regularly cleaned to limit fire hazards and nuisance dust.
related construction required:
- Architect and contractor will coordinate this larger process and incorporate environmental hazards removals as necessary
- For demolition, under an Easy Permit Deconversion, your contractor should coordinate the required work
costs
$200-$550 minor removals, single element or area
$2,500-$4,000 old partitions and extensive areas
d. unit deconversion
Deconversion enables a building owner to avoid future zoning violations and fines, when an illegal unit is unable to be converted.
Deconversion permits are fairly inexpensive and, for small buildings, do not require the same planning resources as a conversion. The schematic shown above is provided by the city, to show and list the typical level of detail required for four or fewer units total, pre-deconversion. Given the site drawings and notes done for the ‘Code Compliance’ assessments, you could certainly make similar plans. Note that in this sample, attic deconversion simply requires kitchen & plumbing removal, without complex structural/room alterations.
related construction required:
- majority of work will be demolition, see notes under C.
- not all unit elements need to be removed—Walls can stay and bathrooms are permitted (without full tub or shower).
costs
$750 permit via standard plan review (does not include demolition)
Lead & Asbestos Removal
a. safety: lead paint removal
Lead paint is common in older buildings. Lead particulate and paint chips, if ingested by children, cause lead poisoning and developmental damage. Lead is typically either covered and contained—away from accessible surfaces—or removed during demolition to avoid future hazards.
Properly done lead abatement is easy to recognize as it requires the use of plastic tarp for containment, ventilator masks for work safety. and vacuums to remove dusty, contaminated air. Testing is typically inexpensive (under $500) but abatement costs will depend on the extent and complexity of the area. Chicago LRRP certification is required if a building occupant test positive & work includes window replacement, work that disturbs 6 square feet + of interior paint or 20 square feet + of exterior paint.
(Learn more from the EPA.)
related construction required:
- cleaning is done in tandem with preparatory demolition
- city certification is only required if occupants test positive, but federal safety protocols should guide cover/cleaning practices
costs
cost varies by extent
b. safety: asbestos removal
Asbestos was once a common insulating material and may be found wrapping old pipes or in floor and sheathing materials. When airborne it can be inhaled and causes lung cancer. As with lead, intact asbestos can be covered and contained. If crumbling, it should be removed during renovations to lessen the risk of accidental disturbance and fiber release.(Learn more from the EPA and the Chicago Department of Public Health.)
Asbestos abatement looks similar to lead—with ventilators, plastic containment bags, and air tubes—as removal protocols seek to contain dust and stop particulate dispersal. Testing is reasonable (under $250-750) but abatement costs will depend on the extent and complexity of the area. Removals tend to be more focused, on specific pipes or insulation, in contrast with the wider area attention required for lead paint abatement.
related construction required:
- cleaning is done in tandem with preparatory demolition
costs
$300 permit costs, cost varies by extent
Construction PreparationDemolition & Deconversion
c. Interior Demolition
General demolition is done at the start of construction or phased by building system to align with repairs and replacements.
General demolition, esp. for deconversion or an empty basement, can be minimal (cabinet removals and capping plumbing). For larger projects, your contractor should coordinate 1) disposal needs, 2) any specific abatement protocols (left), and 3) the temporary structures or transitional services required during demolition and construction. The site should be regularly cleaned to limit fire hazards and nuisance dust.
related construction required:
- Architect and contractor will coordinate this larger process and incorporate environmental hazards removals as necessary
- For demolition, under an Easy Permit Deconversion, your contractor should coordinate the required work
costs
$200-$550 minor removals, single element or area
$2,500-$4,000 old partitions and extensive areas
d. unit deconversion
Deconversion enables a building owner to avoid future zoning violations and fines, when an illegal unit is unable to be converted.
Deconversion permits are fairly inexpensive and, for small buildings, do not require the same planning resources as a conversion. The schematic shown above is provided by the city, to show and list the typical level of detail required for four or fewer units total, pre-deconversion. Given the site drawings and notes done for the ‘Code Compliance’ assessments, you could certainly make similar plans. Note that in this sample, attic deconversion simply requires kitchen & plumbing removal, without complex structural/room alterations.
related construction required:
- majority of work will be demolition, see notes under C.
- not all unit elements need to be removed—Walls can stay and bathrooms are permitted (without full tub or shower).
costs
$750 permit via standard plan review (does not include demolition)
Demolition & Deconversion
c. Interior Demolition
General demolition is done at the start of construction or phased by building system to align with repairs and replacements.
General demolition, esp. for deconversion or an empty basement, can be minimal (cabinet removals and capping plumbing). For larger projects, your contractor should coordinate 1) disposal needs, 2) any specific abatement protocols (left), and 3) the temporary structures or transitional services required during demolition and construction. The site should be regularly cleaned to limit fire hazards and nuisance dust.
related construction required:
- Architect and contractor will coordinate this larger process and incorporate environmental hazards removals as necessary
- For demolition, under an Easy Permit Deconversion, your contractor should coordinate the required work
costs
$200-$550 minor removals, single element or area
$2,500-$4,000 old partitions and extensive areas
d. unit deconversion
Deconversion enables a building owner to avoid future zoning violations and fines, when an illegal unit is unable to be converted.
Deconversion permits are fairly inexpensive and, for small buildings, do not require the same planning resources as a conversion. The schematic shown above is provided by the city, to show and list the typical level of detail required for four or fewer units total, pre-deconversion. Given the site drawings and notes done for the ‘Code Compliance’ assessments, you could certainly make similar plans. Note that in this sample, attic deconversion simply requires kitchen & plumbing removal, without complex structural/room alterations.
related construction required:
- majority of work will be demolition, see notes under C.
- not all unit elements need to be removed—Walls can stay and bathrooms are permitted (without full tub or shower).
costs
$750 permit via standard plan review (does not include demolition)
structural repair:
Key Elements & Decisions
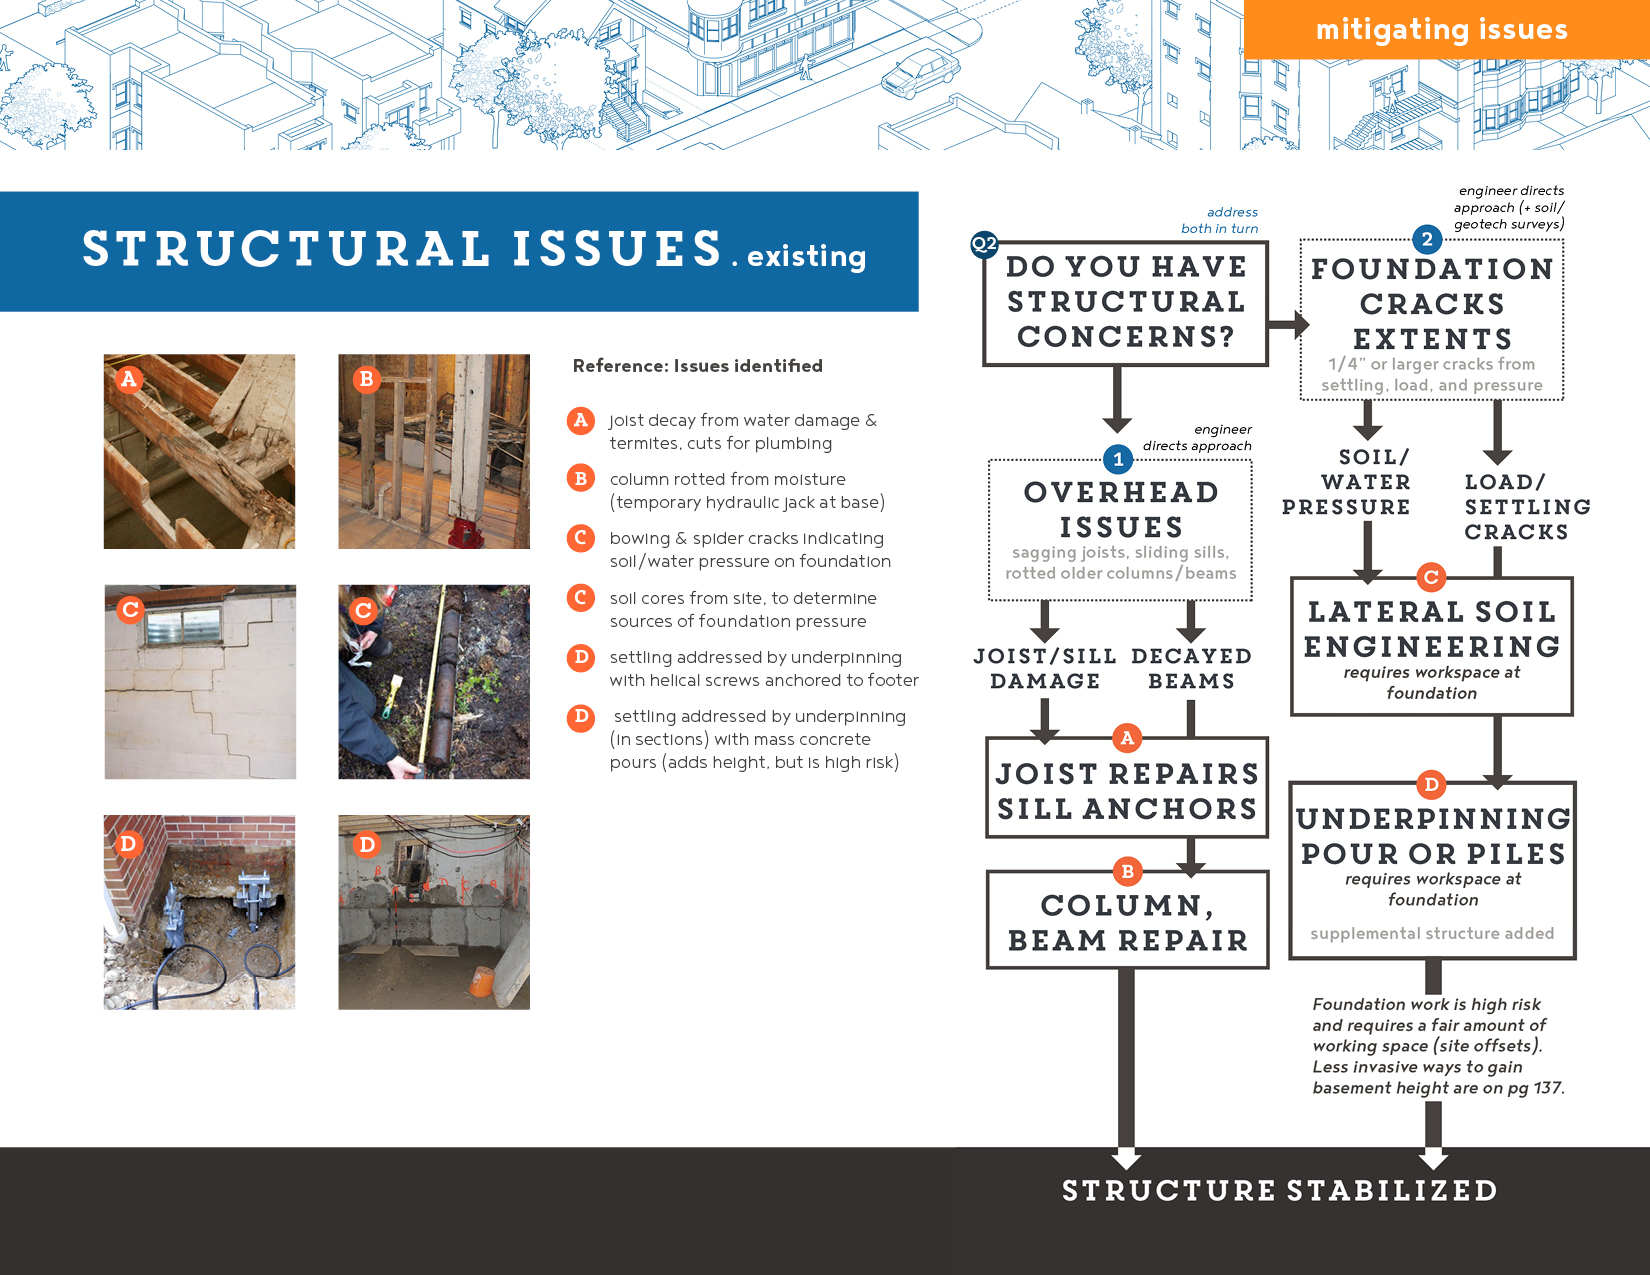
If you have structural failures or damage in your basement ceiling or your foundation walls, your architect or structural engineer will assess the issues and direct mitigation.
1. For overhead areas: visual assessment, material samples, and deflection measurements will guide your architect or engineer’s recommendations for ceiling joists, sill anchors, and the beam and column system. You may need to remove existing floorboards or plaster to assess the extent and repair approaches. In addition to some of the typical repair approaches on the next page, you should anticipate adding temporary support structures—braces, jacks, wooden framing—to limit the amount of stress and movement to your overall structure during the repair process.
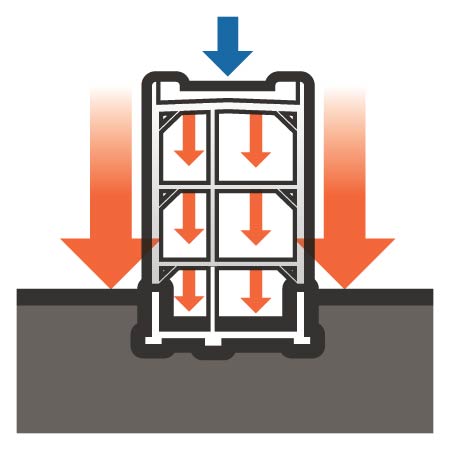
2. For foundations: if there are large cracks (>1/4”-1/2”) which are growing, your architect or engineer should take soil cores or dig test pits—with visual and material samples—to identify the source of loading issues and recommend drainage, soil engineering, or grading/planting resolution. For lesser cracks, you will likely be instructed to take periodic measurements to assess rate of movement/deterioration. For major settling, your architect or engineer may suggest underpinning, replacing unstable soils with supplemental structure. There are several underpinning approaches, which vary based on your foundation materials and work areas. Your architect and engineer will direct this process as it is high risk; under no circumstances should you attempt ‘quick’ foundation repairs without professional guidance.
Expand the Structural Repair slide to learn more about costs and additional building systems associated with each alternative approach

structural Repairs Joists, Sills, columns & Beams
a. joist & sill repairs
Additional joists can be added to shore up floors and address minor loading issues. Repair costs vary by damage and design of new openings/wall and loading connections.
Sill anchors should be retrofitted on wooden frame buildings to avoid the structure sliding off the foundation and stopping water from migrating into the wooden frame. (Sill anchors aren’t necessary in stone/brick; your joists may slot into walls without sills/headers. Architect will provide details.)
related construction required:
- address in tandem with beam & foundation repairs,
- frame out interior stairs, utility, and exhaust openings in tandem
- coordinate with ventilation ducts, new openings (sills/anchors)
costs
cost varies by extent
b. column & beam replacement
Replacing rotten wooden columns/beams with metal elements can both stabilize your building and allow larger open spans.
Beam and column replacement should support joists and the structure above, potentially carrying additional loads or spanning additional space between columns. Cost will vary based on materials (number of columns needed, I-beam or timber profiles used) and complexity of your structure (single center beam or multiple bays, each with a beam).
related construction required:
- address in tandem with other structural issues
- beam height + ducts must work with fire egress height req.
- coordinate footers (at lowest, sewer line depth) and slab joints
costs
$3,500-$6,500 (replacement of main beam & new columns)

Structural Repairs
walls & foundations
c.lateral soils eng. (wall repair)
Water, root, and excessive soil loading impacts on the foundation should be addressed by fixing the underlying issues and rebuilding damaged areas. This will require space around the foundation for implementation.
Repairs and costs will vary by extent. They should address external pressure and internal structure. See drainage, just after height, for structurally healthy wall sections.
related construction required:
- Remediation should be integrated with drainage, utility work
- All repairs should be careful to brace upper structure and use tie-backs or keep soil at repose during sitework
- Excavation permits req. if within 10’ of property line or >12’ deep
cost concerns
$2,000 soil report, testing $800-$2,400 tree & roots removal
$4,000-$20,000 wall repairs vary (minor to mid. replacements)
d.underpinning foundation
Major settling issues require adding support beneath your footers, to act in place of irregular/moving soils. This is expensive, risky work.
Underpinning should only be done if absolutely necessary to prevent structural failure. Digging beneath your foundation has the potential to destabilize your entire house and should be done in small sections, with extensive supplemental support. It may void your home insurance so discuss extensively with your engineer before pursuing underpinning. If you just need ceiling height, see next section.
related construction required:
- coordinate with drainage, utility, and slab replacement
- movement during underpinning can crack walls and damage upper floors—anticipate extra finishing costs across building
- see repair remark under ‘C. Lateral Soils Engineering’ above
cost concerns
$20,000-$40,000 concrete cost less, helical piles more
Joists, Sills, columns & Beams
a. joist & sill repairs
Additional joists can be added to shore up floors and address minor loading issues. Repair costs vary by damage and design of new openings/wall and loading connections.
Sill anchors should be retrofitted on wooden frame buildings to avoid the structure sliding off the foundation and stopping water from migrating into the wooden frame. (Sill anchors aren’t necessary in stone/brick; your joists may slot into walls without sills/headers. Architect will provide details.)
related construction required:
- address in tandem with beam & foundation repairs,
- frame out interior stairs, utility, and exhaust openings in tandem
- coordinate with ventilation ducts, new openings (sills/anchors)
costs
cost varies by extent
b. column & beam replacement
Replacing rotten wooden columns/beams with metal elements can both stabilize your building and allow larger open spans.
Beam and column replacement should support joists and the structure above, potentially carrying additional loads or spanning additional space between columns. Cost will vary based on materials (number of columns needed, I-beam or timber profiles used) and complexity of your structure (single center beam or multiple bays, each with a beam).
related construction required:
- address in tandem with other structural issues
- beam height + ducts must work with fire egress height req.
- coordinate footers (at lowest, sewer line depth) and slab joints
costs
$3,500-$6,500 (replacement of main beam & new columns)
Structural Repairs
walls & foundations
c.lateral soils eng. (wall repair)
Water, root, and excessive soil loading impacts on the foundation should be addressed by fixing the underlying issues and rebuilding damaged areas. This will require space around the foundation for implementation.
Repairs and costs will vary by extent. They should address external pressure and internal structure. See drainage, just after height, for structurally healthy wall sections.
related construction required:
- Remediation should be integrated with drainage, utility work
- All repairs should be careful to brace upper structure and use tie-backs or keep soil at repose during sitework
- Excavation permits req. if within 10’ of property line or >12’ deep
cost concerns
$2,000 soil report, testing $800-$2,400 tree & roots removal
$4,000-$20,000 wall repairs vary (minor to mid. replacements)
d.underpinning foundation
Major settling issues require adding support beneath your footers, to act in place of irregular/moving soils. This is expensive, risky work.
Underpinning should only be done if absolutely necessary to prevent structural failure. Digging beneath your foundation has the potential to destabilize your entire house and should be done in small sections, with extensive supplemental support. It may void your home insurance so discuss extensively with your engineer before pursuing underpinning. If you just need ceiling height, see next section.
related construction required:
- coordinate with drainage, utility, and slab replacement
- movement during underpinning can crack walls and damage upper floors—anticipate extra finishing costs across building
- see repair remark under ‘C. Lateral Soils Engineering’ above
cost concerns
$20,000-$40,000 concrete cost less, helical piles more
height increase:
Key Elements & Decisions
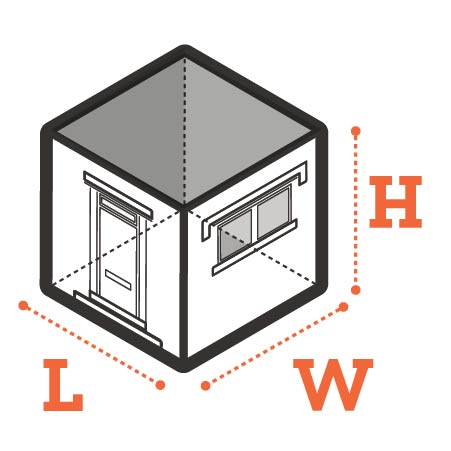
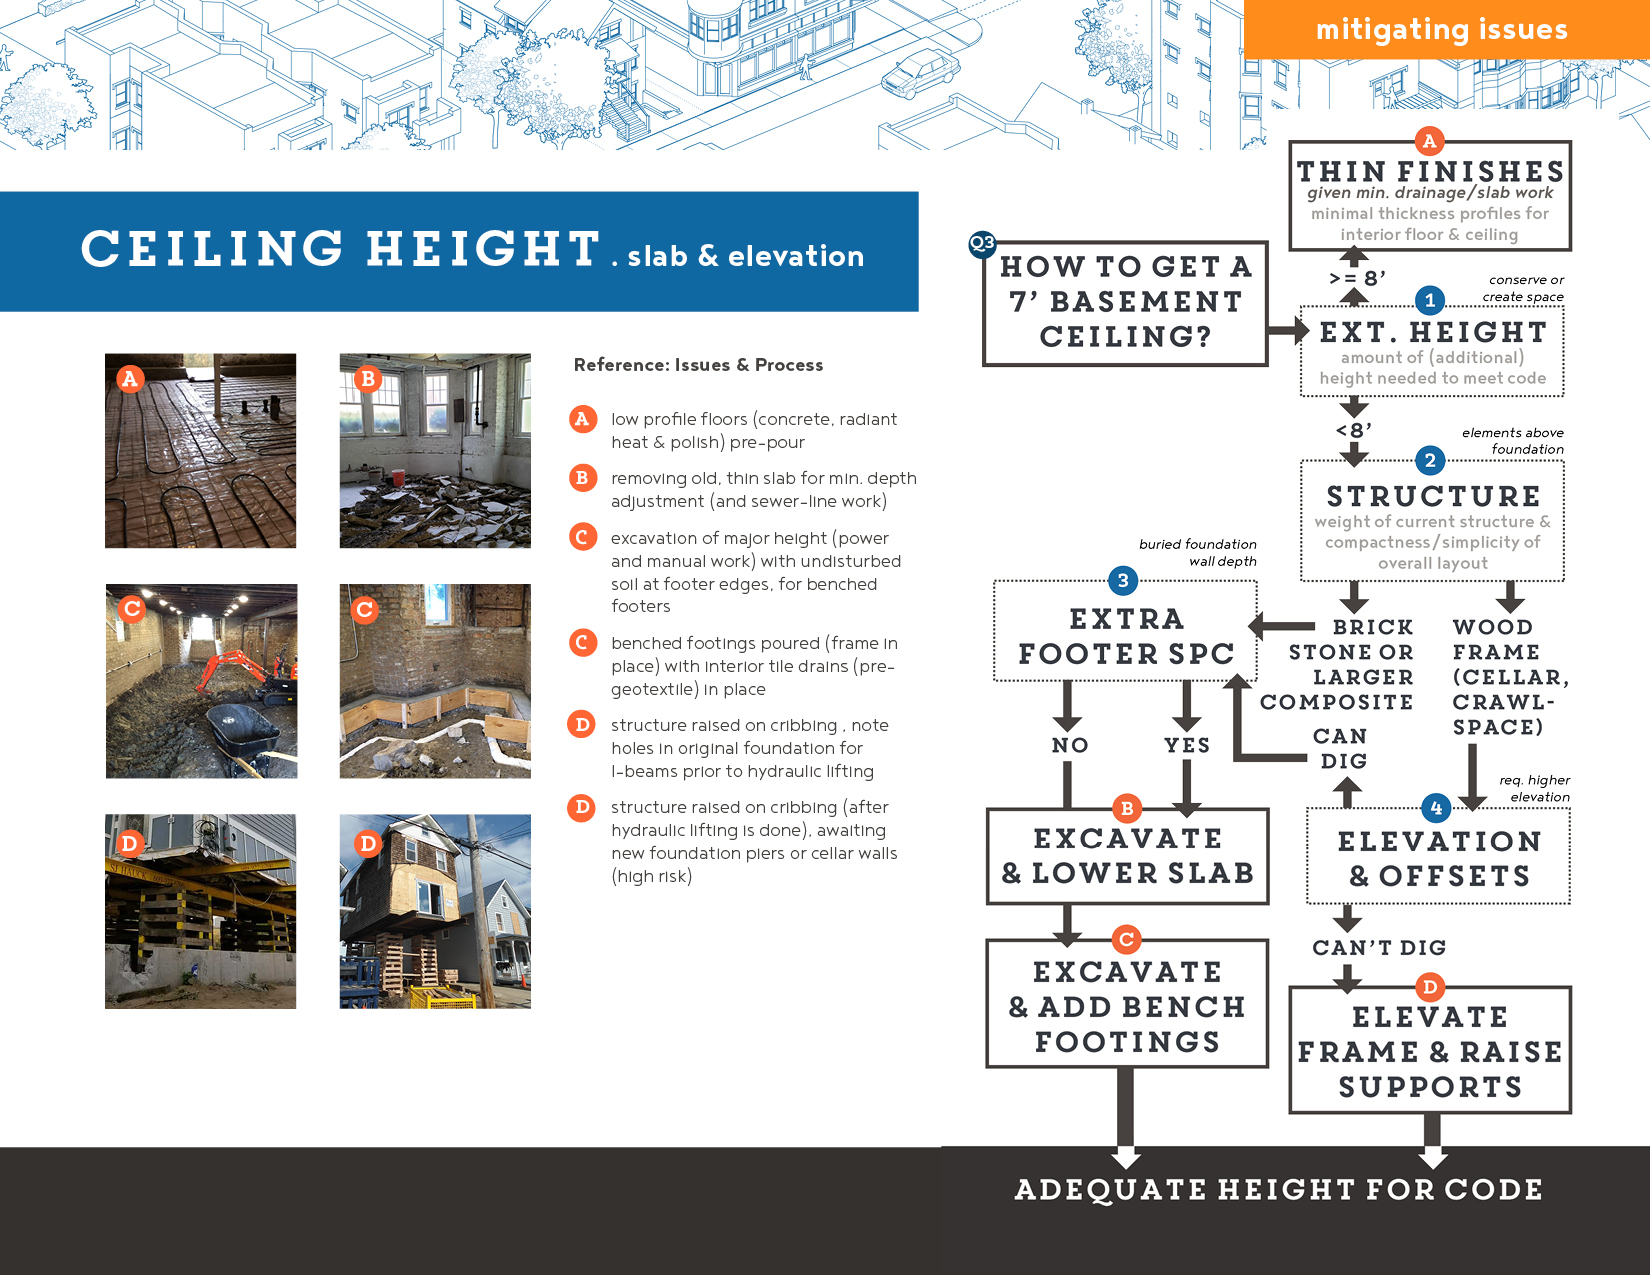
During structural assessment, your architect or engineer should measure—by sonar, cut, or core—existing elevations for footers, walls, and slabs, as well as current and potential ceiling heights. If you have low basement ceilings, your options to create a 7’ tall basement will be determined by the 1) existing height, 2 & 3) the structure of your foundation and upper structure, and 4) the perimeter space around your building (offsets).
1. Existing Height: Basement excavation is costly, given the amount of manual labor and tight spaces involved. If you have a slightly short structure—8’ to 8’6” from soil to joists -you can avoid digging costs and foundation damage risks by using thin assemblies (more rigid insulation, less loose, etc.). The easiest route is to simply conserve space.
2 & 3. Existing Structure—Foundation & Upper Stories: Typically, to get extra height, you’ll want to excavate within your basement. Your wall and column footer may be much deeper than your thin slab and you can lower and repour the slab assembly with minor excavation. If you need multiple feet of depth, without disturbing your foundation or upper structure, you can excavate down and create bench footers. Both of these approaches are labor intensive but far less risky than raising a structure. Be mindful of the potential need for window wells and egress areas as you develop designs for a lower basement unit.
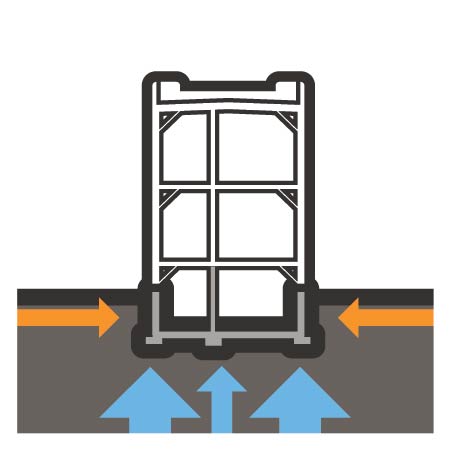
4. Elevation & Perimeter Offsets: If you can’t dig down and have a simple frame structure and external workspace, it is possible to hydraulically lift your building and build walls up to meet a new elevation. This a common approach in sea-level rise mitigation, but, as with underpinning, is high risk because it moves the main structure.
Expand the Height Increase / Slab slide to learn more about costs and additional building systems associated with each alternative approach

Height Increase
Thin Finishes & Slab replacement
a. thin finishes (no excavation)
Thin slab replacement and thin finishes can conserve height and eliminate the need for excavation, while adding insulation, moisture/radon protection, adequate thickness to support unit loads, and, potentially, supplemental services like radiant heat. Cost will vary based on size, complexity of area, joints, and integration of heat. See ventilation and finishing for ceiling and wall approaches to space conservation.
related construction required:
- coordinate slab work with radon, utilities, and drainage work
- insulate/enclose ceilings (around ducts) as fire partitions
- insulate & damp-proof slab/walls to work with drainage
costs
$2,000-$3,000 basic slab pour, not inclusive of heat
b. excavate & replace slab only
Some houses have deeper footers, where thin slabs were belatedly added to mud floors. It is common to excavate this minor depth (plus drainage) and repour the slab. Make sure to isolate the slab from walls & footers.
Minor slab excavations can create height while adding insulation, moisture/radon protection, and adequate thickness to support unit loads. As in approaches A and C, it should be coordinated with water, sewer, and MEP updates, which have sub-slab components. Cost will vary based on size, complexity of area, joints, and final finishing.
related construction required:
- coordinate elevations & slab work with beams/columns, radon, utilities, drainage work and new exits/basement doors
- insulate & damp-proof slab to be consistent with drainage
costs
$2,500-$4,000 demolition of existing structures + slab
$2,000-$3,000
basic slab pour
Height Increase
bench footers & frame elevation
c. excavate & pour bench footers
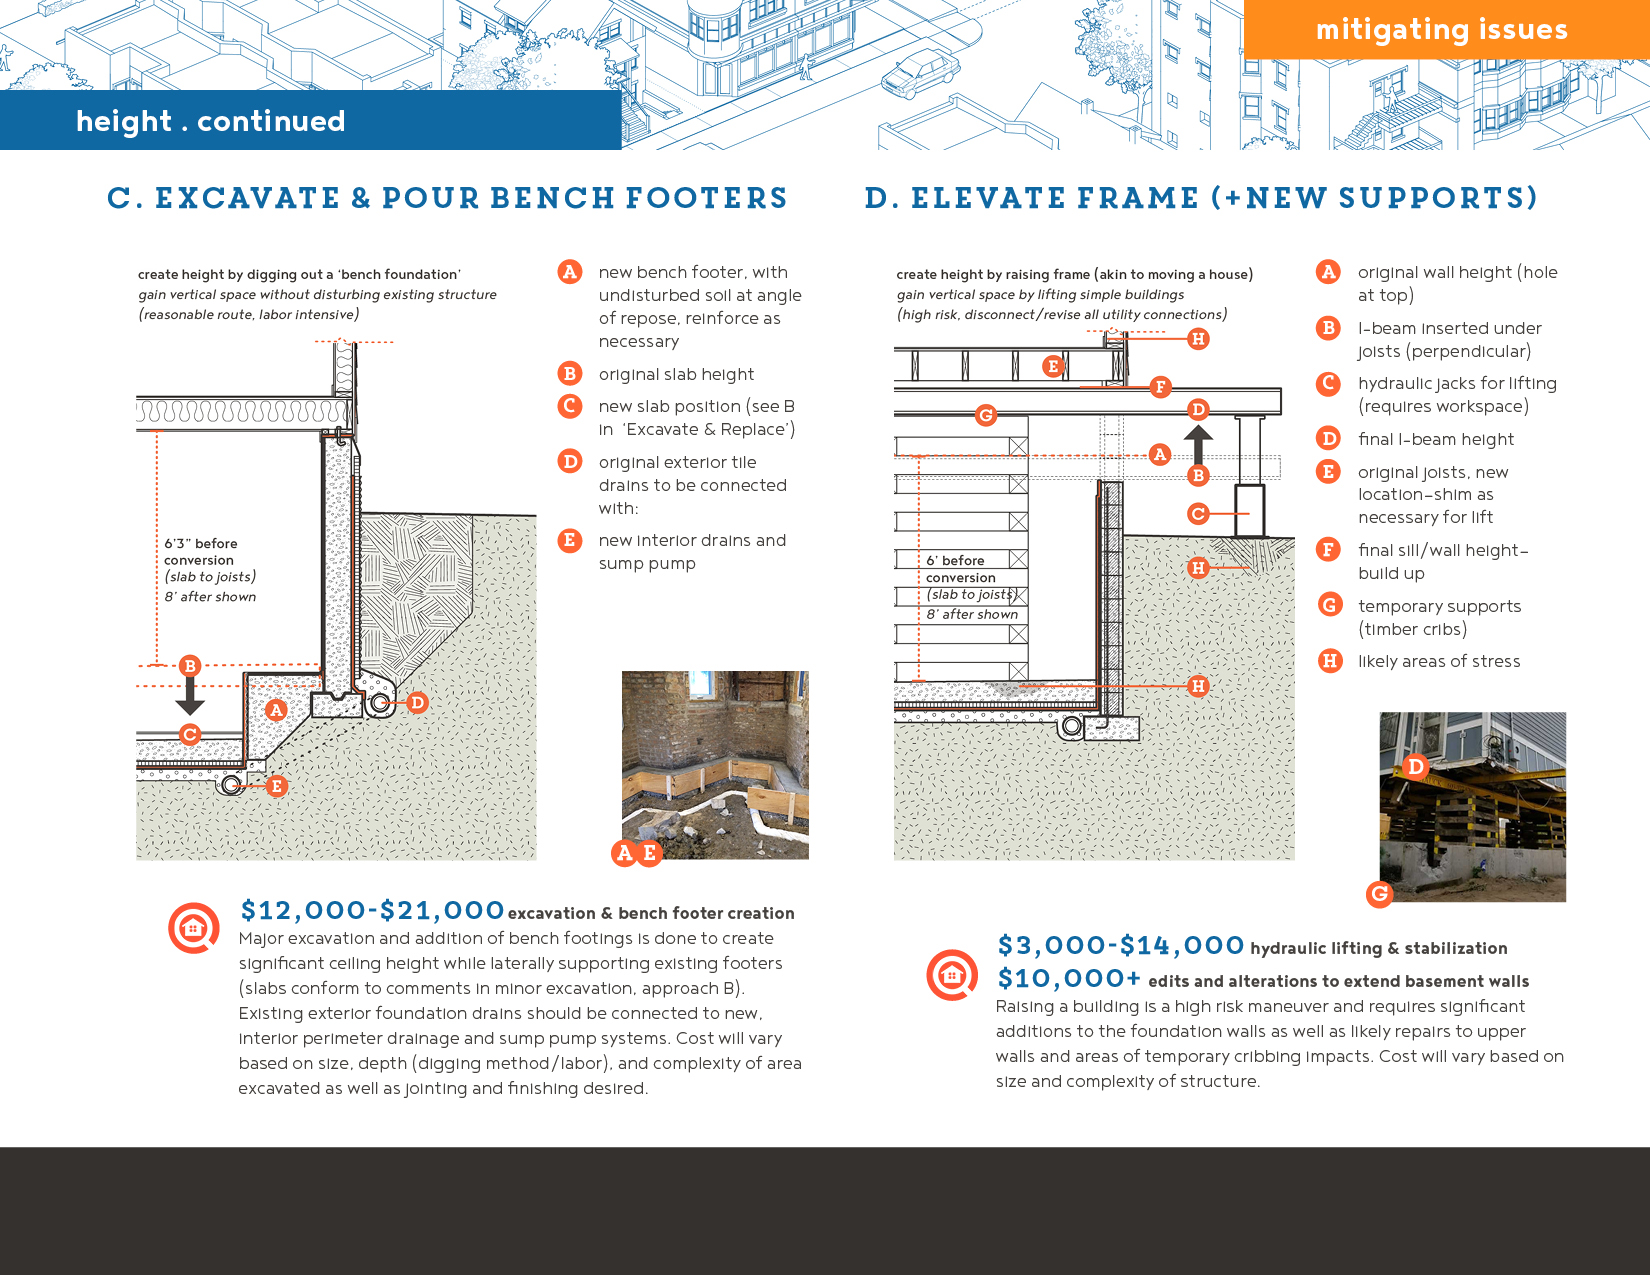
To gain significant height, without touching the foundation, you can excavate the floor (with a repose slope at edges) and pour bench footers. This is less invasive than underpinning.
Major excavation, with bench footings additions, is done to support existing footers (slabs conform to comments in minor excavation, approach B). Existing exterior foundation drains should be connected to new, interior perimeter drainage and sump pump systems. Cost will vary based on size, depth (digging method/labor), and complexity of area excavated as well as jointing and finishing desired.
related construction required:
- coordinate elevations & slab work with beams/columns, radon, utilities, drainage work and new exits/basement doors
- connect existing drains with interior drains & sump pump
costs
$12,000-$21,000 excavation & bench footer creation
d. elevate frame (+new supports)
Akin to traditional house moving, it is possible to raise a simple building on I-beams and hydraulic jacks if you have space and cannot excavate.
Raising a building is a high risk maneuver and requires significant additions to the foundation walls as well as likely repairs to upper walls and areas of temporary cribbing impacts. Cost will vary based on size and complexity of structure.
related construction required:
- See slab comments above and note on cracks in underpinning.
- Requires extensive work space for I-beam maneuvering and additional jack supports/placement.
- The temporary crib supports will likely crack existing slabs so anticipate repairs, if not replacement. As with underpinning, you are likely to void your insurance.
cost concerns
$3,000-$14,000 hydraulic lifting & stabilization
$10,000 + edits and alterations to extend basement walls
Thin Finishes & Slab replacement
a. thin finishes (no excavation)
Thin slab replacement and thin finishes can conserve height and eliminate the need for excavation, while adding insulation, moisture/radon protection, adequate thickness to support unit loads, and, potentially, supplemental services like radiant heat. Cost will vary based on size, complexity of area, joints, and integration of heat. See ventilation and finishing for ceiling and wall approaches to space conservation.
related construction required:
- coordinate slab work with radon, utilities, and drainage work
- insulate/enclose ceilings (around ducts) as fire partitions
- insulate & damp-proof slab/walls to work with drainage
costs
$2,000-$3,000 basic slab pour, not inclusive of heat
b. excavate & replace slab only
Some houses have deeper footers, where thin slabs were belatedly added to mud floors. It is common to excavate this minor depth (plus drainage) and repour the slab. Make sure to isolate the slab from walls & footers.
Minor slab excavations can create height while adding insulation, moisture/radon protection, and adequate thickness to support unit loads. As in approaches A and C, it should be coordinated with water, sewer, and MEP updates, which have sub-slab components. Cost will vary based on size, complexity of area, joints, and final finishing.
related construction required:
- coordinate elevations & slab work with beams/columns, radon, utilities, drainage work and new exits/basement doors
- insulate & damp-proof slab to be consistent with drainage
costs
$2,500-$4,000 demolition of existing structures + slab
$2,000-$3,000 basic slab pour
Height Increase
bench footers & frame elevation
c. excavate & pour bench footers
To gain significant height, without touching the foundation, you can excavate the floor (with a repose slope at edges) and pour bench footers. This is less invasive than underpinning.
Major excavation, with bench footings additions, is done to support existing footers (slabs conform to comments in minor excavation, approach B). Existing exterior foundation drains should be connected to new, interior perimeter drainage and sump pump systems. Cost will vary based on size, depth (digging method/labor), and complexity of area excavated as well as jointing and finishing desired.
related construction required:
- coordinate elevations & slab work with beams/columns, radon, utilities, drainage work and new exits/basement doors
- connect existing drains with interior drains & sump pump
costs
$12,000-$21,000 excavation & bench footer creation
d. elevate frame (+new supports)
Akin to traditional house moving, it is possible to raise a simple building on I-beams and hydraulic jacks if you have space and cannot excavate.
Raising a building is a high risk maneuver and requires significant additions to the foundation walls as well as likely repairs to upper walls and areas of temporary cribbing impacts. Cost will vary based on size and complexity of structure.
related construction required:
- See slab comments above and note on cracks in underpinning.
- Requires extensive work space for I-beam maneuvering and additional jack supports/placement.
- The temporary crib supports will likely crack existing slabs so anticipate repairs, if not replacement. As with underpinning, you are likely to void your insurance.
cost concerns
$3,000-$14,000 hydraulic lifting & stabilization
$10,000 + edits and alterations to extend basement walls
area drainage:
Key Elements & Decisions
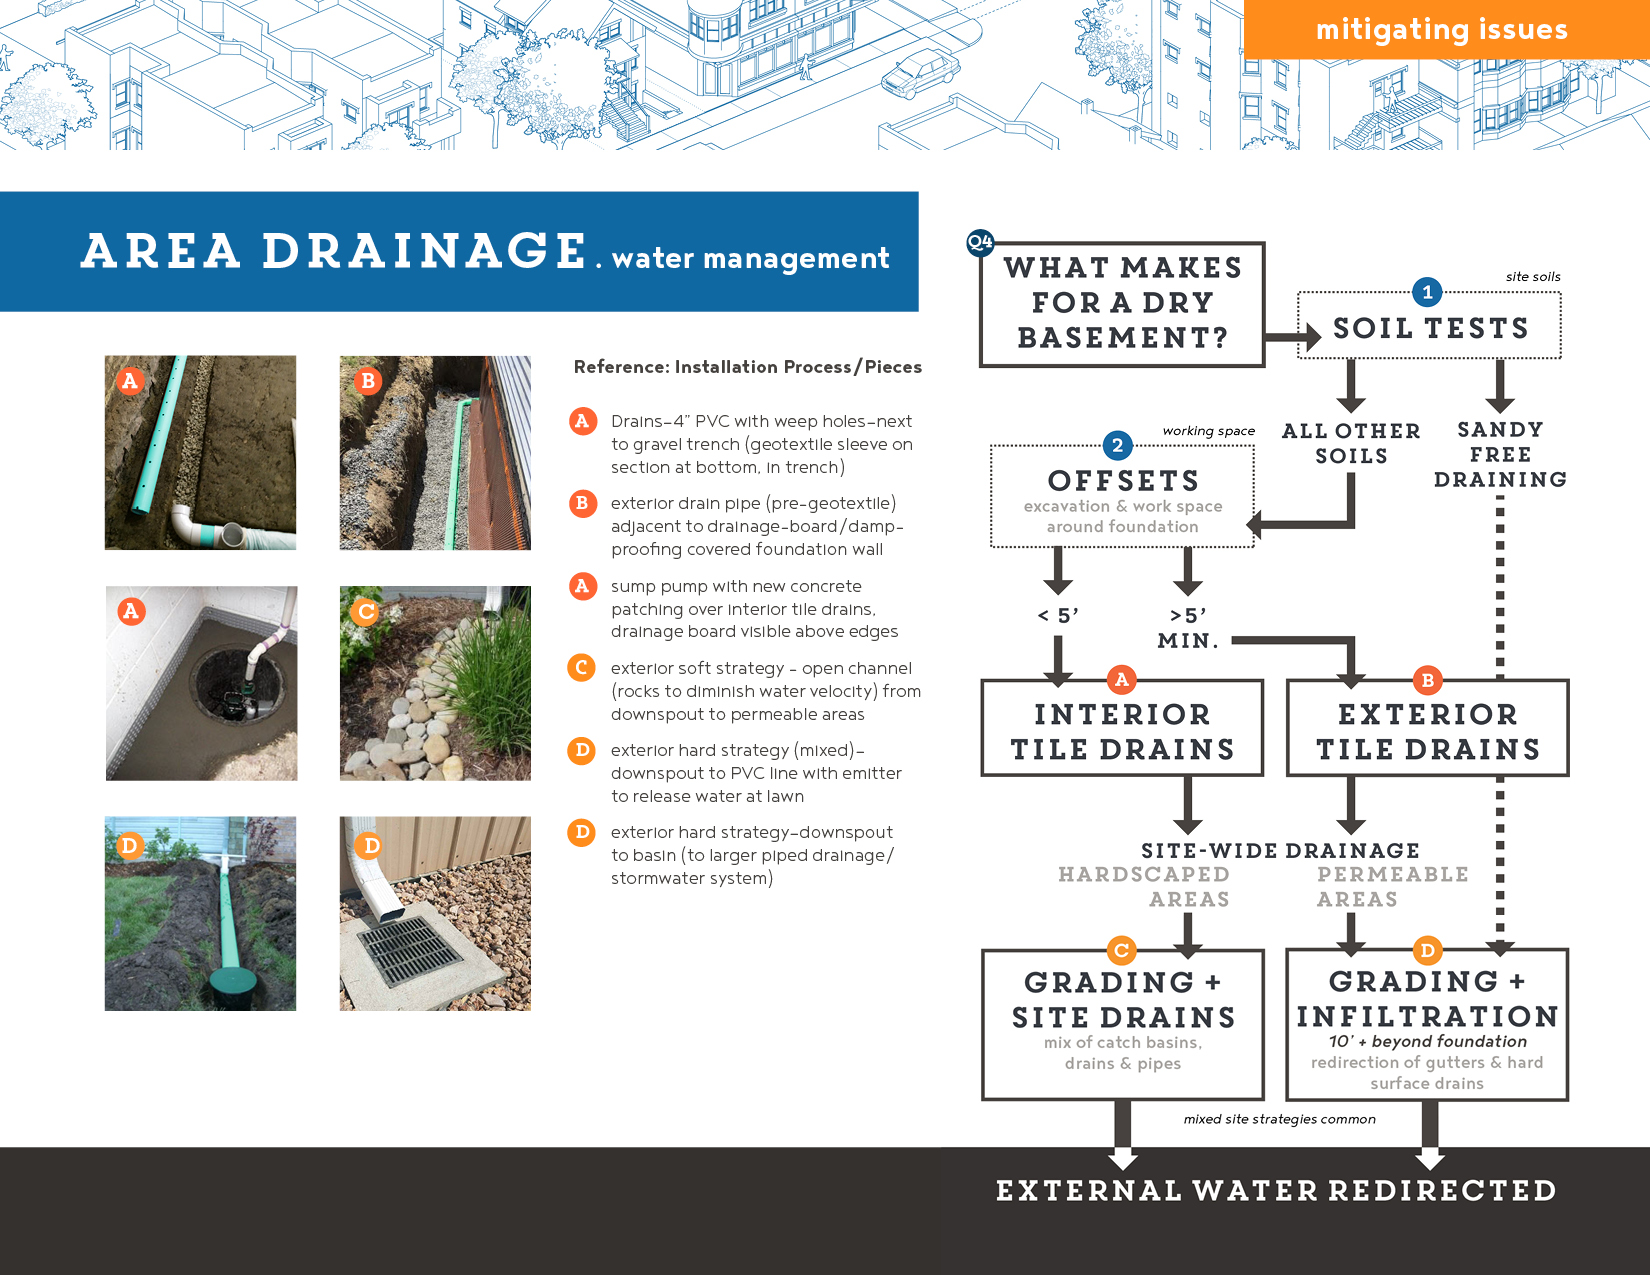
Your approach to creating a dry basement will be determined by your building site, given 1) soil composition and natural drainage and 2) building offsets and perimeter work areas.
1. Soil Composition/Soil Test: Your architect or engineer should do soil cores/test pits to determine existing drainage potential. If you’re lucky, your site has sandy soils which drain without assistance. That said, any mix of sand with loam or clay will trap groundwater and require a drainage system to move flows away from your foundation.
2. Offsets/Perimeter Space: Where you place drainage is determined by your working space. If there is room to work (ideally 10’ offset) external excavation can be done to place tile drainage, vapor/damp-proofing, and insulation on the outside of your foundation walls, preserving interior space. If you lack external room (less than 5’), you can add tile drainage at the inside of footings. In this scheme, water flows through the foundation walls, down drainage boards to gravel and drains. Moisture and condensation are stopped by moisture/vapor barriers and rigid insulation on the inner foundation wall edge, before reaching any finishing materials. In both cases, water flows to perforated PVC drains which, as shown on the next page, connect to sump pumps to be raised to lawn or the combined storm & sewer system (cso) for disposal. In the rare case that your foundation is higher in elevation than the cso connection, tile drains may simply connect and drain by gravity (1-2% slopes).
In addition to the intensive installation of tile drains, you should keep water out of the area next to your foundation by using soft strategies—slopes to promote run-off and remote infiltration areas for downspouts- as well as hard conduit connections to the cso system, like catch-basins, trench and french drains, and maintenance clean-outs.
Expand the Site / Foundation Drainage slide to learn more about costs and additional building systems associated with each alternative approach
Foundation Drainage
Interior & Exterior tile Drains
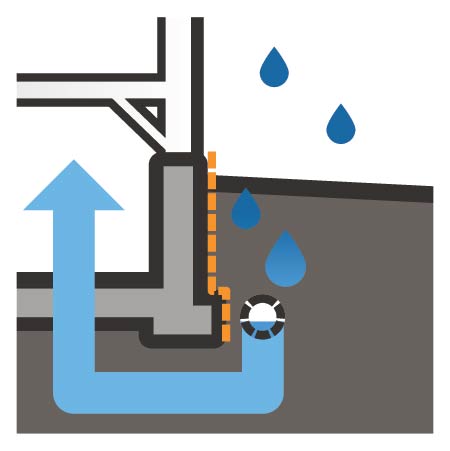
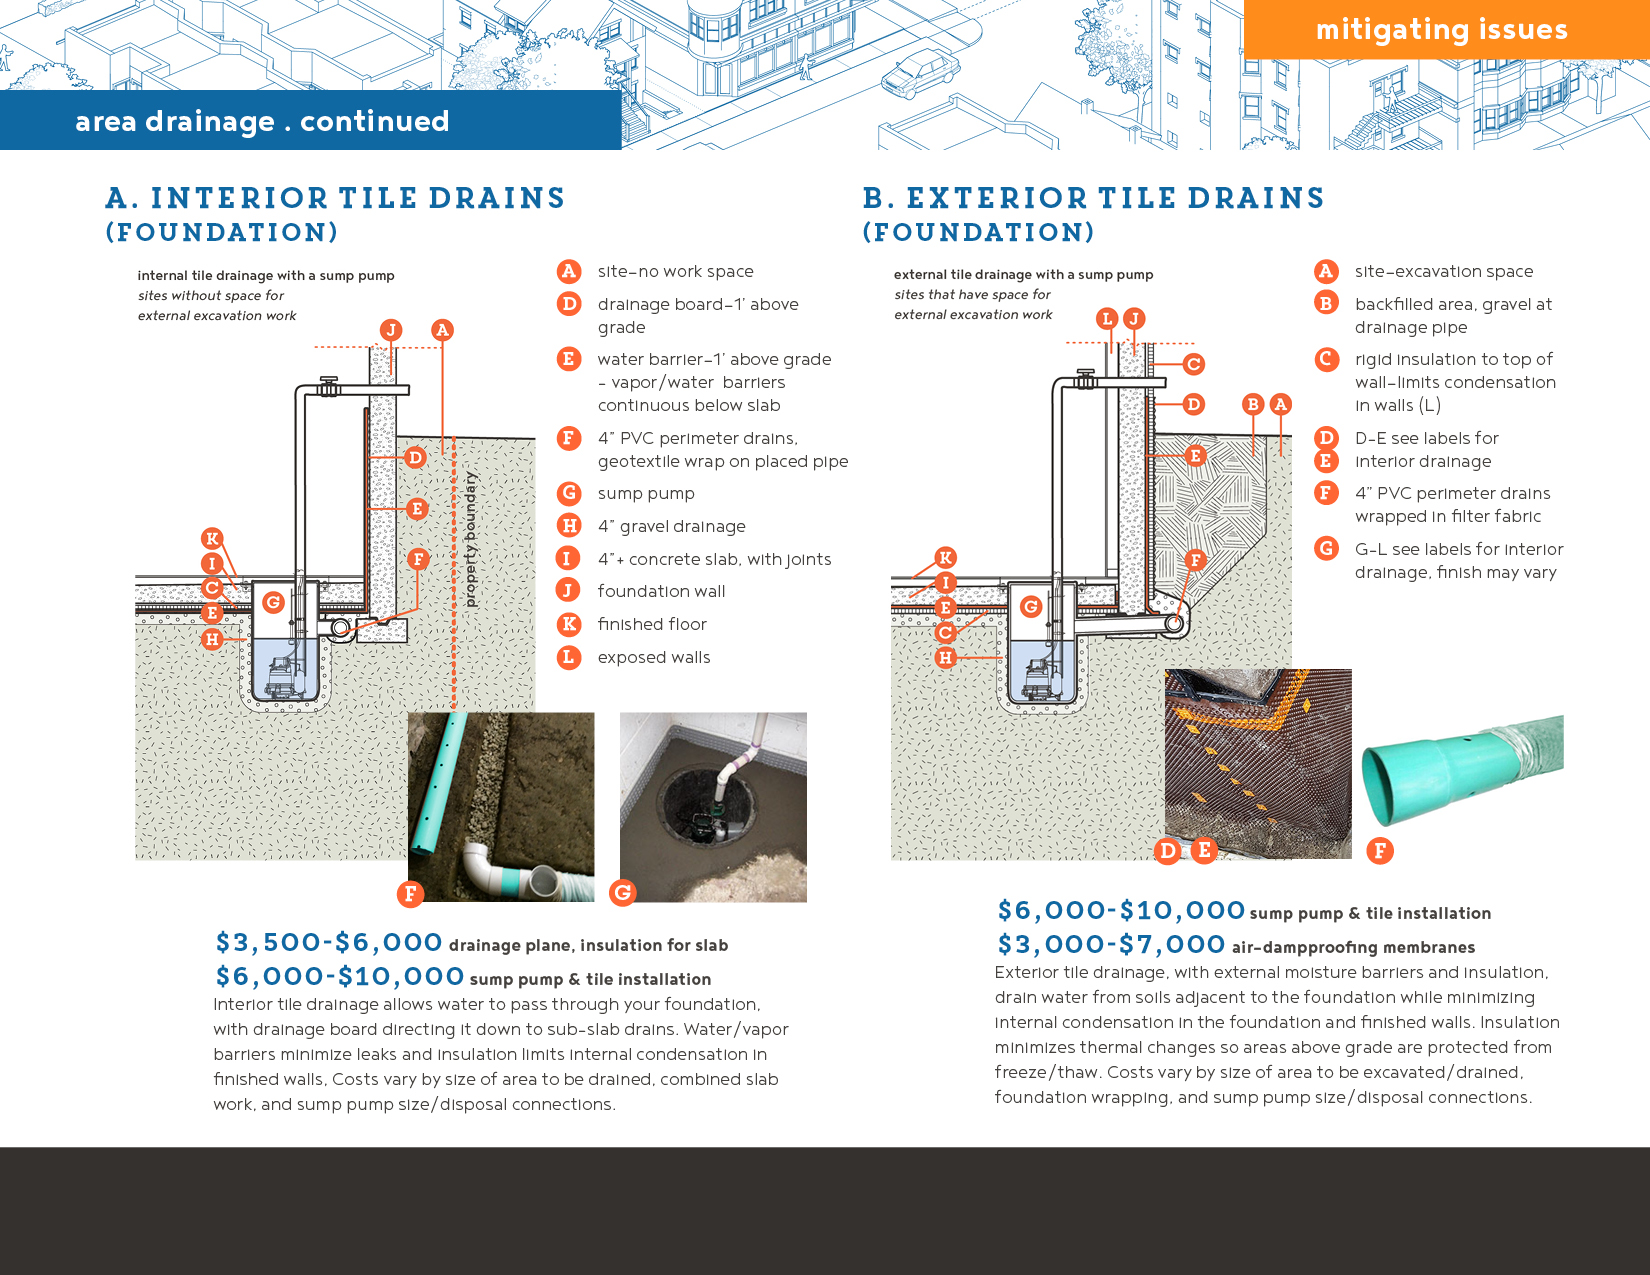
a. interior tile drains (foundation)
If you have water coming through your foundation, but no space to address on the outside, you will need to add interior drains and a sump pump to intercept those flows.
Interior tile drainage allows water to pass through your foundation, with drainage board directing it down to sub-slab drains. Water/vapor barriers minimize leaks and insulation limits internal condensation in finished walls, Costs vary by size of area to be drained, combined slab work, and sump pump size/disposal connections.
related construction required:
- coordinate with slab patching (at edges) or replacement, radon venting, and utility connections (to the cso)
- combine with siteworks redirecting surface water (C, D below)
costs
$3,500-$6,000 drainage plane, insulation for slab
$6,000-$10,000 sump pump & tile installation
b. exterior tile drains (foundation)
If you have water coming through your foundation and space to work on the outside, you can add exterior drains.
Exterior tile drainage, with external moisture barriers and insulation, drains water from soils adjacent to the foundation while minimizing internal condensation in the foundation and finished walls. Insulation minimizes thermal changes so areas above grade are protected from freeze/thaw. Costs vary by size of area to be excavated/drained, foundation wrapping, and sump pump size/disposal connections.
related construction required:
- perform in tandem with foundation repairs (as necessary)
- coordinate with slab patching (at sump), radon & damp-proofing membranes/venting, and utility connections (to the cso)
- combine with siteworks redirecting surface water (C, D below)
- requires excavation permit if within 10’ of site boundary
costs
$6,000-$10,000 sump pump & tile installation
$3,000-$7000 air-dampproofing membranes
Site Grading
soft systems & hard systems
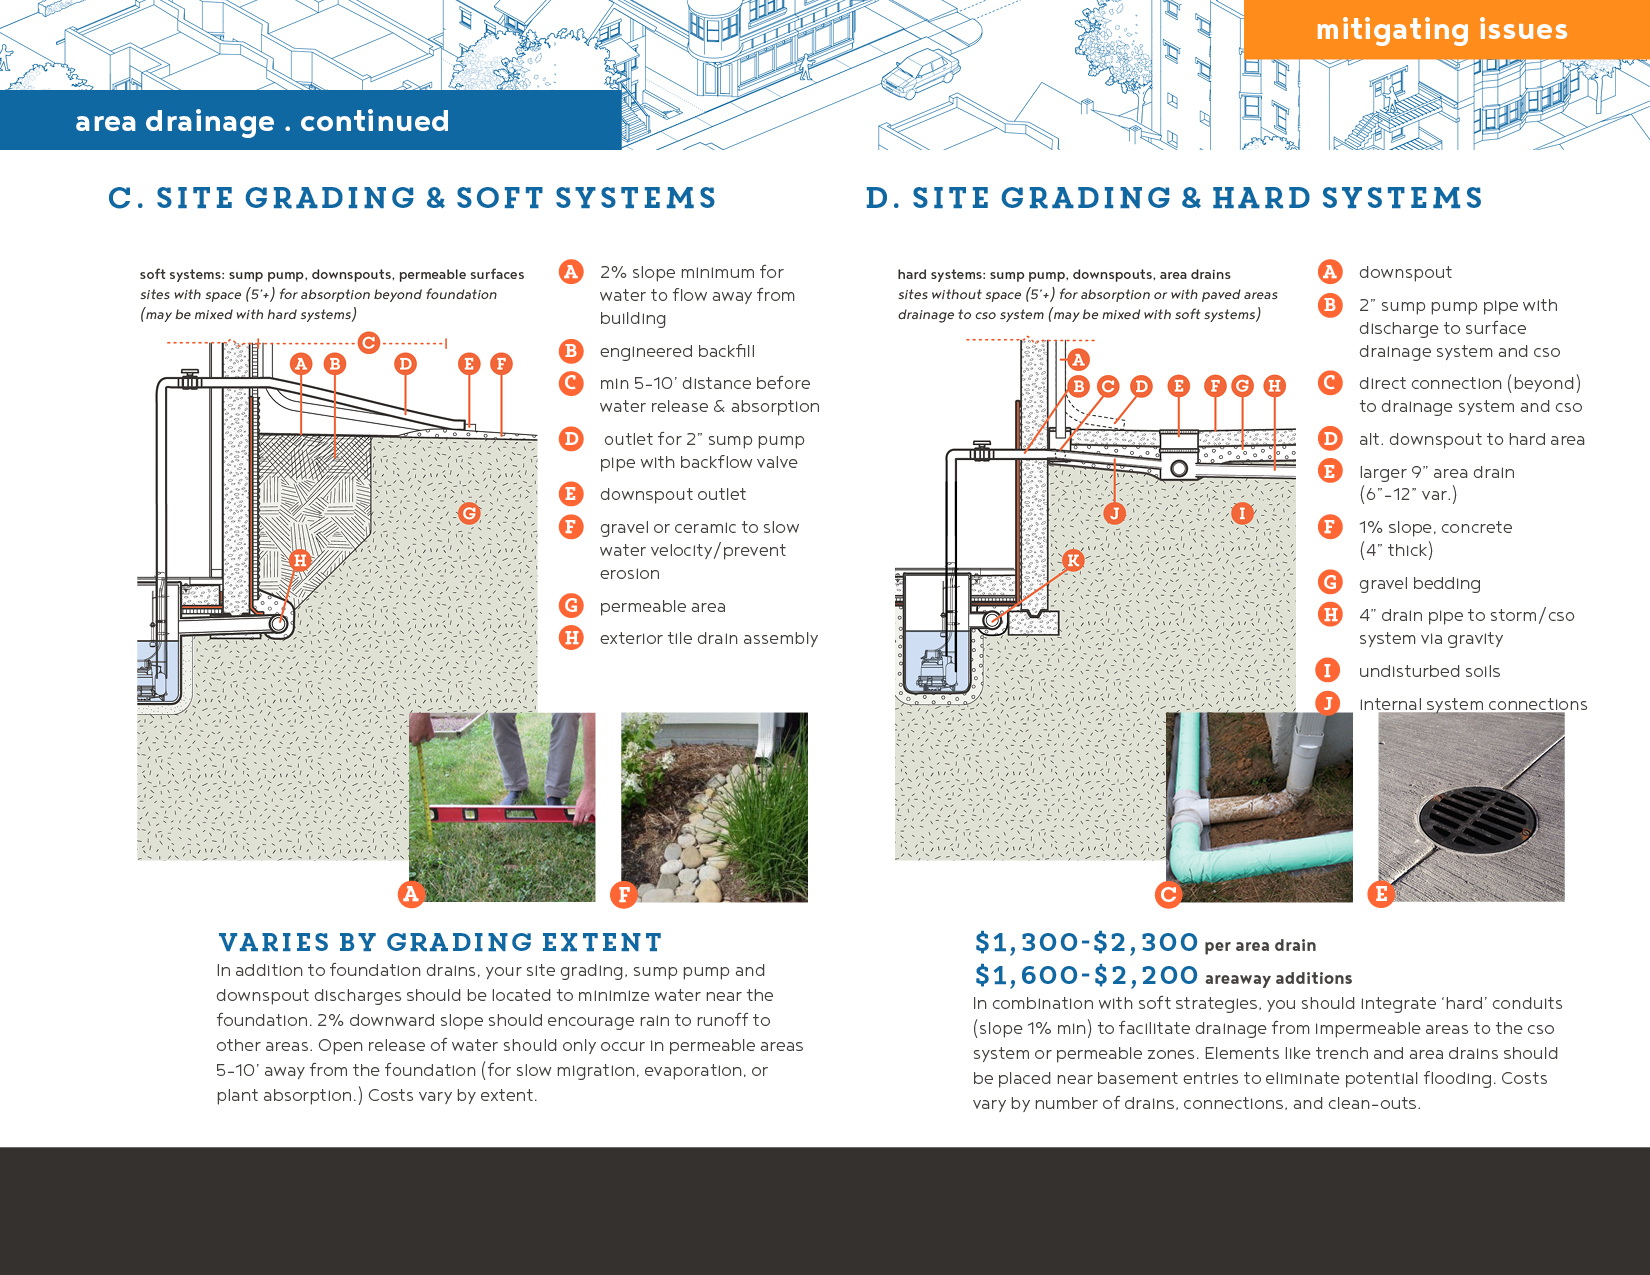
c. site grading & soft systems
In addition to foundation drains, your larger site should be graded to move water away from the foundation (2%+ slope), inclusive of sump pump and downspout discharges. Collection areas for permeable absorption, evaporation, or plant absorption should be at least 10’ from the building (5' min.). Costs vary by extent.
related construction required:
- combine with foundation drains & ‘hard’ drainage below
- coordinate with any new doors, areaways, and window wells needed for egress, light, and ventilation
costs
varies by grading extent
d. site grading & hard systems
In addition to permeable areas, you should use catch-basins and extra french/trench/area drains and pipes to redistribute water and connect downspouts and cso systems.
‘Hard’ conduits (slope 1% min) move surface and sump pump water from impermeable areas to the cso system or permeable zones. Elements like trench and area drains should be placed near basement entries to eliminate potential flooding. Costs vary by number of drains, connections, and clean-outs.
related construction required:
- same comments as ‘C. site grading & soft systems’ above
cost concerns
$1,300-$2,300 per area drain
$1,600-$2,200 areaway additions
air safety:
Key Elements & Decisions
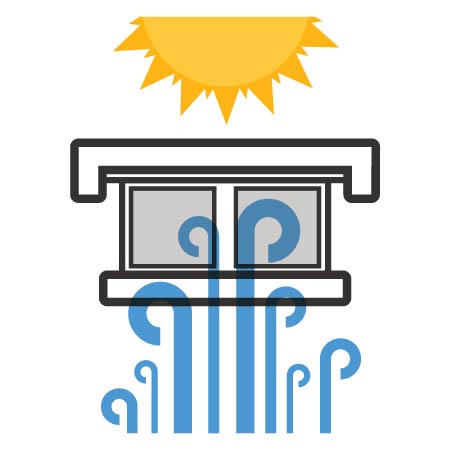
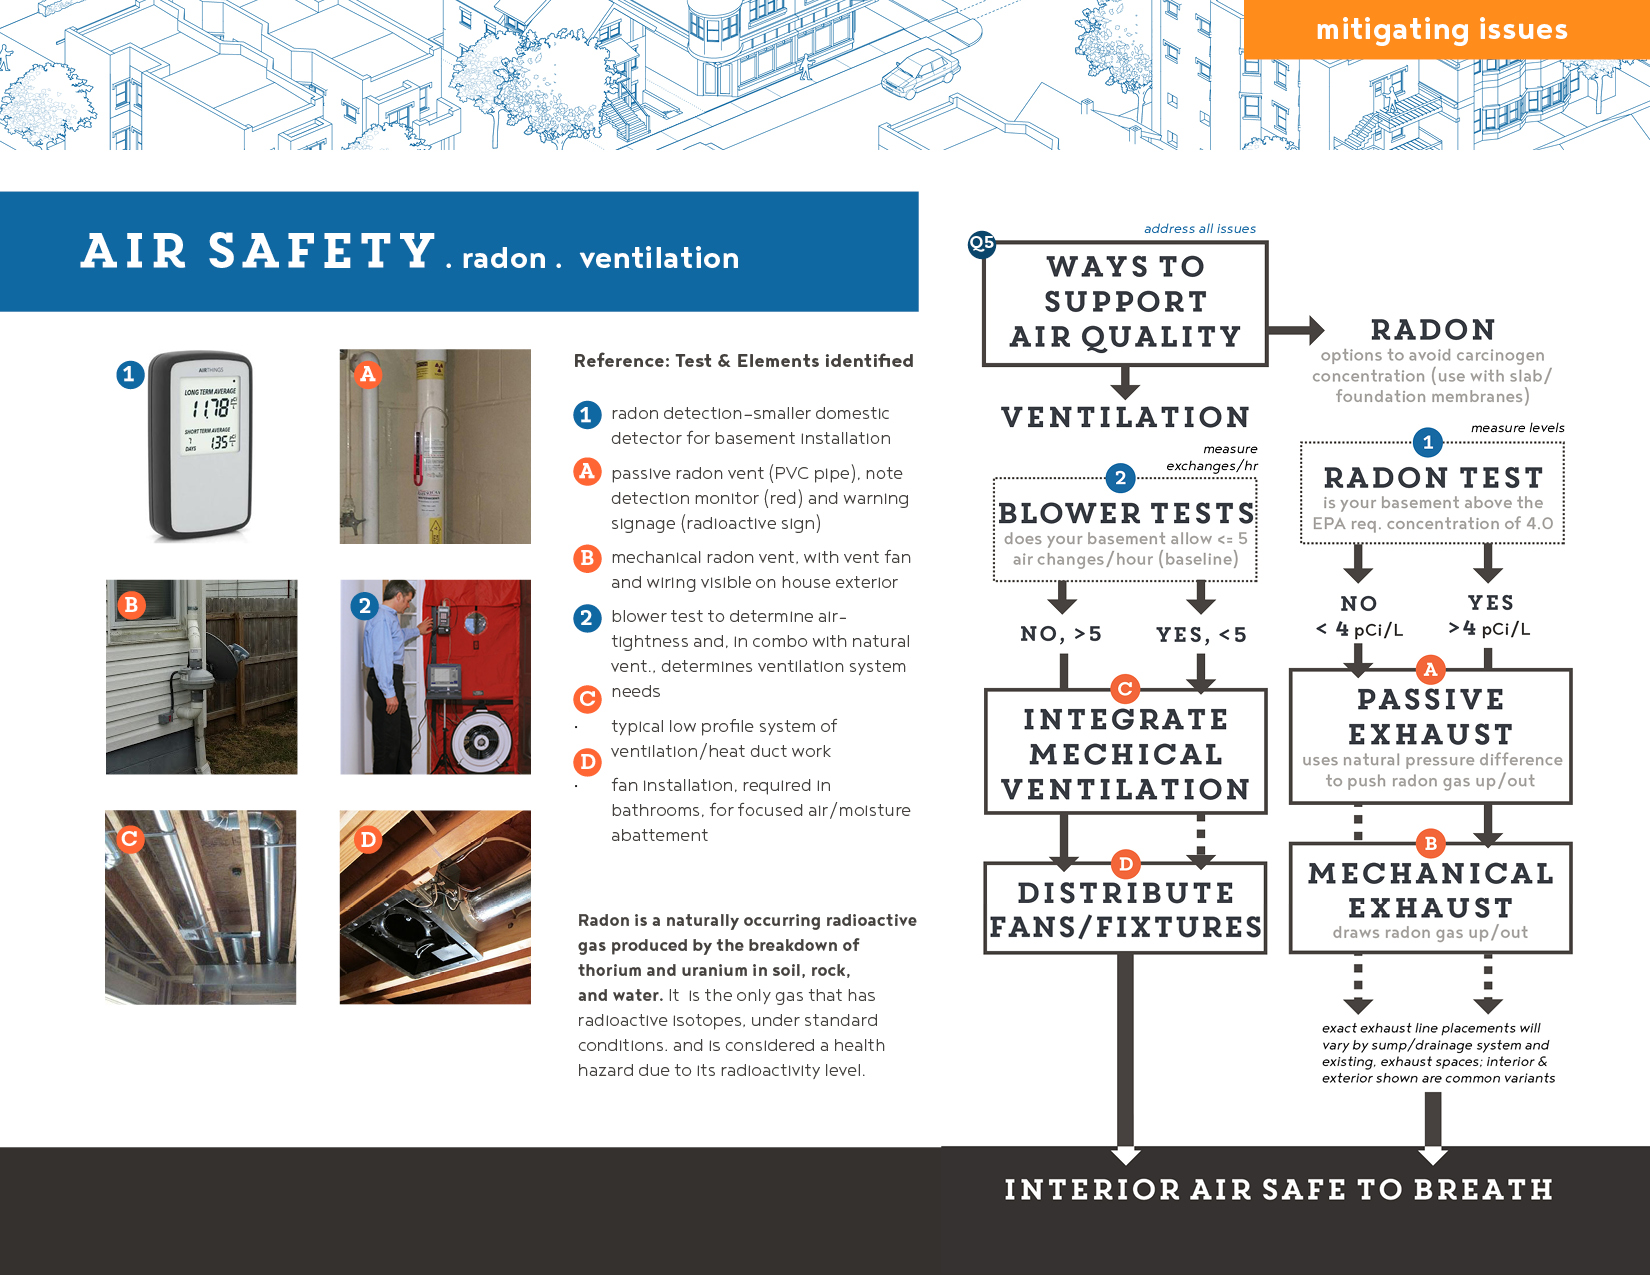
Your approach to interior air quality will be determined by 1) the natural rate of radon release in your area (geology and soils) and 2) the relative internal moisture condensation and air circulation of your basement.
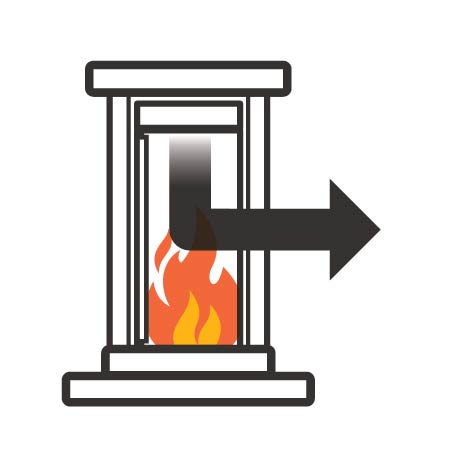
1. Radon Seepage: Radon comes from the breakdown of uranium in soil, rock and water and gets into the air you breathe (see EPA). It is the second highest cause of lung cancer, after smoking. There is no safe level of radon exposure. As basements are the lowest area of a house, with relative low air pressure (vs. soil and outdoors), they can act as a vacuum. Unsealed floor and wall cracks, uncovered sumps, and loose fitting drains allow radon to seep in and concentrate in the air. For this reason all renovations are required to add vapor-barriers and sub-slab exhaust for all basements. You should purchase a radon test, available at hardware stores, to determine the current radon level in your basement. If higher than 4 pCi/L, you must install a mechanical system (also encouraged for 2-4 pCi/L).
2. Air Circulation and Moisture: Basements tend to be naturally insulated and often have less ambient air change, leading to extra moisture, wall condensation, and mold growth. For existing buildings, a blower test is done to determine air tightness. A high powered fan pulls air out of the house, lowering the air pressure inside and an airflow manometer measures the rate of infiltration through the structure. Conservatively, if your design has minimal natural ventilation and new vapor barriers (for radon),you should integrate mechanical ventilation—with intake and exhaust fans—to achieve a minimum of .35 air changes per hour and stable air pressure. If you achieve 5+ air changes, you can combat moisture and mold by installing mechanical vents in baths (req.), kitchens, and still areas like closets. Dehumidifiers can help reduce residual moisture. Existing mold should be treated with antifungals in tandem with increased ventilation and dehumidification.
Expand the Air Safety / Quality slide to learn more about costs and additional building systems associated with each alternative approach
Air Safety / Quality
Active & Passive Radon Exhaust
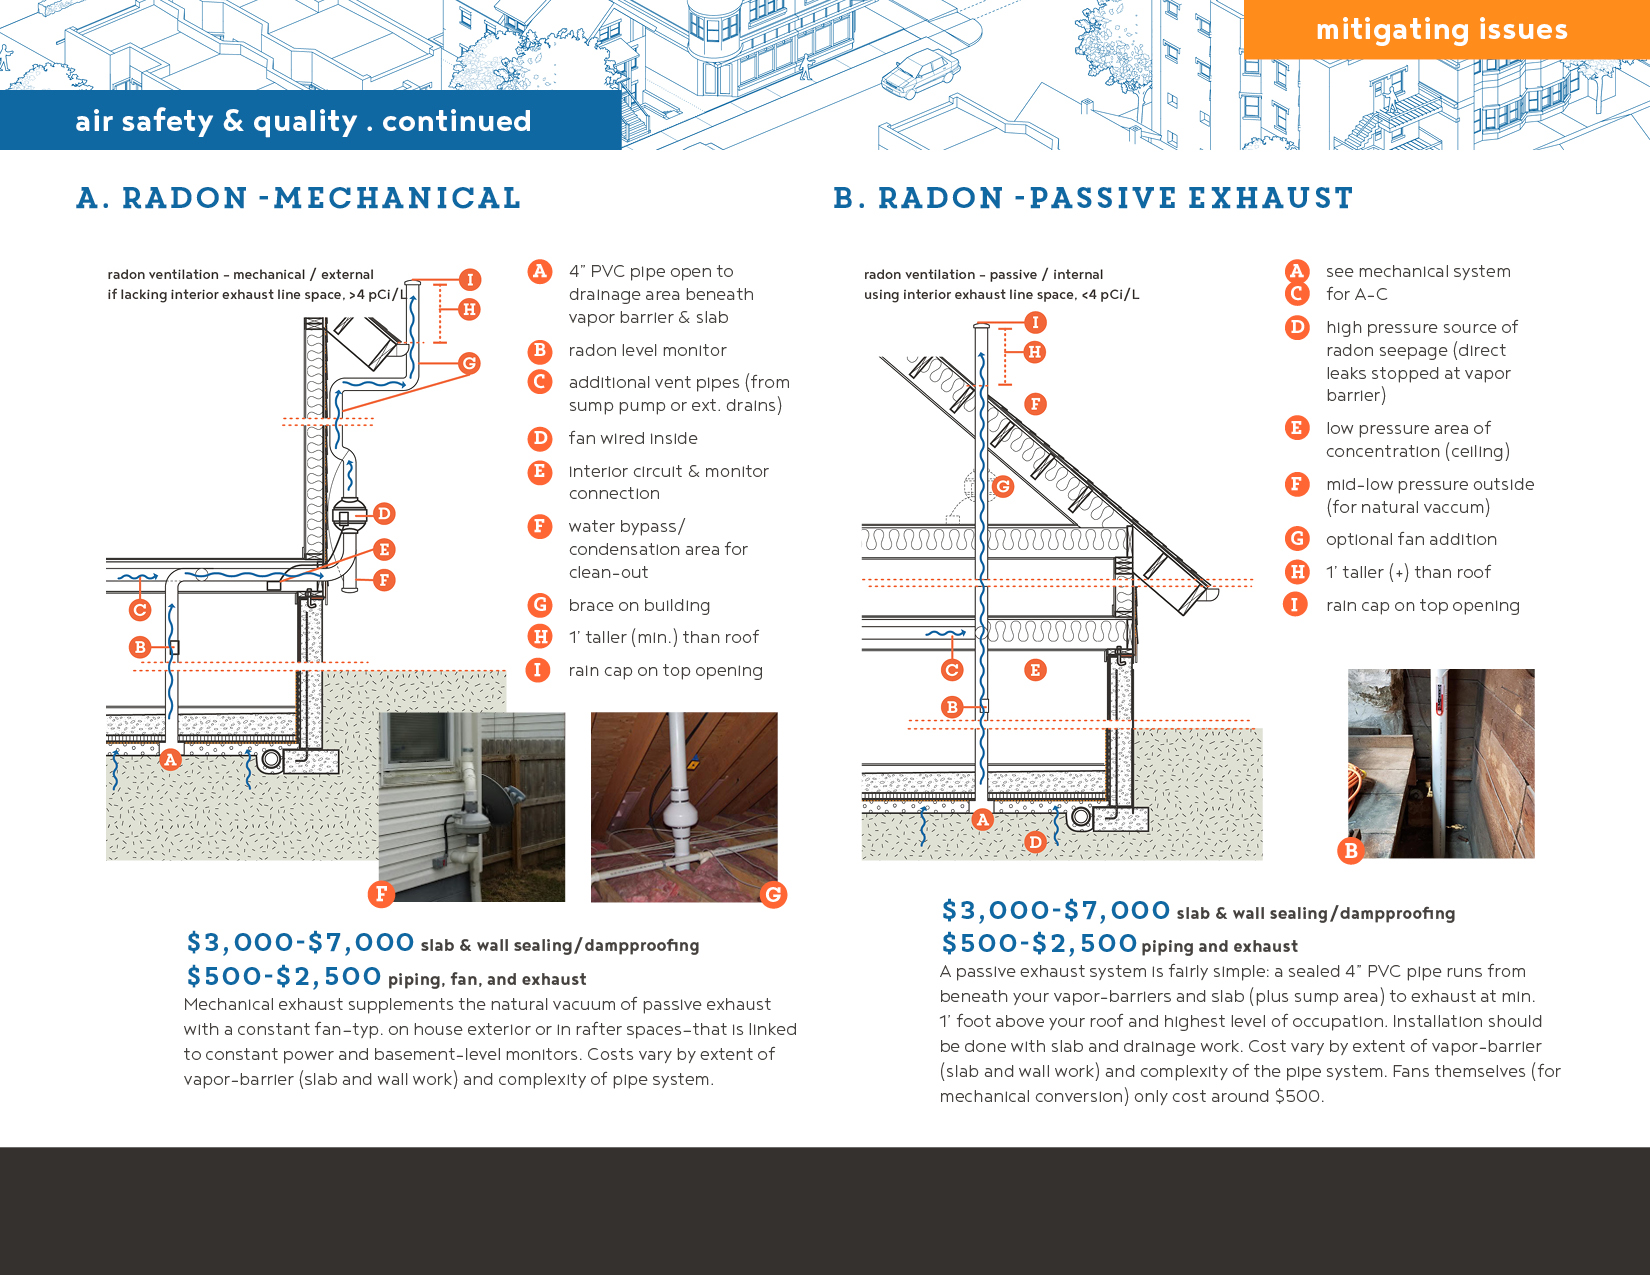
a. radon—mechanical exhaust
For high radon levels (4 pCi/L), mechanical radon exhaust systems use a fan to pull radon out of the sub-slab area (accelerating the process in B. below). Passive systems can be converted to active by adding fans.
This system supplements the natural vacuum of passive exhaust with a constant fan—typ. on house exterior or in rafter spaces—that is linked to power and basement-level monitors. Costs vary by extent of vapor-barrier (slab and wall work) and complexity of pipe system.
related construction required:
- coordinate placement with slab repair/replacement and
- vapor/moisture barriers for drainage systems
- all sump pumps should be air-tight to avoid radon leaks
costs
$3,000-$7,000 slab & wall sealing/dampproofing
$500-$2,500 piping, fan, and exhaust
b. radon—passive exhaust
For low radon levels (<4 pCi/L), the passive exhaust system relies on higher air pressure at the foundation to push radon toward low pressure areas in the environment above, where it can dissipate at the top of the exhaust pipe.
This system is fairly simple: a sealed 4” PVC pipe runs from beneath your vapor-barriers and slab (plus sump or ejector pump areas) to exhaust at min. 1’ foot above your roof and highest level of occupation. Installation should be done with slab and drainage work. Cost vary by extent of vapor-barrier (slab and wall work) and complexity of the pipe system. Fans themselves (for mechanical conversion) only cost around $500.
related construction required:
- see comments under ‘A. Radon—Mechanical Exhaust’
costs
$3,000-$7,000 slab & wall sealing/dampproofing
$500-$2,500 piping and exhaust
Air Safety / Quality
Central & Distributed ventilation systems
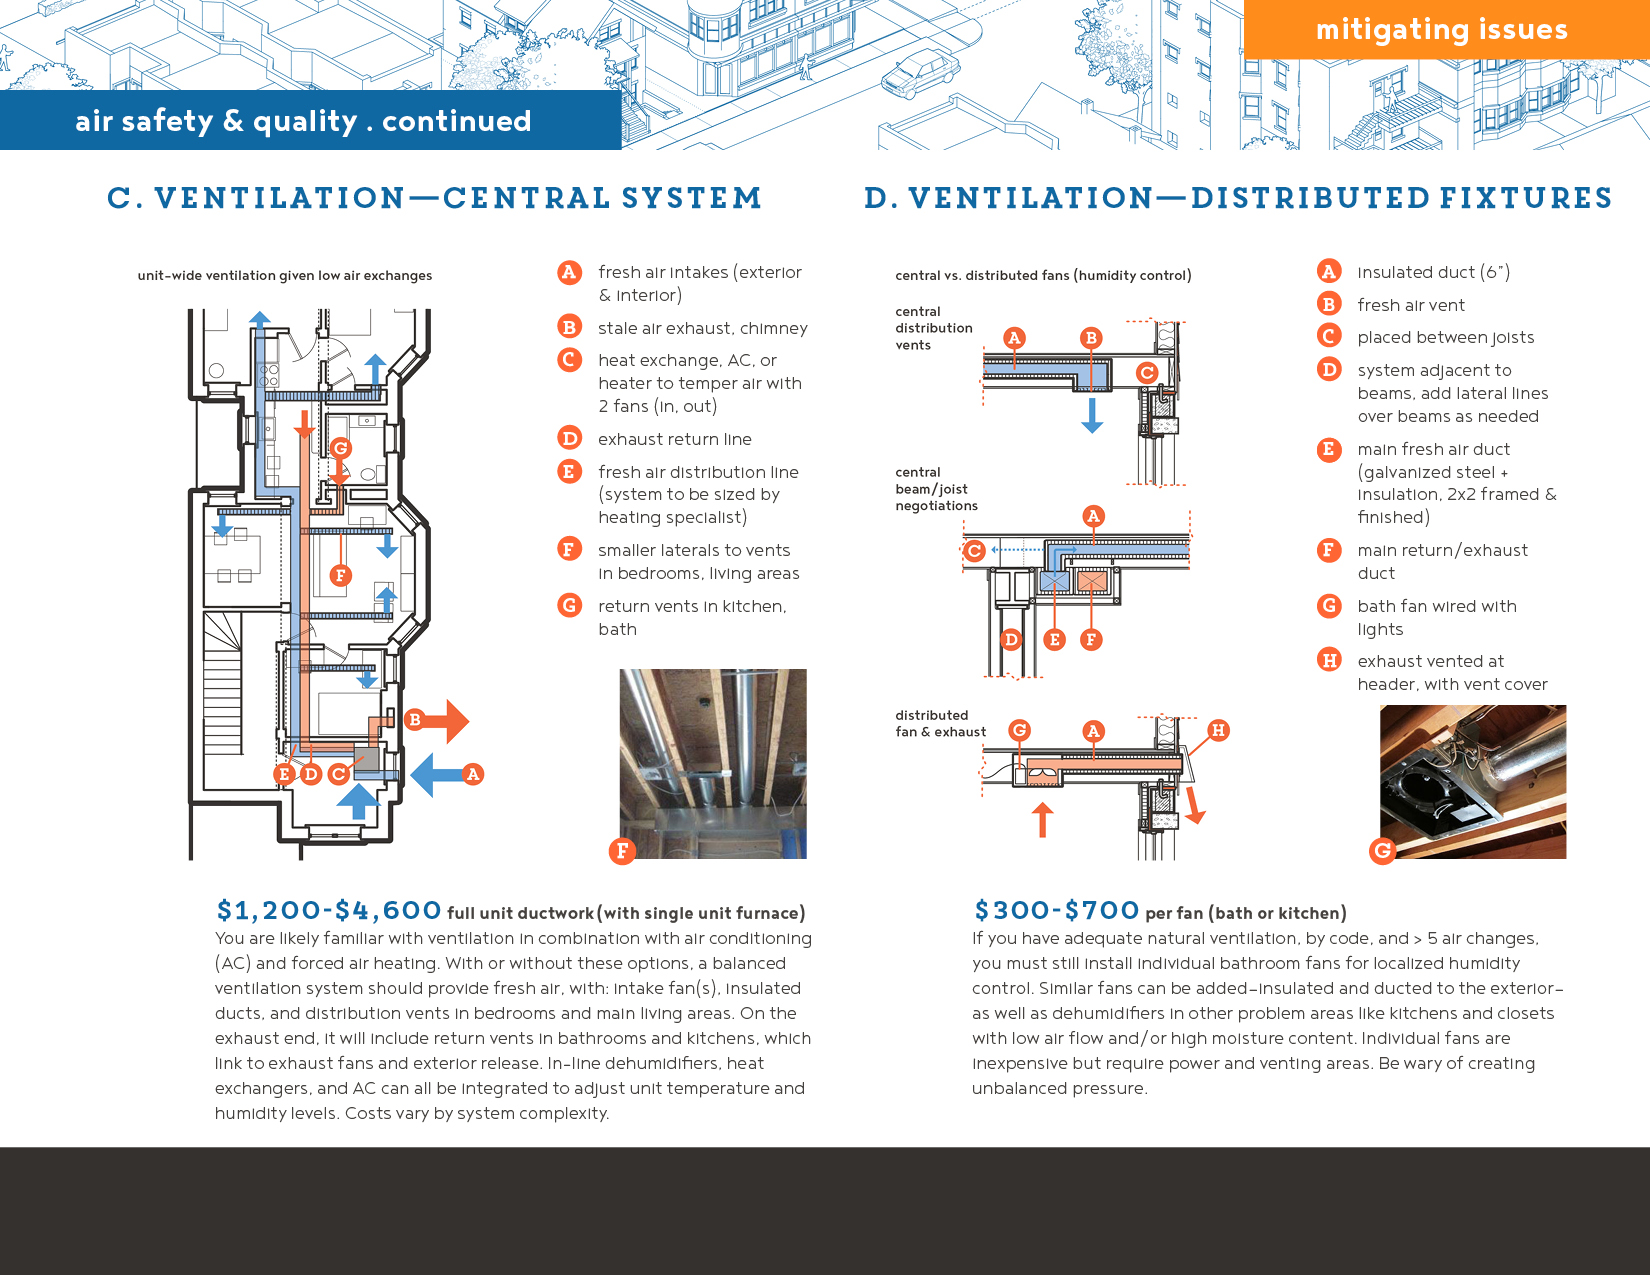
c. ventilation—central system
If lacking adequate natural ventilation (or having excessive air-tightness), basements are required to have mechanical ventilation. While it is common to find exhaust only and intake only (single direction fans) in older duct systems, those pressure imbalances can exacerbate radon issues. A system with dual fans (in and out) is recommended for balanced air circulation.
You are likely familiar with ventilation in combination with air conditioning (AC) and forced air heating. With or without these options, a balanced ventilation system should provide fresh air, with: intake fan(s), insulated ducts, and distribution vents in bedrooms and main living areas. On the exhaust end, it will include return vents in bathrooms and kitchens, which link to exhaust fans and exterior release. In-line dehumidifiers, heat exchangers, and AC can all be integrated to adjust unit temperature and humidity levels. Costs vary by system complexity.
related construction required:
- coordinate with MEP/heating additions and natural ventilation
- coordinate depth/duct design with joist and beam layouts
costs
$1200-4600 full unit ductwork (with single unit furnace)
d. ventilation—distributed
Even without central systems, wet rooms like bathrooms must have focused fans, to vent humidity and moisture to the exterior.Along with bathroom fans, for localized humidity control, fans can be added—insulated and ducted to the exterior—in other problem areas like kitchens and closets with low air flow and/or high moisture content. Individual fans are inexpensive but require power and venting areas. Be wary of creating unbalanced pressure.
related construction required:
- coordinate placement with plumbing (water/sewer shafts), fixtures, and joists
- coordinate with centralized ventilation as needed (exhaust)
costs
$300-$700 per fan (bath or kitchen)
plumbing connections:
Key Elements & Decisions
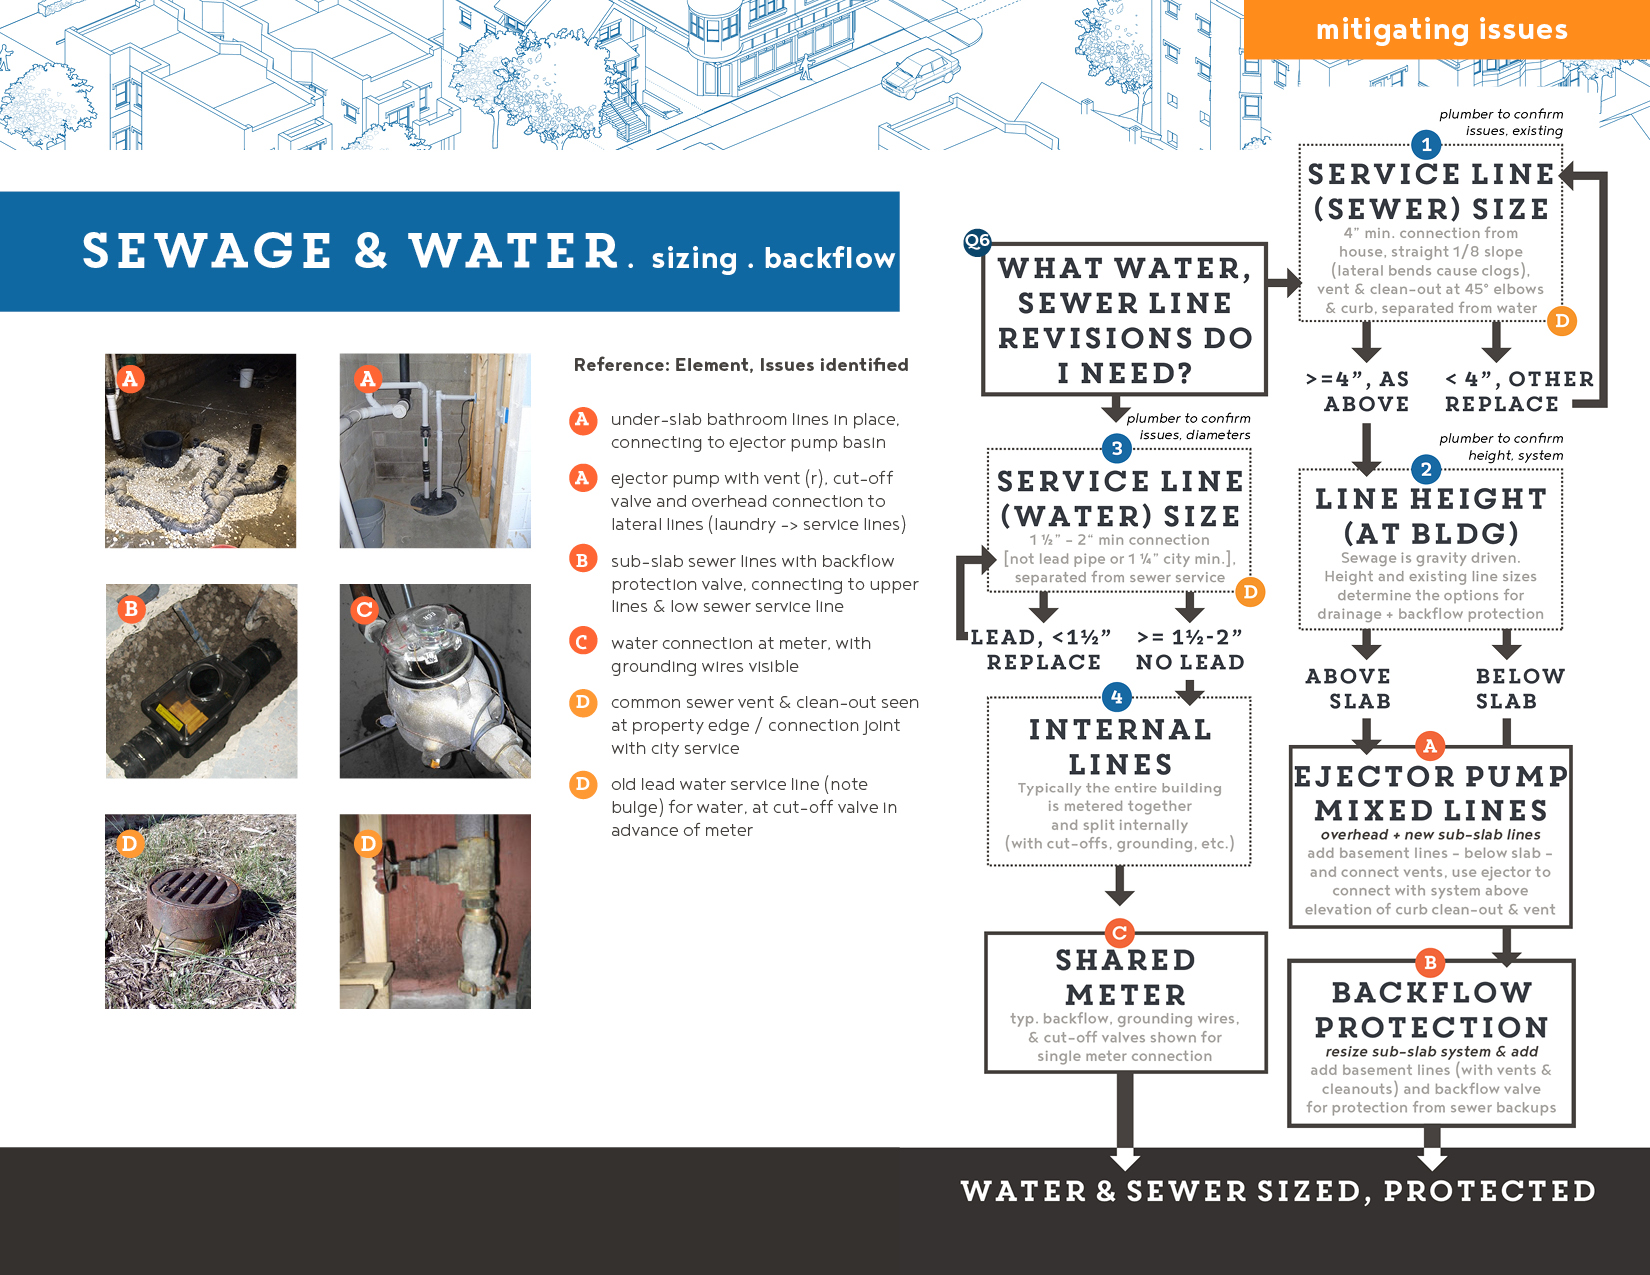
Your approach to sewer and water updates will be determined by 1) the size (volume) and condition of your service connections running from your building to city mains at the curb, 2) the elevation of your sewer service, as a system of gravity-based flows, and 3) your preference for separate or combined metering of units’ water.
1. Sewer connections (volume, slope, angle): Your plumber will advise on the needed size and slope of your sewer’s service connections based on anticipated fixtures and service line length. At minimum, you must have lines of 4” diameter (for multiple units), 1% slope, ideally lacking lateral bends, and with a clean-out and vent at the curb.
2. Sewer height (relative to slab and curb vent/clean-out): Your plumber should also advise on adding an ejector pump and/or backflow protection based on the elevation of your sewer connection. Any fixtures, drains, or connections that are beneath the elevation of your curb clean-out will require backflow protection (see drawings A and B for integration, next page).
3. Water connections (volume, flow/pressure, pipe materials): Your plumber will advise on the needed size for water service connections based on anticipated fixtures, overall elevation (highest fixture to raise water to), pipe materials’ friction, and overall plumbing system length. Sizes at left are from approx. calculations in 'Code Compliant Units’. Older buildings are also likely to have lead lines, which must be replaced.
4. Water meters (standard metering and line details): Meters can be added before or after lines are split for individual units and will depend on whether you want to separate and track tenant usage (with separate water heaters, in-unit washers, etc.).
Expand the Plumbing Connections slide to learn more about costs and additional building systems associated with each alternative approach
Plumbing Connections
High & Low Sewer Connections
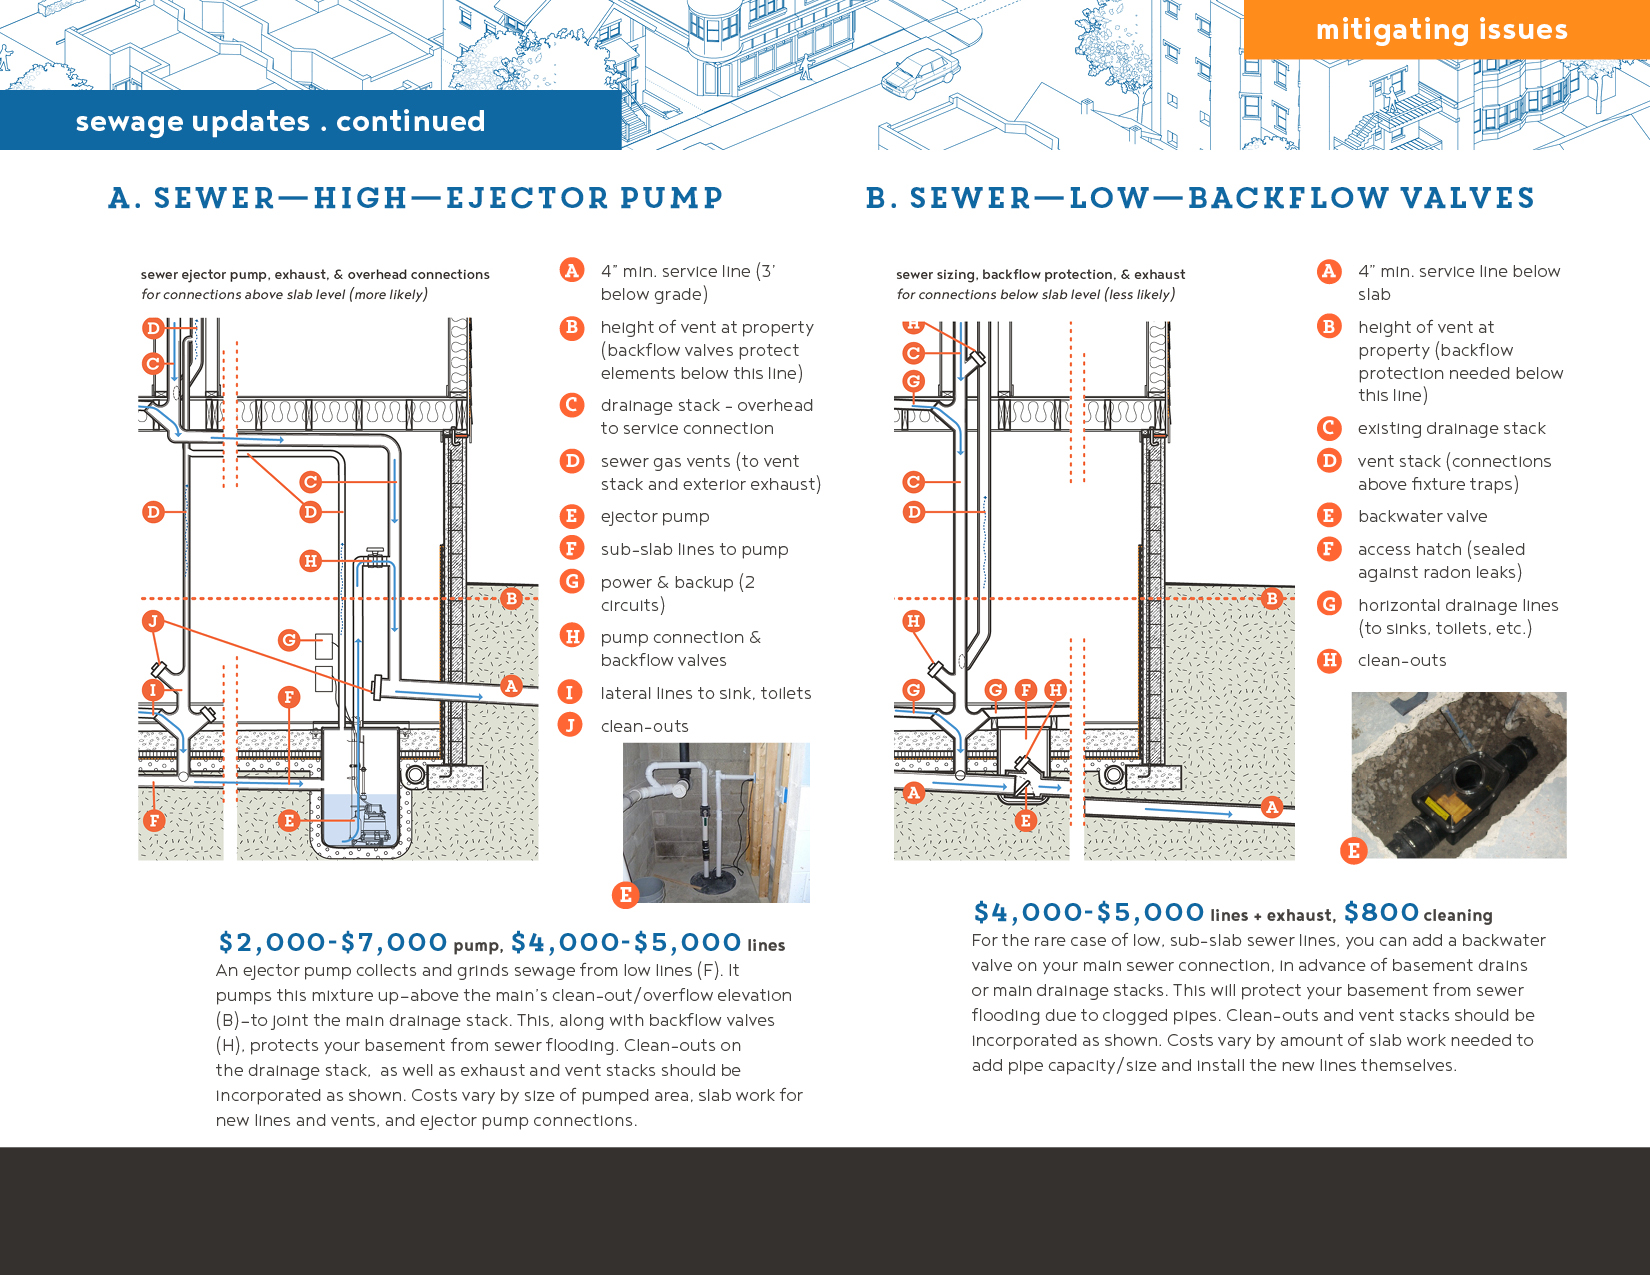
a. sewer -high—ejector pump
For all sewer updates, you may need to add larger pipes, as discussed in ‘Code Compliant Units,’ straighten service lines (D below) and add clean-outs to eliminate backups. If your sewer lines connect above the slab, you can add sub-slab drainage with an ejector pump. See drawings to coordinate elevation, venting, and backflow protection.
An ejector pump collects and grinds sewage from low lines (F). It pumps this mixture up—above the main’s clean-out/overflow elevation (B)—to joint the main drainage stack. This, along with backflow valves (H), protects your basement from sewer flooding. Clean-outs on the drainage stack, as well as exhaust and vent stacks should be incorporated as shown. Costs vary by size of pumped area, slab work for new lines and vents, and ejector pump connections.
related construction required:
- coordinate pump placement, new lines, and drainage slopes with existing vents, elevations, slab, and drainage work
- make sure water and sewer connections are separated (5’ min.)
costs
$2,000-$7,000 pump, $4,000-$5,000 lines, exhaust
b. sewer—low—lines + valves
See note in A on service connections. If your sewer lines connect below slab, you can revise pipe sizing for new fixtures and add backflow protection valves to prevent basement flooding (selectively patch slab).
The backwater valve is placed on your main sewer connection, in advance of basement drains or main drainage stacks. This will protect your basement from sewer flooding due to clogged pipes. Clean-outs and vent stacks should be incorporated as shown. Costs vary by amount of slab work needed to add pipe capacity/size and install the new lines themselves.
related construction required:
- see comments on A above and D below
costs
$4,000-$5,000 lines + exhaust additions, $800 cleaning

Plumbing Connections
Water & Curb Connections
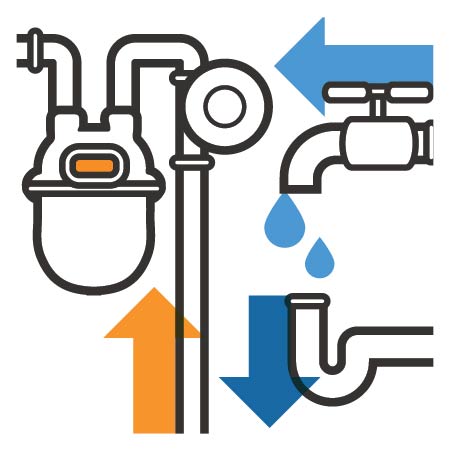
c. water connections
Most likely you will need to replace/enlarge old lead service connections for adequate water flow/pressure (install system filters to be safe). It is your choice how to split units’ water (separate or single meter) as long as you have required cut-off values and backflow protection.
At minimum, you should install a new service connection sized for adequate water flow and pressure, given the addition of bath and kitchen fixtures. Older houses are often not metered in Chicago, so you can anticipate adding at least one meter on your grounded service line, with cut-off valves and backflow protection both before and after the meter. Costs vary by size of system and number of meters.
related construction required:
- coordinate connections to avoid sewer lines and foundation drainage infrastructure
- make sure to incorporate MEP/water-heating decisions in overall line layouts
costs
$1,700-$5,000 water lines $1,000-$4,000 per meter
d. property/curb connections
This reference highlights the cut-offs and vents required on service lines at the property edge, connecting to water and sewer mains. New service connections are expensive but commonly required for single family homes, given their smaller starting water and sewer capacity. See rough sizing calcs in 'Code Compliant Units'. In addition water and sewer should be in separated trenches, each with straight, appropriately-sloped lines with appropriate cut-offs, vents/clean-outs, and traps at fixtures to avoid sewage clogs and sewage gas backflow.
related construction required:
- in areas with combined sewage & storm water systems (cso), hard site drainage should send water to the sewer main.
costs
$15,000-$21,000 per new service connection
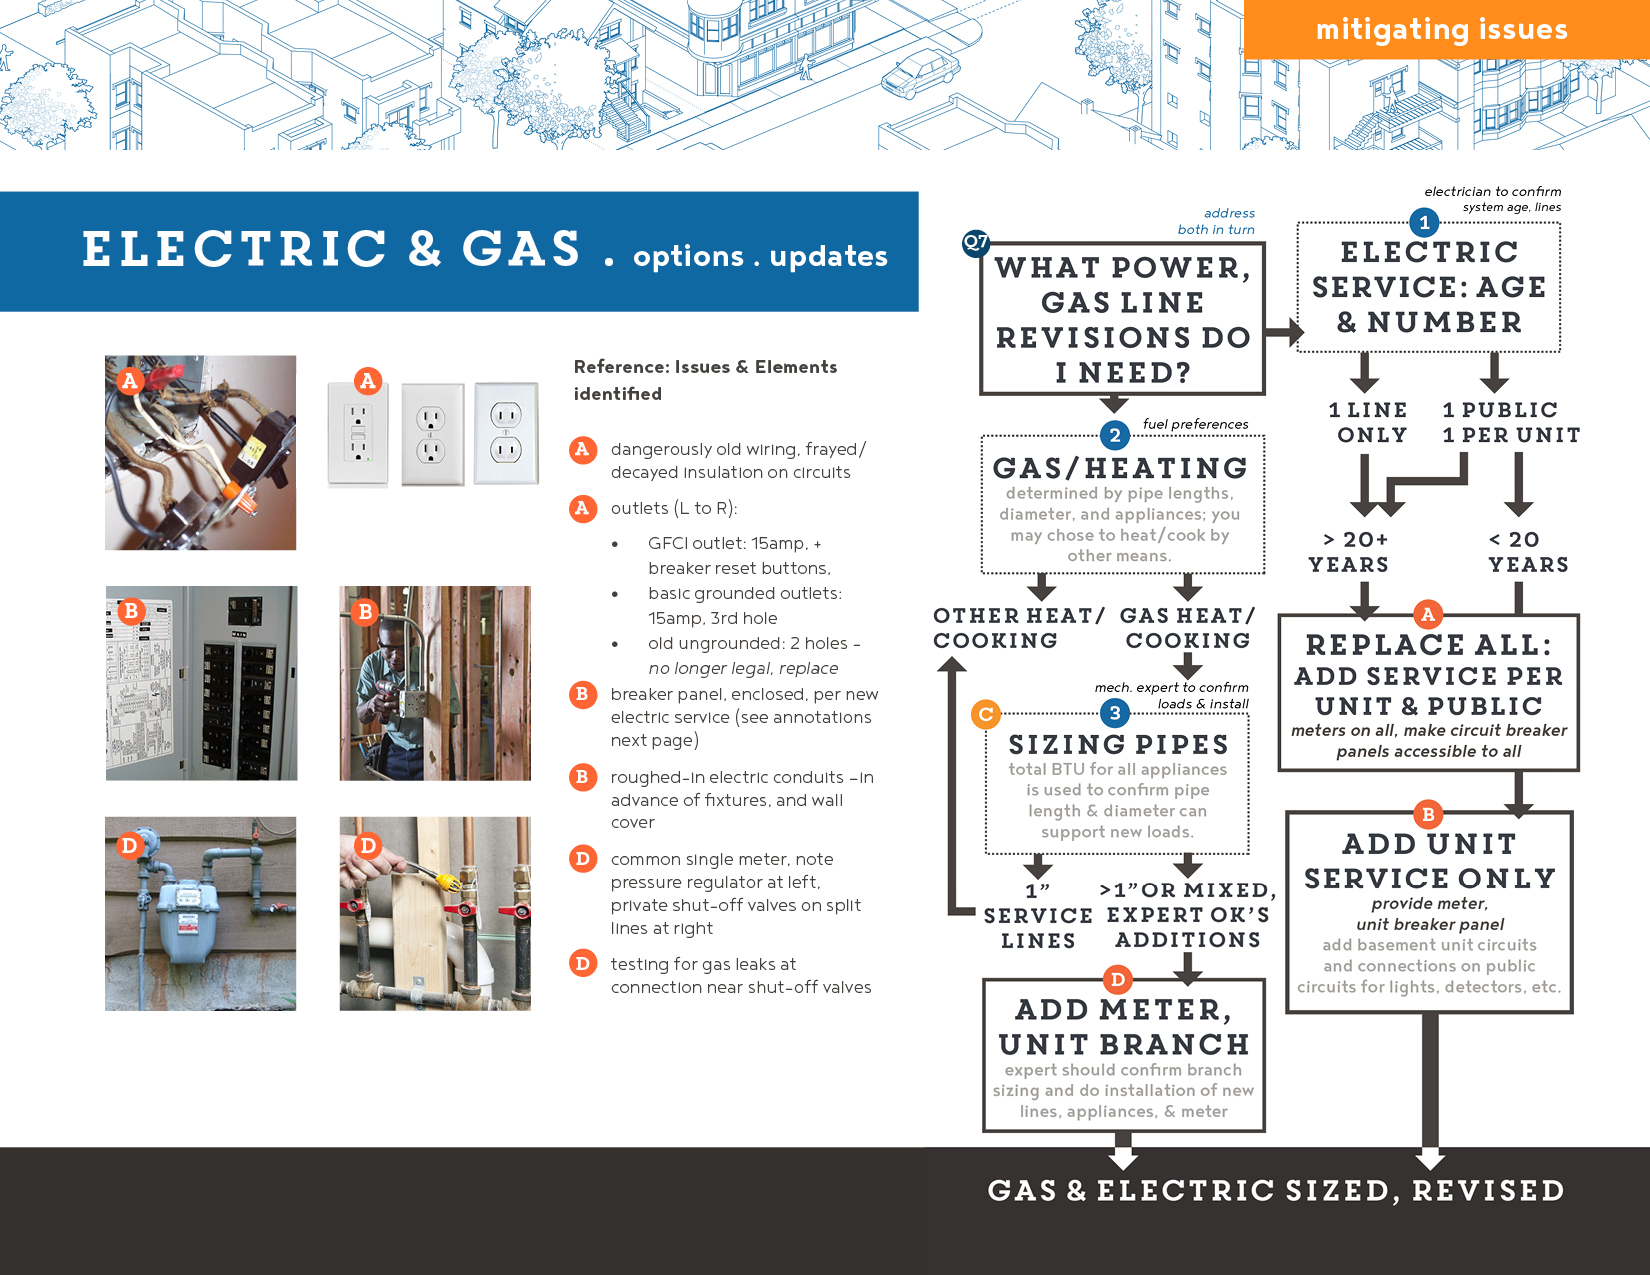
Gas & electric connections:
Key Elements & Decisions
Your approach to electric and gas updates will be determined by 1) the age of wiring and the number of current electric services, and 2-3) the size and loading on your gas line. Because cooking and heating can be done with electricity, there’s no immediate code reason to update a smaller external gas line, which is adequate for single family use, but not split, multi-unit service.
1. Number & Age of Electric Service connections:
- Number: Your building should have separate, metered electric service per each unit and common or public metered service for hallways, utility rooms, exterior lights, and the circuits powering smoke detectors and pumps. This allows each service to be shutoff (at the breaker box) for work and repairs. It’s typical to have 100 to 200-amp and 120/240 volt circuits per service connection. Units with electric heat and electric appliances (instead of gas) may require up to 300-amp. Your electrician will calculate loads.
- Age: Because electric insulation decays over time and energy demands are higher than in the past, you should replace electric circuits every 20 years to avoid overloading wires (with electronics, air conditioning). In general, it costs less to add new wiring (per unit) than to trace, test, and replace specific deficiencies.
2. Fuel Preferences: Given environmental preferences, you may not be considering gas additions. In terms of costs, it can make sense to add electric appliances if you wish to avoid adding a meter or updating the gas company’s external line.
3. Capacity/Size of Service Lines: Adding a meter and a new branch line for gas appliances can be inexpensive, as a unit may only need a single range connection (often 1/2” line). The following page unpacks the estimate from 'Code Compliant Units', so you can calculate your needs. A heating and ventilation professional should estimate your building’s gas usage, confirm service line size and capacity. In general, single family homes are more likely to have small service pipes, which may be inadequate for multiple units and new appliances.
Expand the Gas & Electric Connections slide to learn more about costs and additional building systems associated with each alternative approach
Electric Connections
All New Service vs. one new line
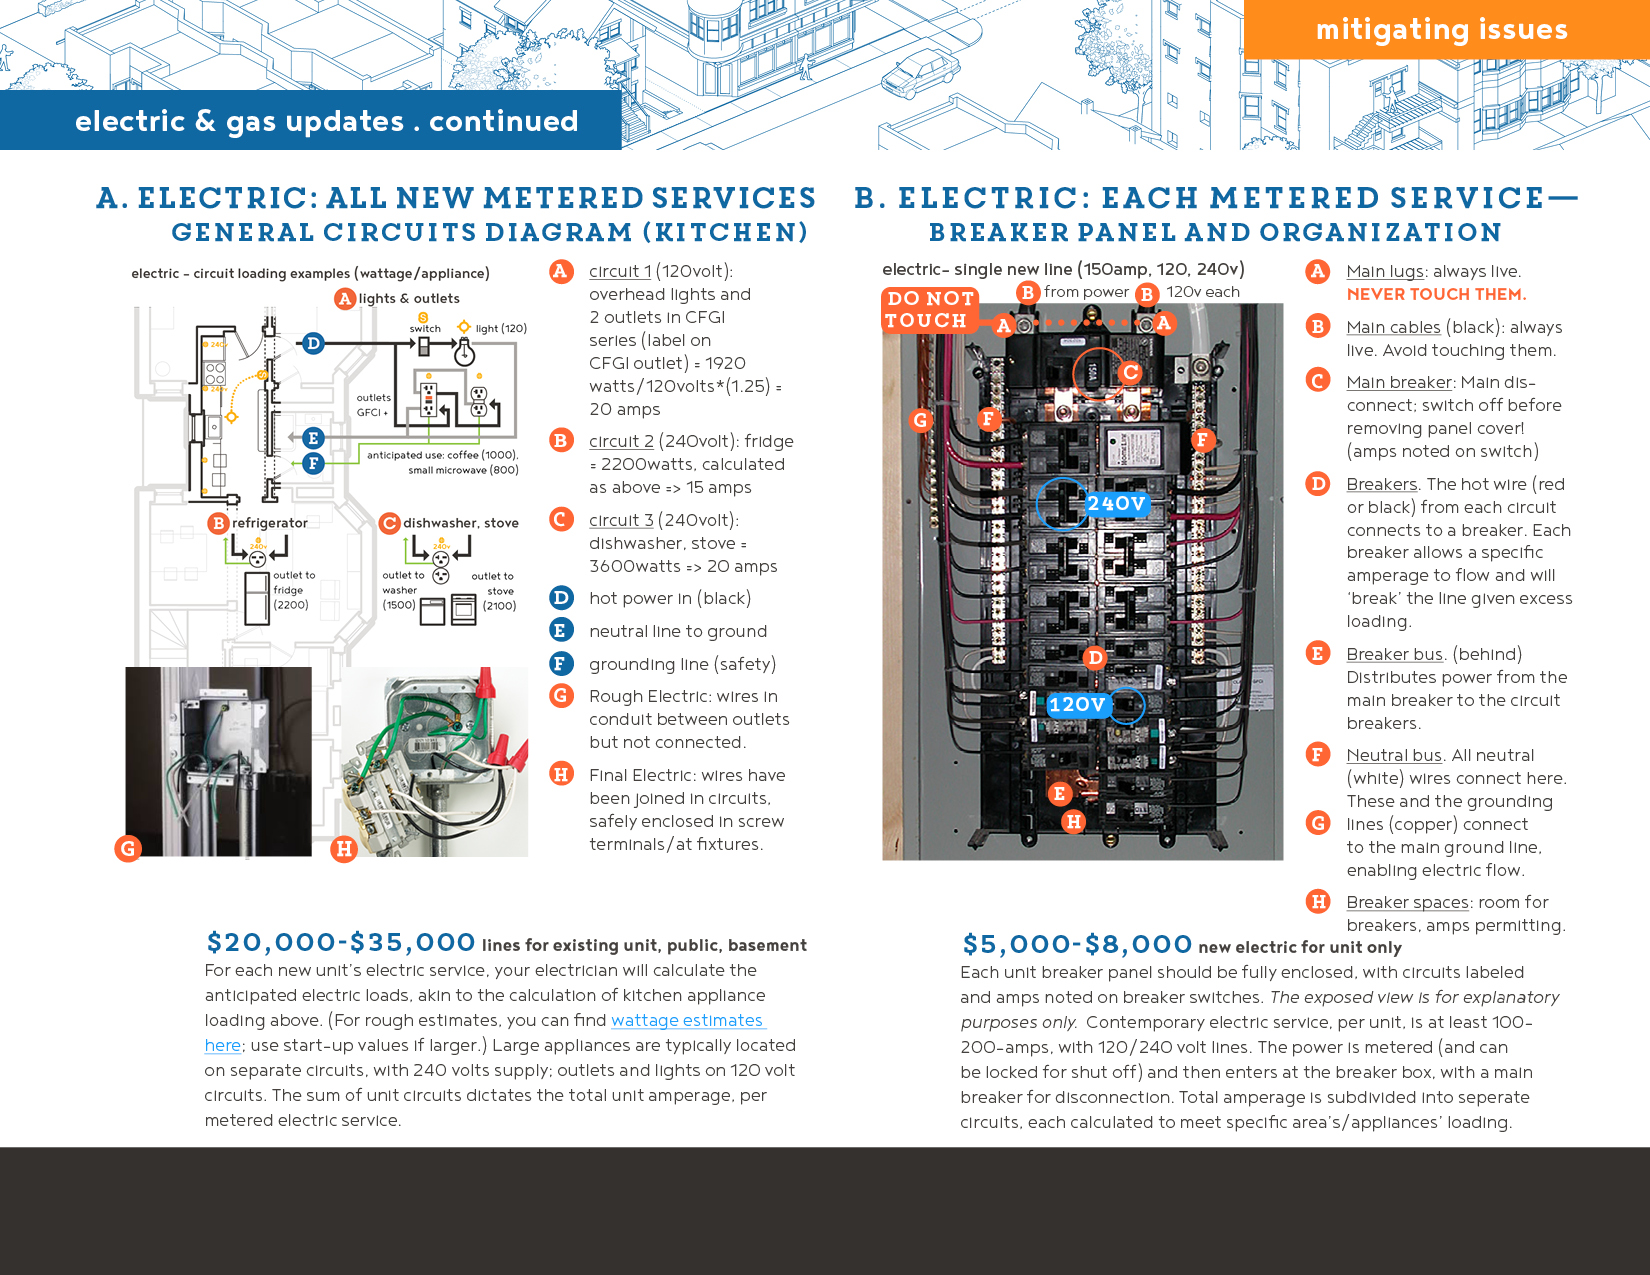
a. electric: all new metered services
Graphic explains circuits structure and current flow, from source to ground (akin to water + sewer). Photos show rough & finished electric installations. For electric,tenants must have access to their breaker panels and public area panels. For whole house replacements, you will need to patch ceilings and walls within your existing unit(s).
For each new unit’s electric service, your electrician will calculate the anticipated electric loads, akin to the calculation of kitchen appliance loading right. (For rough estimates, you can find wattage estimates here; use start-up values if larger.) Large appliances are typically located on separate circuits, with 240 volts supply; outlets and lights on 120 volt circuits. The sum of unit circuits dictates the total unit amperage, per metered electric service.
related construction required:
- coordinate additional public circuits to a) enable safe backup power to sump pumps, ejector pumps, and radon fans; b) enable the hardwiring of required smoke detectors in units and common areas; and c) provide adequate exterior lighting
- your electrician should determine required amperage per metered service, particularly if using electric heating, air conditioning, and cooking appliances
costs
$20,000-$35,000 lines for existing unit, public, basement
b. electric: single new service
Graphic unpacks breaker panel, so you can follow organization of installed circuits per each unit.
Each unit breaker panel should be fully enclosed, with circuits labeled and amps noted on breaker switches. The exposed view is for explanatory purposes only. Contemporary electric service, per unit, is at least 100-200-amps, with 120/240 volt lines. The power is metered (and can be locked for shut off) and then enters at the breaker box, with a main breaker for disconnection. Total amperage is subdivided into seperate circuits, each calculated to meet specific area’s/appliances’ loading.
related construction required:
- see public circuit note in ‘A. Electric: All New Lines’
- same unit amperage calculation applies as above
costs
$5,000-$8,000 new electric for unit only
Gas Connections
Estimating loads & sizing
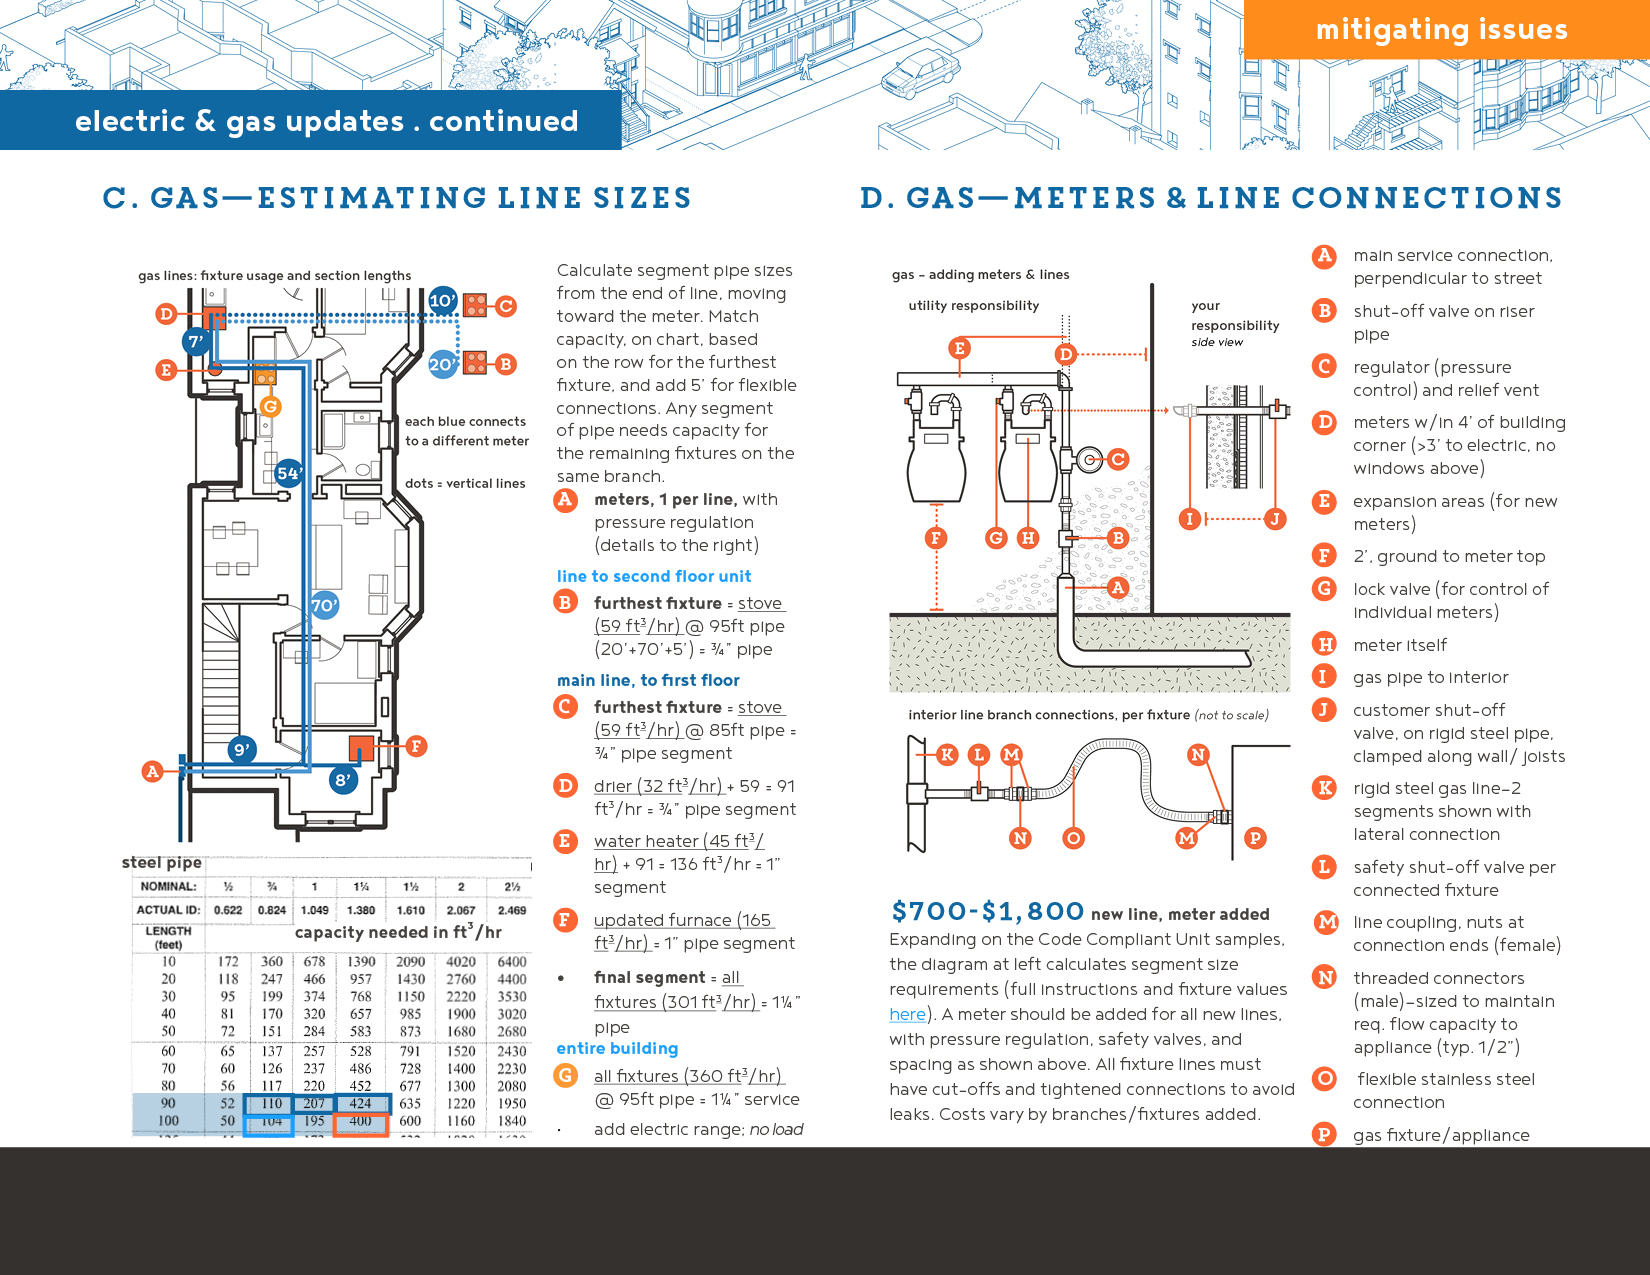
c. gas: estimating line sizes
A rough estimate of current and potential gas pipe sizing is possible, as shown in ‘Code Compliance Units’. This schematic guidance should be supplemented by professional calculations.
Calculate segment pipe sizes from the end of line, moving toward the meter. Match capacity, on chart, based on the row for the furthest fixture, and add 5’ for flexible connections. Any segment of pipe needs capacity for the remaining fixtures on the same branch.
Enlarge image for example numbers
D. gas: branch line & meter
Gas lines are relatively easy to alter and adapt, akin to water piping. Updates (and system shut-offs) by your heating and ventilation specialist should be timed to minimize redundancy and maximize safety.
Expanding on the Code Compliant Unit samples, the diagram at right calculates segment size requirements (full instructions and fixture values here). A meter should be added for all new lines, with pressure regulation, safety valves, and spacing as shown above. All fixture lines must have cut-offs and tightened connections to avoid leaks. Costs vary by branches/fixtures added.
related construction required:
- Gas lines are small, so they are unlikely to impact height or finishing profiles. See tables under C. for length/flow relation
- Coordinate updates with surrounding construction.
costs
$700-$1,800 new unit line, meter added

New Opening & Egress:
Key Elements & Decisions
Your addition of new exits and window openings will be determined by code and 1) the vertical space and lateral offsets limiting window and wells dimensions as well as 2) placement of 80” tall doors and egress areaways, landings, and steps. As multi-units must have two exits per floor, single family conversions 3) need a rear fire-escape for upper floor travel paths.
1. Light & Windows—height and lateral space for wells: Your architect will advise on the available wall and lot space required to meet code requirements for light. Given foundation loading, it often makes more sense to dig window wells, if you have the space, than to have larger horizontal spanning lintels. The area of openings, on building sides, will be limited by allowed open areas according to fire code.
2. Egress Doors—floor height and clear passage/step limits As with windows, your architect will advise on placement and elevation in coordination with structure and thermal envelope, as well as aligning with areaways/landings, exterior drains, and clear passage/step requirements. Entry and exit areaways within a property’s off-sets will require an administrative adjustment for zoning.
3. Egress areaways—offsets, landings, and step requirements: Your architect will advise on exit areaways and/or landing locations as determined by site-offsets and the coordination between stair parameters, elevation to ascend, and exterior drainage systems. For thermal and structural reasons, stairs or a porch roof should be built over new areaways, in addition to insulating exterior walls. The overhead protection creates a microclimate which collects heat escaping from the building. This keeps the area around the foundation and old footers (no longer insulated by soil) from experiencing frost heave and thus limits foundation movement, cracks, and structural damage.
4. Egress upper level—porches:Your architect will advise on placement of new porches, typ. aligning stair paths to reach/enlarge windows to doors and bridge from building structure to pier/footings aligned with planned retention and drainage systems. Your overall placement will be limited by rear-offset and open space requirements.
Expand the Openings & Egress slide to learn more about costs and additional building systems associated with each alternative approach
Openings
Window Wells, Doors, & Areaways
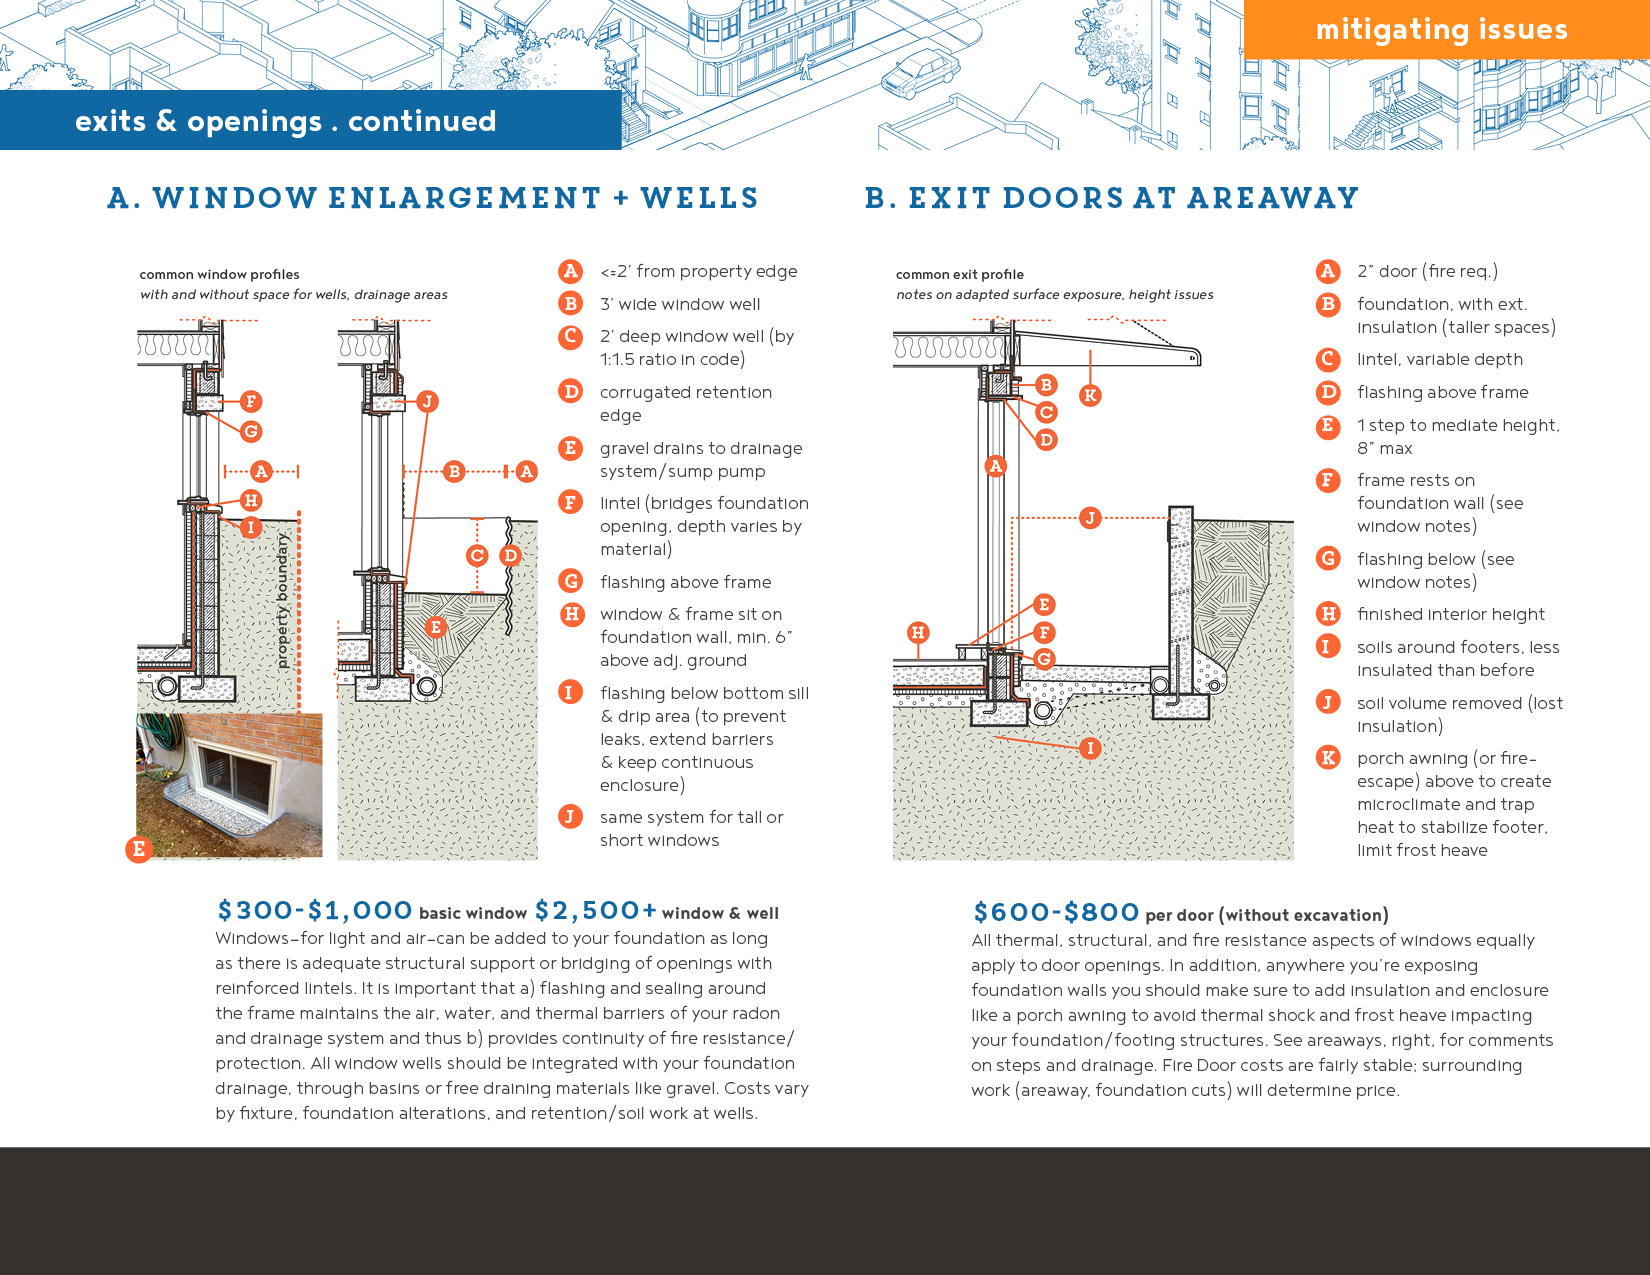
a. window additions (+ wells)
Based on site area, you may be able to add window wells and taller windows to meet your light & air requirements. If not, you can add shorter windows (within structural reason, as advised by your architect).
Windows—for light and air—can be added to your foundation as long as there is adequate structural support or bridging of openings with reinforced lintels. It is important that a) flashing and sealing around the frame maintains the air, water, and thermal barriers of your radon and drainage system and thus b) provides continuity of fire resistance/protection. All window wells should be integrated with your foundation drainage, through basins or free draining materials like gravel. Costs vary by fixture, foundation alterations, and retention/soil work at wells.
related construction required:
- coordinate flashing and sealing of frames to continue vapor barriers & thermal envelope req. for drainage & radon protection
- coordinate well drainage with foundation drainage
- coordinate lintels/height with any sill/anchoring work
- coordinate area with fire code (3-15’ offsets = 15-45% openings with fire-resistant materials)
costs
$300-$1,000 basic window $2500+ egress window & well
b. exit doors at areaway
Direct exits help satisfy fire code (two exits per floor) and their structure is fairly simple. Key element to coordinate is matching elevation/height with existing sills (top) and areaway drainage (bottom).
All thermal, structural, and fire resistance aspects of windows equally apply to door openings. In addition, anywhere you’re exposing foundation walls you should make sure to add insulation and enclosure like a porch awning to avoid thermal shock and frost heave impacting your foundation/footing structures. See areaways, below, for comments on steps and drainage. Fire door costs are fairly stable; surrounding work (areaway, foundation cuts) will determine price.
related construction required:
- see all the remarks under ‘A. window additions’
- a single step, under 8” high, is allowed on interior side of exit—use to increase height and avoid flooding (if areaway drains fail)
- coordinate with ‘C. landings, areaways, stairs’ (below)
- add roof for thermal protection if lacking ‘D. fire-escape’ (below)
costs
$600-$800 per door (without excavation)
Egresss
Areaway Stairs & Fire Escapes
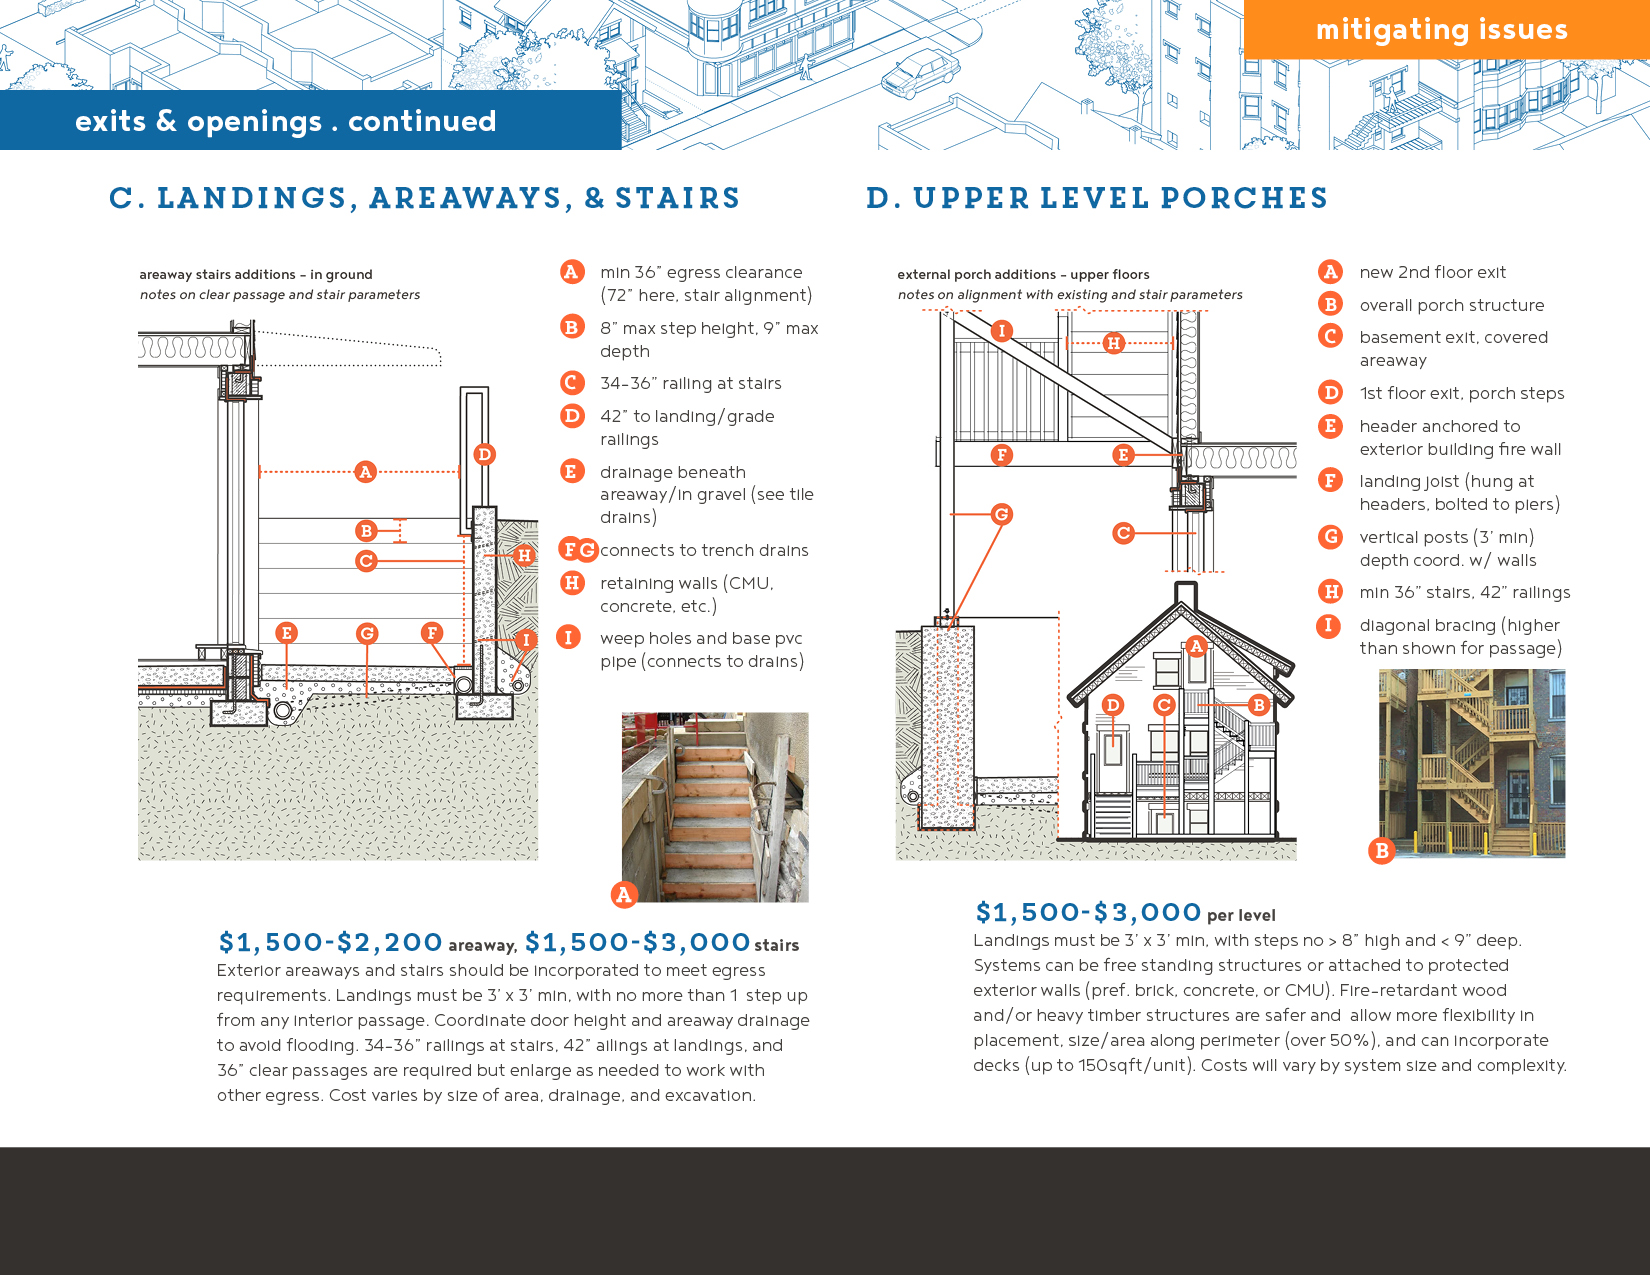
c. landings, areaways, stairs
A second exterior stair/areaway addition is common for Cottage conversions, as it eliminates the need for an interior stair and hallway. These areaways and stairs should be incorporated to meet egress requirements. Landings must be 3’ x 3’ min, with no more than one step up from any interior passage. Coordinate door height and areaway drainage to avoid flooding. 34-36” railings at stairs, 42” ailings at landings, and 36” clear passages are required but enlarge as needed to work with other egress. Cost varies by size of area, drainage, and excavation.
related construction required:
- coordinate retention walls and drains with drainage
- coordinate placement with new doors and existing walkways
costs
$1,500-$2,200 per area way, $1,500-$3,000 stairs
d. upper level fire-escapes
A porch addition is common for single family conversions, as code requires two exits per floor (no matter the associated unit). Landings must be 3’ x 3’ min, with steps no > 8” high and < 9” deep. Systems can be free standing structures or attached to protected exterior walls (pref. brick, concrete, or CMU). Fire-retardant wood and/or heavy timber structures are safer and allow more flexibility in placement, size/area along perimeter (over 50%), and can incorporate decks (up to 150sqft/unit). Costs will vary by system size and complexity.
related construction required:
- coordinate structure with building frame, existing porches/stairs
- coordinate foundations with other site walls and drainage
costs
$1,500-$3,000 per level
Finishing:
Key Elements & Decisions
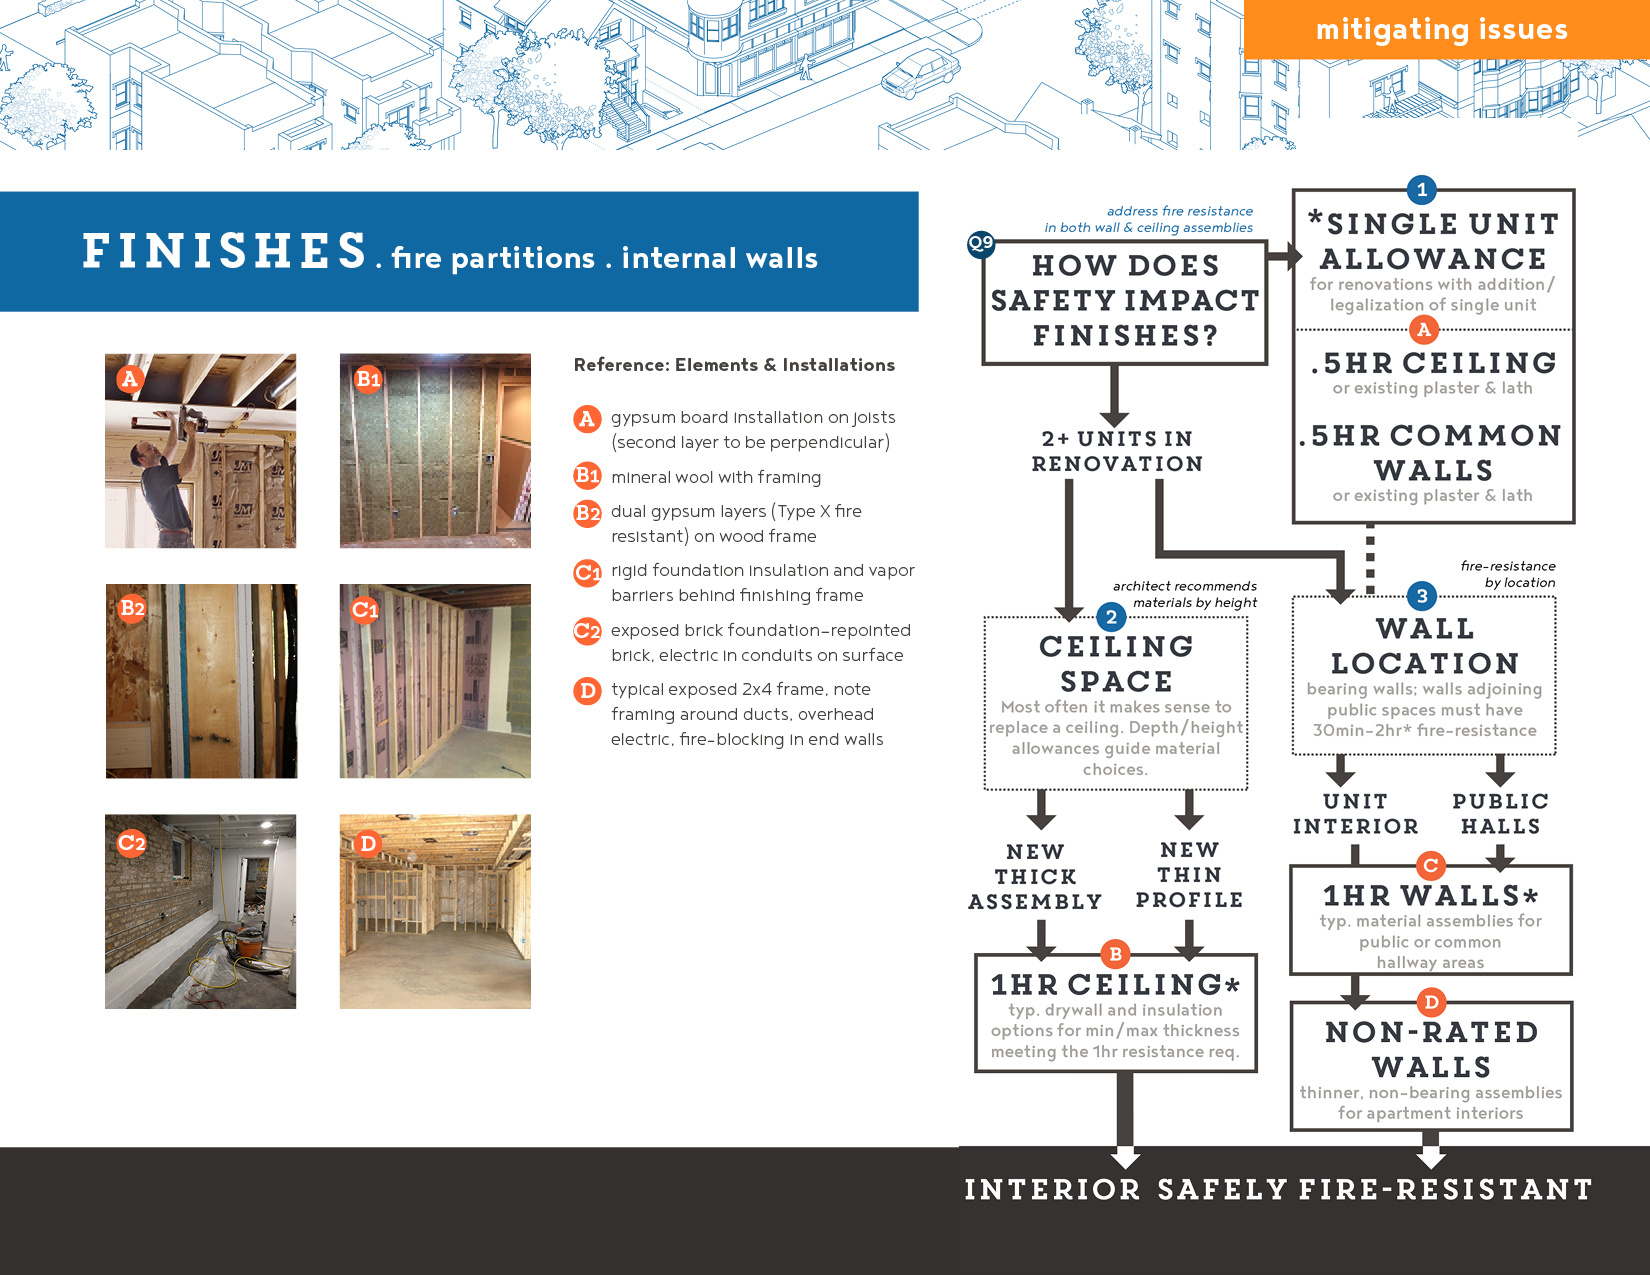
Your basement unit will incorporate common wall assemblies (see details), with location and foundation material dictating the degree of fire-resistance necessary (0-2hr). Those burn-time requirements necessitate different materials/thicknesses for framing, drywall, insulation, and treatment of openings. Understanding those differences and your overall room count can help you estimate finishing costs.
1. *Renovations with a Single Unit Addition-.5hr partitions: For renovations that add (or legalize) a single unit, ceiling and common wall burn time are reduced to 30 minutes or, if original surfaces are present, the existing resistance of plaster and lath walls/ceilings. (14R-3-309.1) Additional units result in all areas (ceiling, common walls) reverting to 1hr fire-resistances of 2 and 3 below. For the unit’s interior walls see D.
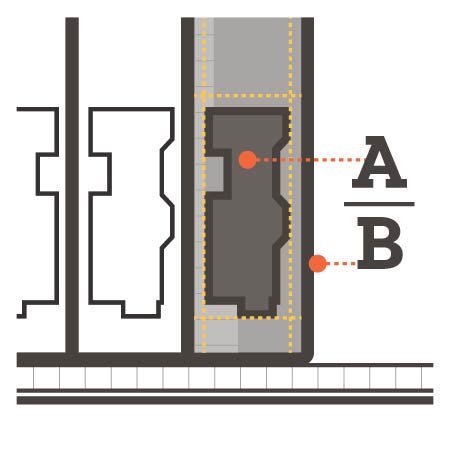
2. Ceiling—1hr fire partition*: Your architect will advise on your specific ceiling assembly, given ductwork and height requirements. Typical new and archaic assemblies are shown with ductwork. Diagram shows where resistance is measured from when estimating burn-times.
3. Common Area Walls—1hr fire partition*: As with the ceiling, your architect will advise on specific assemblies. Drawing shows typical frame walls of different thickness—5 ½” to 4”—that take advantage of fire-resistant gypsum, mineral insulation, and pressure-treated, fire retardant wood.
D. Interior Unit Walls—non-rated:Your architect will advise on specific room assemblies, as interior unit walls do not have req. resistance. Exposed framing is shown so you are familiar with basic wall structure.
Expand the Finishing slide to learn more about costs and additional building systems associated with each alternative approach
Finishing
Ceiling & Interior Fire Paritions
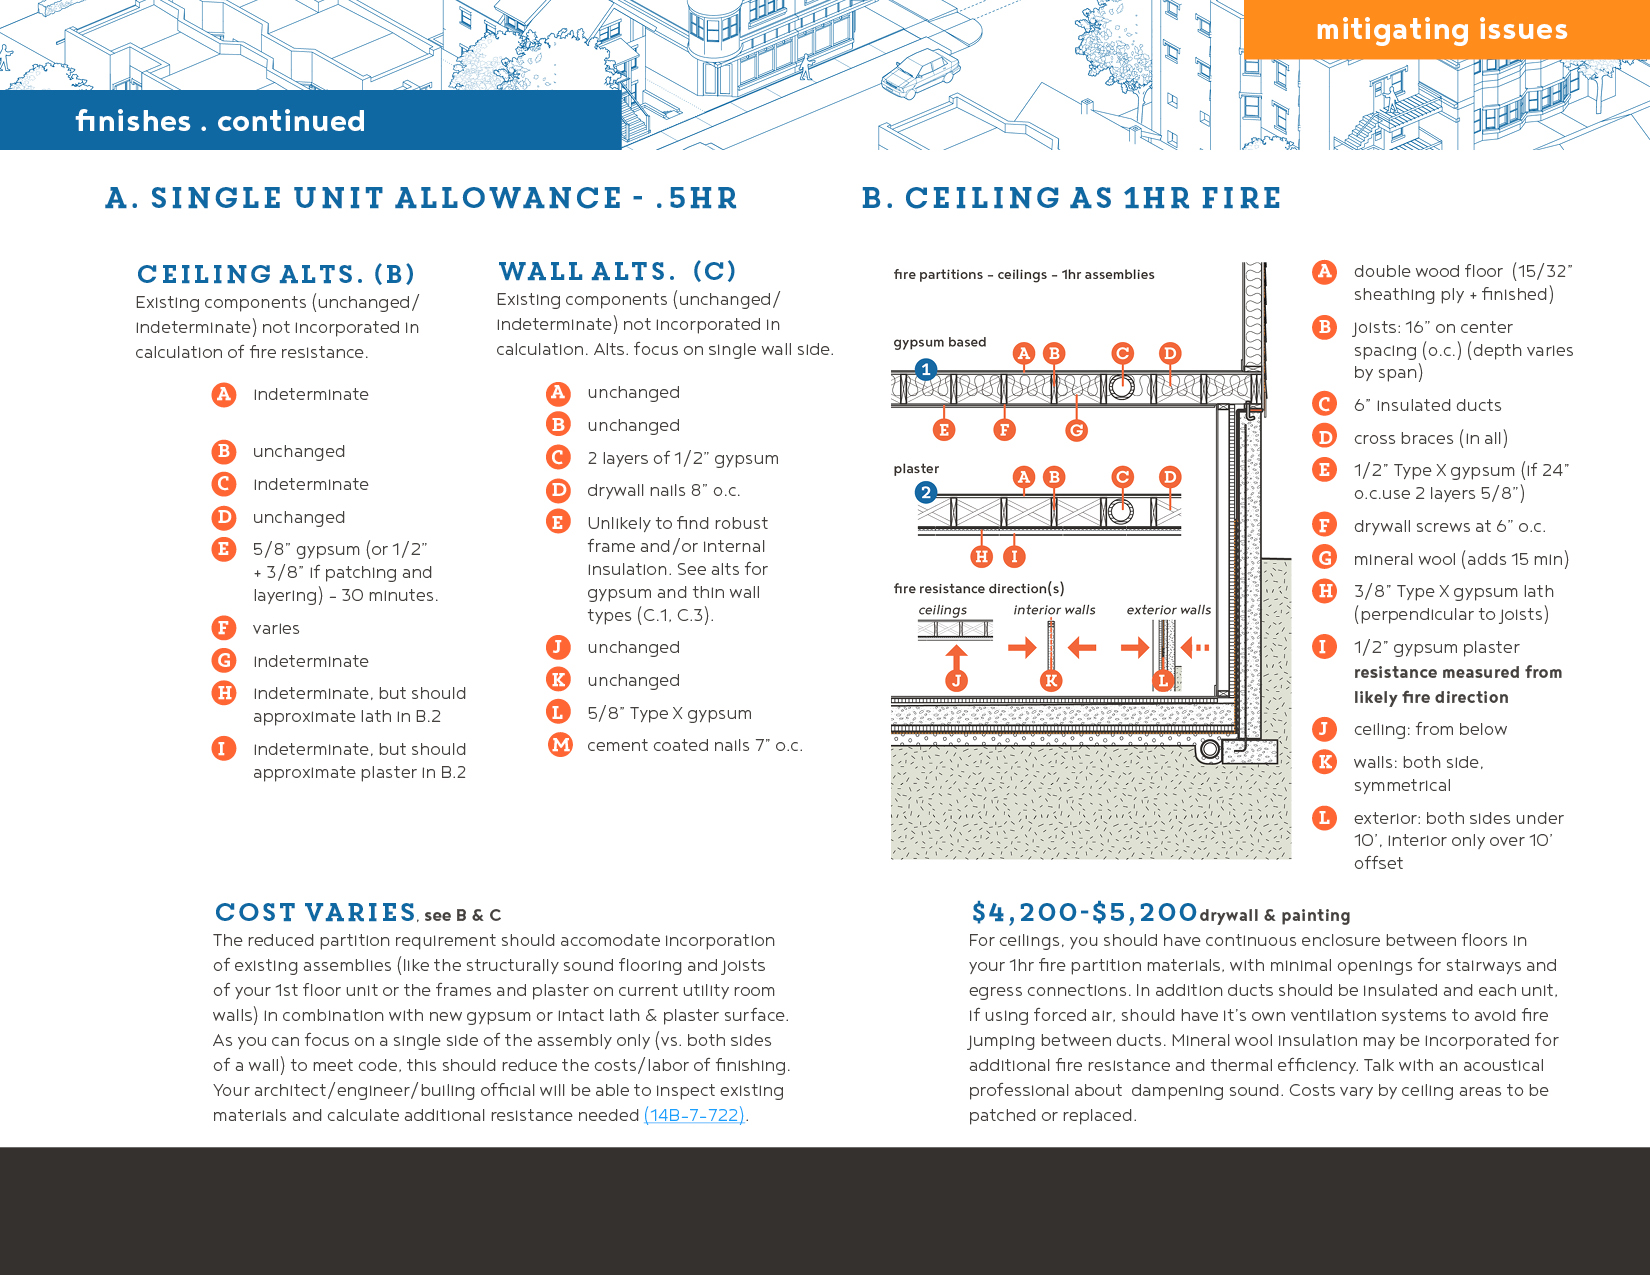
a. *single unit allowance - .5hr
Single unit additions, when renovating a building, are premitted to reuse intact plaster and lath or use new 30 minute partitions on ceilings and common walls. The annotations list alternate materials/thicknesses relative to profiles in B and C.
The reduced partition requirement should accomodate incorporation of existing assemblies (like the structurally sound flooring and joists of your first floor unit or the frames and plaster on current utility room walls) in combination with new gypsum or intact lath & plaster surface. As you can focus on a single side of the assembly only (vs. both sides of a wall) to meet code, this should reduce the costs/labor of finishing. Your architect/engineer/builing official will be able to inspect existing materials and calculate additional resistance needed (14B-7-722).
related construction required:
- see notes on coordination in details B and C.
costs
cost varies, see B & C
b. ceiling as 1hr fire partition*
All new ceilings (for two + units) should be 1hr fire-resistant assemblies to keep fire from climbing up the structure. More generally, elements like fire stops (in D. non-rated walls), blocking between joists (at top plate connections) and mineral insulation enclose and cellularize air-space within the wall, so the frame does not act as an open chimney.
For ceilings, you should have continuous enclosure between floors in your 1hr fire partition materials, with minimal openings for stairways and egress connections. In addition ducts should be insulated and each unit, if using forced air, should have it’s own ventilation systems to avoid fire jumping between ducts. Mineral wool insulation may be incorporated for additional fire resistance and thermal efficiency. Talk with an acoustical professional about dampening sound. Costs vary by ceiling areas to be patched or replaced.
related construction required:
- coordinate with electric, ventilation, overhead plumbing, and all joist/beam repairs
costs
$4,200-$5,200 drywall & painting
$6,000-$11,000 partition walls for entire unit
Finishing
Wall & Frame Elements
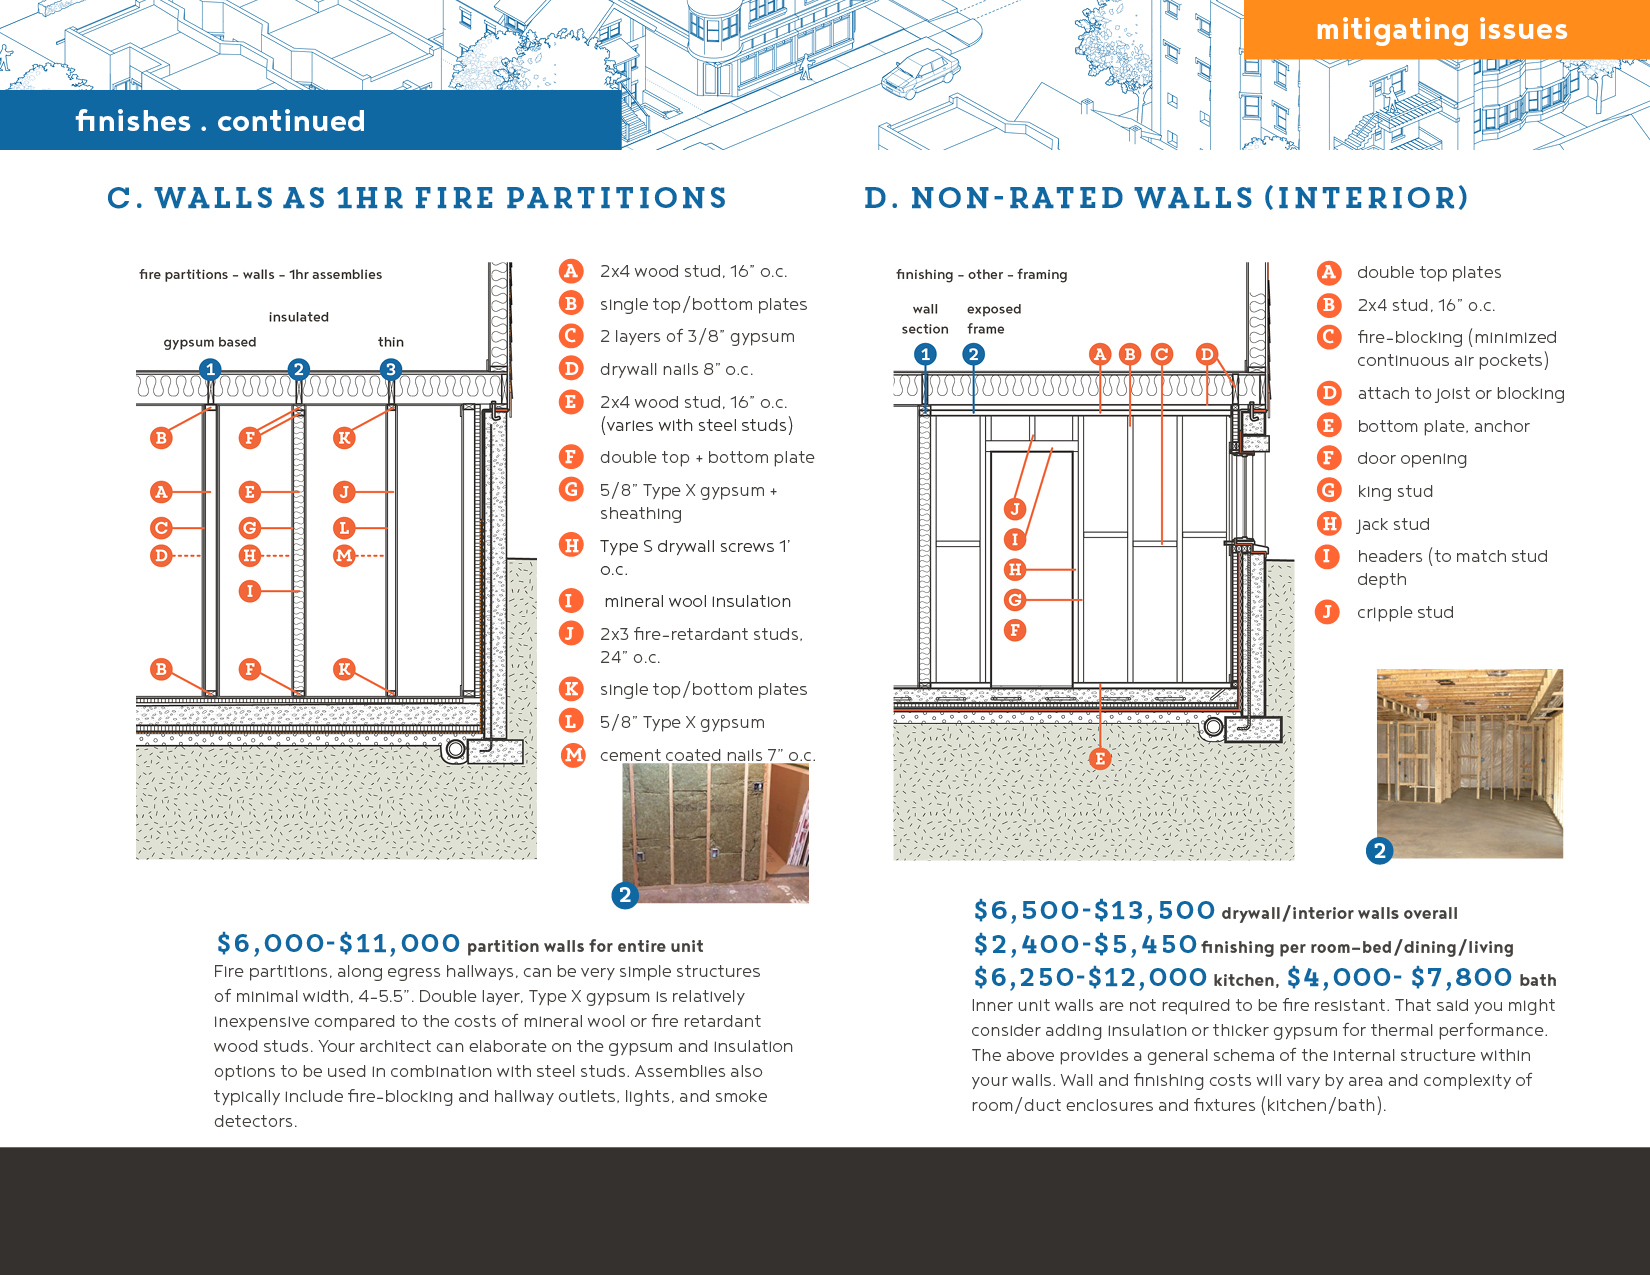
c. walls as 1hr fire partition*
New walls (for two + units) between common areas and units must be 1hr assemblies, in order to protect passage along fire egress routes. Measured from either side, these assemblies can be symmetrical, as shown, or mix equivalent 1hr drywall, panel, and attachment assemblies.
Fire partitions, along egress hallways, can be very simple structures of minimal width, 4-5.5”. Double layer, Type X gypsum is relatively inexpensive compared to the costs of mineral wool or fire retardant wood studs. Your architect can elaborate on the gypsum and insulation options to be used in combination with steel studs. Assemblies also typically include fire-blocking and hallway outlets, lights, and smoke detectors.
related construction required:
- coordinate with any in-wall plumbing, electric, or vents.
- partition placement overall should be coordinated between egress route reqs., openings, and unit size reqs.
costs
$6,000-$11,000 partition walls for entire unit
d. non-rated walls (interior)
Interior unit walls, if not bearing weight, do not have resistance requirements. That said you might consider adding insulation or thicker gypsum for thermal performance. Drawing of frame is to show overall elements & structure within your walls. Wall and finishing costs will vary by area and complexity of room/duct enclosures and fixtures (kitchen/bath).
related construction required:
- coordinate thickness with plumbing, electric, and vent needs.
- coordinate layout/openings with room size and egress needs.
costs
$6,500-$13,500 drywall/interior walls overall
$2,400-$5,450 finishing per room—bed/dining/living
$6,250-$12,000 kitchen, $4,000-$7,800 bath
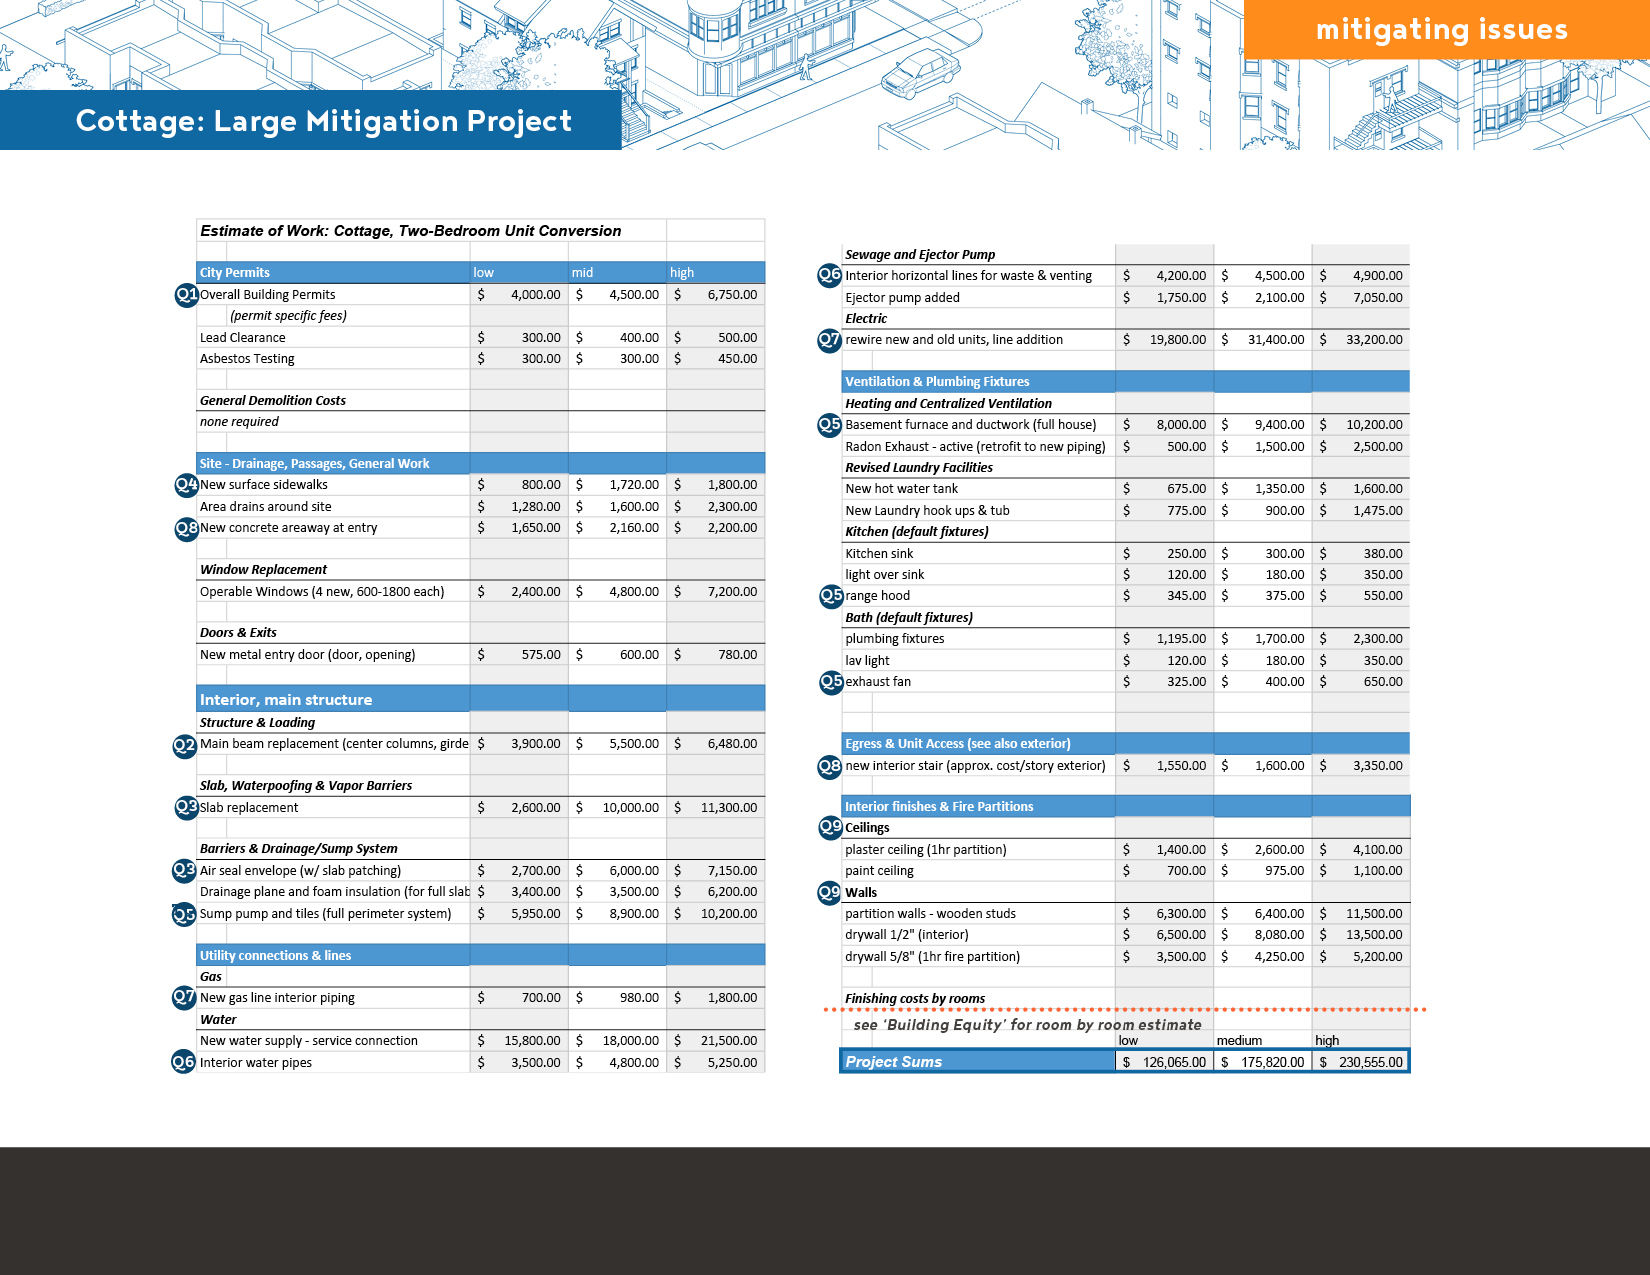
Scenario: Cottage
major renovation
conversion assumptions:
This Cottage conversion creates a 633 sqft, two bedroom basement apartment. It offers a good example of a larger adaption, which is necessary to convert an older single family home to a multi-unit building.
It consists of:
- construction preparation: safe lead and asbestos removals in advance of construction, plus basic permits
- structural work: old beam spanning between small chimney cores needs to be replaced to support joists
- height/slab work: unlikely to have an adequately thick slab, lower floor level as much as possible (without excavation) and use thin tile floors
- drainage: small lot requires the installation of interior drainage and sump pump, integrate with newly created areaway drains; sump pump is piped to rear yard for infiltration
- air quality: vapor barriers and exhaust need to be added (with slab), heat & duct work should be added (from common area at rear) for fresh air, directly vent bath fans to the exterior
- water/sewer: resized water line is necessary for new fixtures, basement sewer lines are connected to a new, larger ejector pump which meets the service line near front entry
- electric/gas: gas separated for water heater, furnace use. full house replacement of old electric as well as new unit lines.
- exits/openings: addition of front door and entry stairway, addition of fire-escape for second floor.
- finishing/fire-resistance: minimal wall partitions, full replacement of ceiling partition and full apartment worth of drywall, paint, doors, and trim.
For details, click and zoom into the estimate shown at the right. A flow chart of decisions is available below.
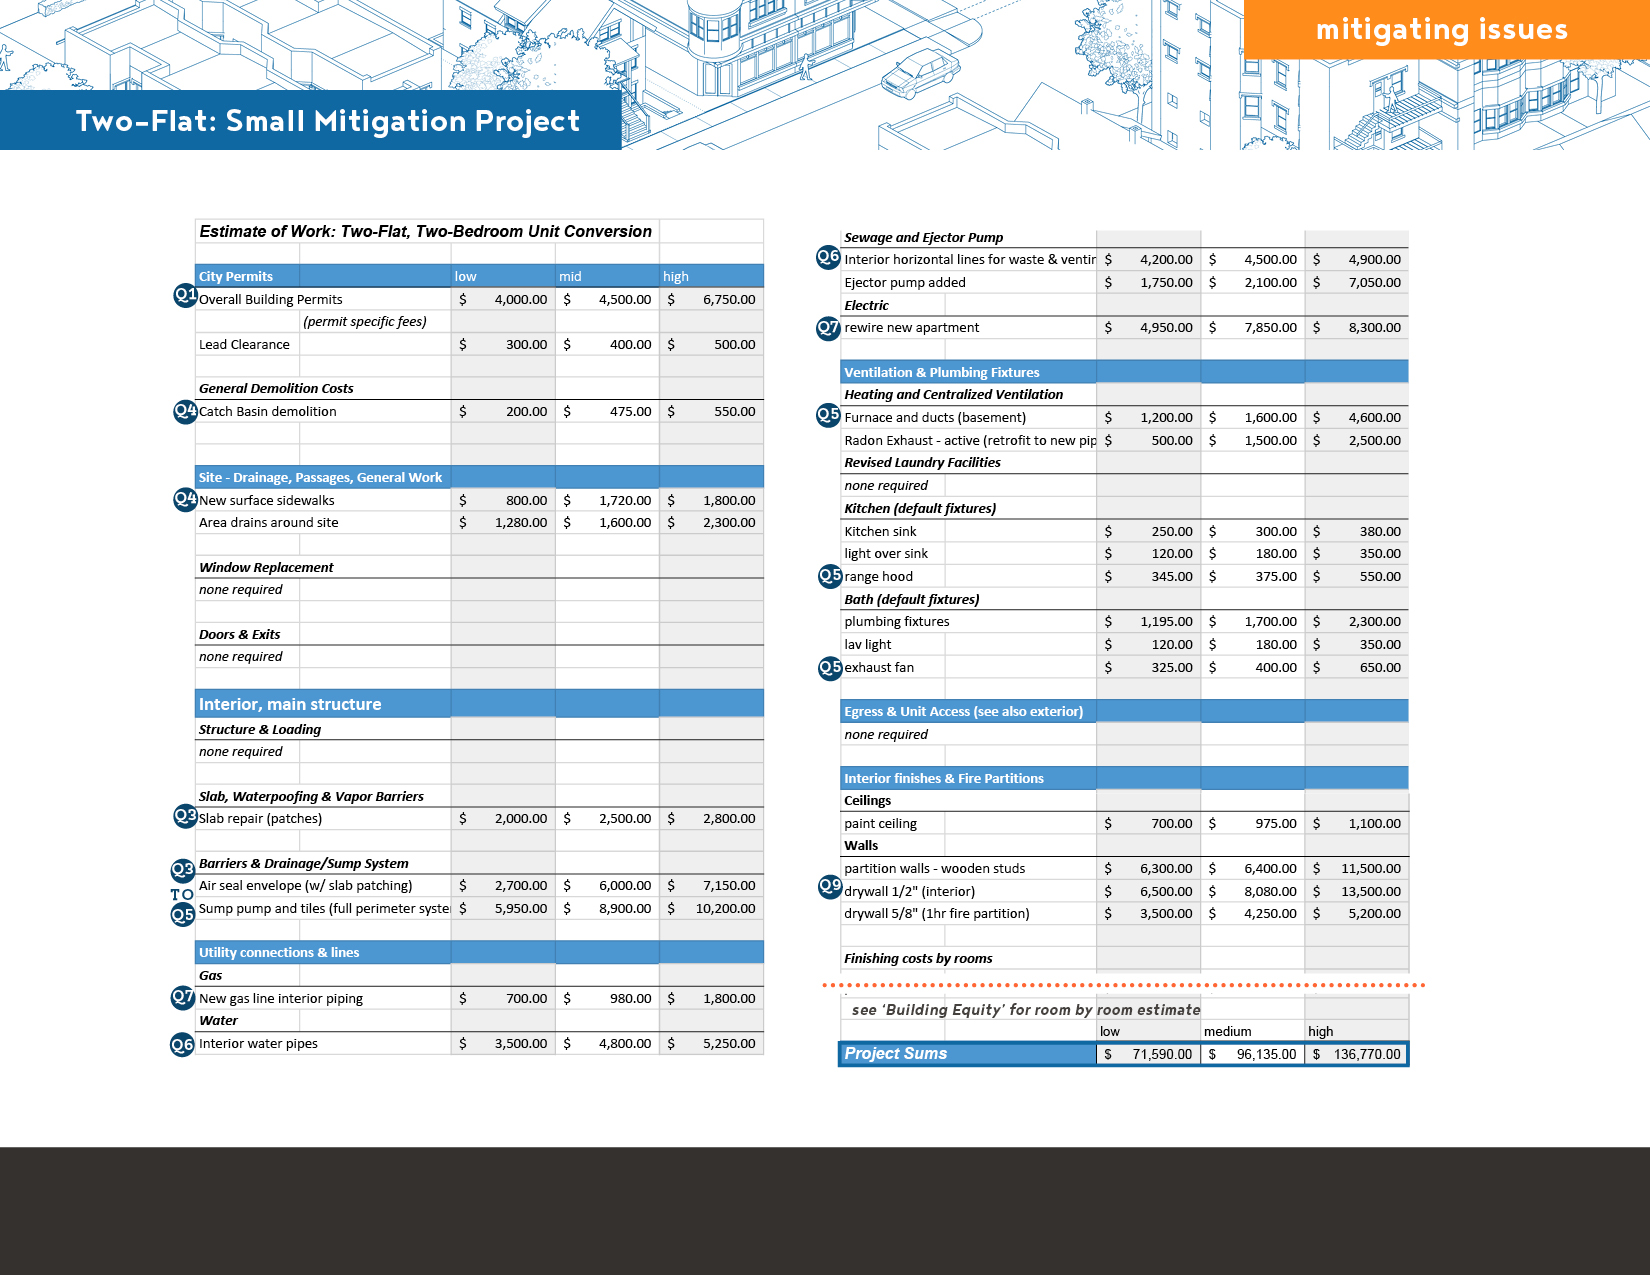
Scenario: Two-Flat
medium renovation
conversion assumptions:
This Two-Flat conversion creates a 720 sqft, two bedroom basement apartment. It offers a good example of a small-mid-sized budget which is necessary for adding another unit to a multi-unit building.
It consists of:
- construction preparation: safe lead removal in advance of construction, plus basic permits
- no structural work: brick walls (above) are likely to have original steel spanning beams and columns
- height/slab work: height is fine, slab will need patching and resealing of existing barriers during drainage and sewage work
- drainage: larger lot and offset allow for exterior drainage and sump pump, excess slab drains removed, and sump pump connected to front storm system for disposal
- air quality: likely to have passive radon exhaust at front, minor fans for fresh air, directly vent bath/kitchen to the exterior
- water/sewer: water service line is adequate to fixtures, basement sewer lines are connected to a new, larger ejector pump which meets the service line in the common front area
- electric/gas: gas connection is fine. only gas work is adjusted furnace lines; uses electric cooking; electric is only added to the new unit; existing public and upper units’ lines are fine.
- exits/openings: no additional stairs or fire-escapes are necessary. Laundry door is enlarged from existing window.
- finishing/fire-resistance: larger fire partitions added at front and rear common areas, some replacement of ceiling plaster and full apartment worth of drywall, paint, doors, and trim.

For details, click and zoom into the estimate shown at the right. A flow chart of decisions is available below.